Showing posts with label import p2 mxf to FCP. Show all posts

Tuesday, August 20, 2013

Import Panasonic AG-HPX170/HPX171 P2 MXF files to FCP and Burn FCP projects to DVD on Mac

Summary: Follow this post to know how to import Panasonic AG-HPX170/HPX171 P2 MXF to FCP for editing and burn FCP projects to DVD on Mac, hope it can solve you P2 mxf to FCP problem and dvd burning solution.

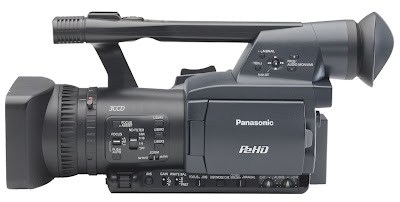
Every time that there is a need to hire a better camera it seems that everyone is hiring the Panasonic HVX200 and not the Sony EX1. So I have not had a chance to see how the HVX200's 4:2:2 with 720p helps with my Blue or Green Screen filming. I know that the EX1 produces a cleaner and better picture than the the Panasonic – or so I am told – but the colour decimation is 4:2:0, hmmm. But here is the Panasonic HPX170/171 that also has a much better picture but with 4:2:2 colour decimation. So this will be my best choice.


However, there cames another problem- How to import Panasonic AG-HPX170/HPX171 P2 MXF footages into FCP for editing smoothly on Mac?

The thing is, FCP does not work perfectly with the Panasonic P2 MXF codec. As far as I know, to solve the P2 MXF importing problems, the most important piece of the equation is that transcoding Panasonic P2 Card MXF files to a FCP's supported video format, like Apple ProRes (422).

If you looking for a solution for this problem likewise, check out Pavtube MXF Converter for Mac which is entitled as a top P2 MXF Converter. It supports encoding Panasonic P2 and Canon MXF files and Sony XDCAM MXF to FCP native format so that you can easily import the Panasonic AG-HPX170/HPX171 P2 MXF recordings to FCP for editing on Mac.


So follow the quick tutorial below to transcode Panasonic AG-HPX170/HPX171 P2 MXF to FCP compatible format and then edit in FCP or burn to DVD on Mac.

Part 1: How to import Panasonic AG-HPX170/HPX171 P2 MXF files to FCP? 

  • For FCP X users, pls make sure you have installed ProApps QuickTime Codecs, or you may get files only without video. You can download it from here:

    http://support.apple.com/kb/DL1396

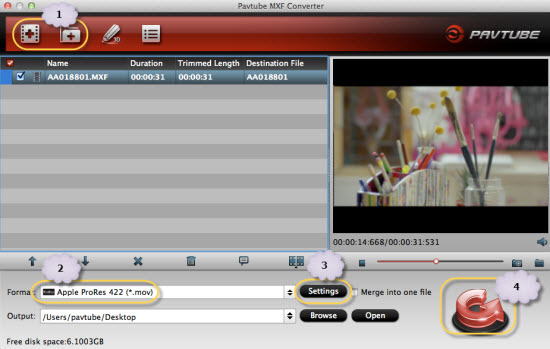
1. Free download Pavtube MXF Converter for Mac trial version, install and launch it.


2. Click "Add video" or "Add from folder" icon to load Panasonic AG-HPX170/HPX171 MXF files into Pavtube application.


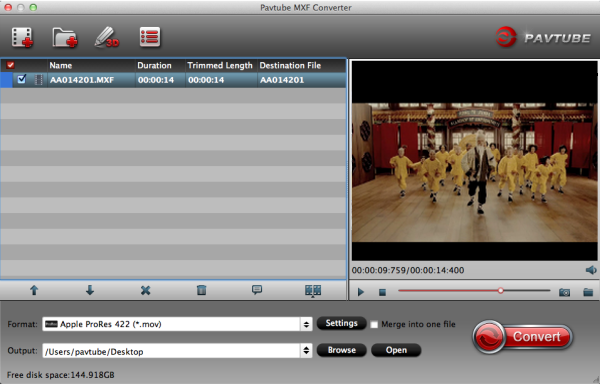
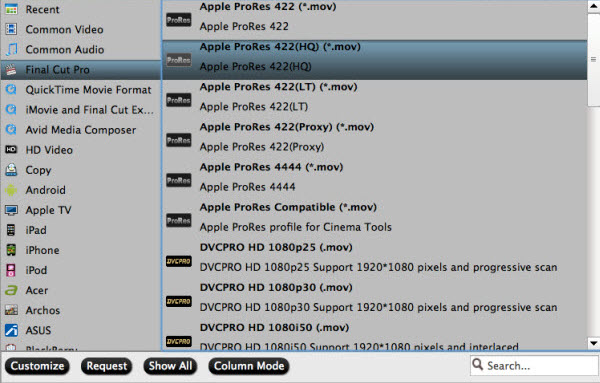
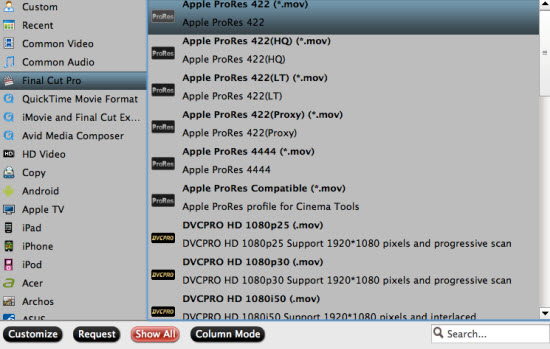
3. Select Final Cut Pro friendly output format.

Apple ProRes 422 is considered as the best format for FCP, so you are recommended to choose "Apple ProRes 422 (*.mov) as target format from "Format" > "Final Cut Pro".


4. Start Panasonic AG-HPX170/HPX171 P2 MXF to Apple ProRes 422 conversion.

Click the big "Convert" button to start encoding Panasonic AG-HPX170/HPX171 P2 MXF to Apple ProRes 422 MOV for Final Cut Pro.

When completes, locate the converted MOV files from target file path by clicking "Open" icon.

Now, open up Final Cut Pro, choose File > Import > Files…to select and load the generated ProRes 422 MOV files to FCP for editing use.


Part 2: Burn FCP projects to DVD on Mac

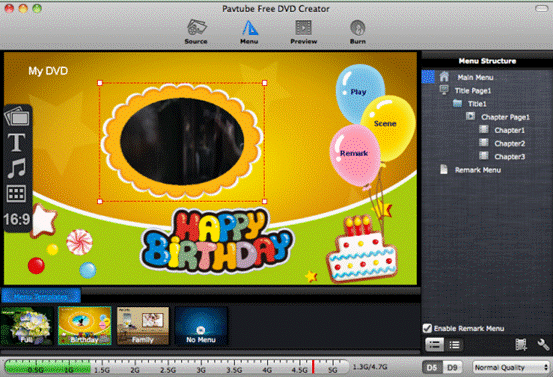
Pavtube DVD Creator for Mac adds support for MXF files burning, it can burn single file or folder structure videos, you can burn MXF/FCP projects to DVD disc in few steps, just follow it:

1. Install DVD Creator for Mac, connect your DVD Writer and insert a blank DVD. Add your videos into the DVD Creator for Mac

2. Edit movie clip and Customize your DVD menu. You can edit your videos with trim, crop, watermark, effect settings, audio replacing settings features.


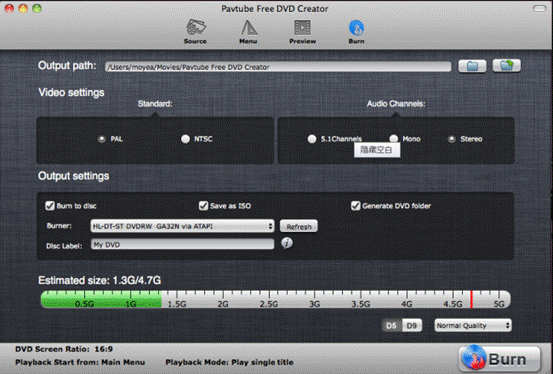
3. Preview Created DVD-Video and click burn button to start burning.


Read More:

Wednesday, June 5, 2013

Losslessly transcode Panasonic AJ-HPX3100 P2 MXF to Final Cut Pro for editing

Summary: To make it easier for editing Panasonic AJ-HPX3100 P2 AVC-Intra MXF videos on FCP 6/7/X, you need to convert P2 MXF to ProRes codec for FCP with a professional P2 MXF converter Mac.

Panasonic AJ-HPX3100 is a high-end professional camera which offers high image quality and performance for high-end video production. This camera's native effective resolution is 1920 x 1080 and features 3x 2/3" 2.2MP CCD sensors for high quality imagery. Recording is possible in AVC-Intra 100, AVC-Intra 50, and DVCPRO HD; 4:2:2 full raster sampling is supported in the AC-Intra 100 format.

After make some footage on the Panasonic AJ-HPX3700, you may want to edit the P2 MXF files in Final Cut Pro. However, you may face the problem that FCP 6/7/X does not recognize the P2 AVC-Intra MXF .mxf videos. This is due to the unfriendly codec.

To smoothly import AJ-HPX3700 P2 footage into Final Cut Pro, you can need a professional P2 MXF Converter for Mac, which is a great Mac Panasonic MXF Converter to help me make the P2 MXF to FCP compatible ProRes transcoding. It offers the optimal preset profiles for Apple ProRes including ProRes 422, ProRes 422 (HQ), ProRes 422 (LT), ProRes 422 (Proxy) and ProRes 4444 for you to choose. And there is no need to worry about the quality loss. Now please follow the steps to transcoding AJ-HPX3700 P2 MXF to Final Cut Pro (FCP 6/7 and FCP X) with Apple Prores codec.

How to convert P2 Card MXF footage from Panasonic AJ-HPX3100 to ProRes 422 HQ

Step 1. Connect your AVC-Intra MXF Camcorder to iMac with USB 2.0 cable or use card reader to transfer the P2 AVC-Intra .mxf files to Apple hard drive disk.


Step 2. Add Panasonic AJ-HPX3100 P2 AVC-Intra MXF videos to this top Mac Panasonic MXF Converter.

Run Pavtube MXF Converter for Mac, and click the "Add Files" button to load the P2.mxf videos.
 

Step 3. Choose MOV with Apple ProRes 422 codec for Final Cut Pro 6/7/X.

Click the "Profile" option, and move mouse cursor to Final Cut Pro > Apple ProRes 422 HQ (*.mov) as output format. To get 1080 videos, we need to click the "Settings" button and choose 1920*1080 as output video resolution.
best format for editing xavc in fcp x 4K XAVC workflow with FCP 7  Convert F55 4K XAVC to ProRes 422 HQ

Step 4. Specify output file path. Click on "Browse" and browse to where you'd like to save target Apple ProRes 422 HQ video.

Step 5. Convert Panasonic AJ-HPX3100 P2 MXF to ProRes 422 HQ MOV for Final Cut Pro 6/7/X.

Click the "Convert" button and the Mac MXF Video converter would start converting Panasonic AJ-HPX3100 AVC-Intra MXF videos to Apple ProRes 422 MOV immediately.

Step 6. Press "Open" to locate result video. Launch FCP 6/7/X, and go to "File > Import > Files…" to import converted P2 footage to FCP project.


The software also converts P2 MXF and Canon MXF video to compatible formats for FCE/iMovie, Avid, Adobe Premiere Pro, After Effects, etc. You can convert Panasonic P2 MXF to AIC .MOV for FCE and iMovie, or transcode Panasonic AVC-Intra MXF to H.264 MOV, DV, AVI, M4V, MPG for Avid, Adobe Premiere Pro, and After Effects.

MXF files bite up storage. If you have lots of MXF video stored on Mac HDD and are now ending up with plenty of long files with only a few short gems, it is recommended that you use Bytecopy for Mac to import MXF and trim long video clips in Apple ProRes as well as common video formats (MOV, AVI, MP4, M4V, etc).

Read More: