Summary: Read on this article,
you can get the hints how to import and edit Panasonic HDC-MDH1 2.7" AVCHD MTS
footage with Final Cut Pro 6/7 flawlessly without any issue.
I purchased Panasonic HDC-MDH1 on 26.3.2012 in Bangalore. This is an exellent professional shoulder mount camera in lowest price, also best for Wedding, Birthday parties, Functions, outdoor shoots etc. Shoots in very lowest light clear picture. No vibration in long zoom shooting.

I have just shot my first HD wedding video with the MDH1. I am very happy with the video quality with the 2.7" Touchscreen LCD, the camera which records in AVCHD format, I need to edit the 2.7" mts files on Mac with FCP before sharing with my friends and family.
But I find that Panasonic HDC-MDH1's recording AVCHD MTS files are not the preferred format for Final Cut Pro 6/7. Then I think the first step to do is to convert Panasonic mts video to FCP compatible Prores codec for editing with high quality on iMac/MacBook Pro with Mac OS X like Leopard, Snow Leopard, Lion, Mountain Lion and Mavericks 10.9. Now I will share the easy steps here.
Step 1: Free Download and install Panasonic MTS to FCP Converter to your Mac. It's excellent Panasonic AVCHD Converter which can convert nearly all Panasonic camcorder videos to any formats you need, such as Apple Prores 422 MOV, Apple InterMediate Codec MOV, QuickTime MOV, etc. Then import your 2.7" AVCHD files from HDC-MDH1.

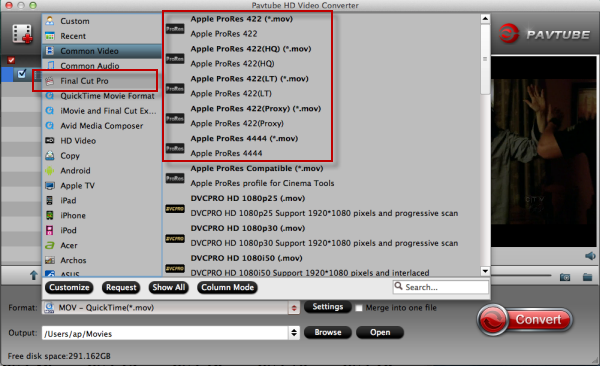
Step 2: Click the format bar, and move mouse cursor to "Final Cut Pro > Apple ProRes 422 (*.mov)" as output format .

Tips:
a. There are other four presets for ProRes: Apple ProRes 422 HQ, Apple ProRes 422 LT, Apple ProRes 422 Proxy and Apple ProRes 4444. Usually the ProRes 422 HQ has better video quality than ProRes 422 and could meet your needs. If you need smaller size, turn to ProRes 422 LT.
Learn more Apple ProRes, please refer to Types of Apple ProRes Codecs
b. Click Settings to customize video size, bitrate, frame rate and other specs.

Step 3. Click "Convert" button to start transcoding Panasonic HDC-MDH1 2.7" AVCHD videos to FCP 6/7 on Mac OS (Mavericks 10.9 included).
After a shot conversion, you will be able to import/load Panasonic HDC-MDH1 2.7" videos into Final Cut Pro 6/7 for editing without rendering.
Read More:
- How to Solve the freezes when importing MTS media to Premiere CC-2015.3?
- How to Convert MTS/M2TS with Handbrake Easily?
- Best Solution to Play Sony MTS/M2TS Files on MacBook Pro
- Play MTS on Smart TV (Windows and Mac Solutions)
- Top 5 MTS/M2TS Video Editors for Mac
- Top 5 MTS/M2TS Video Editors for Windows (10, 8.1, 8, 7, XP, etc)
- Fix Choppy Issues When Importing AVCHD Files to FCP
- Join and Convert MTS/M2TS Files for playing with VLC Player
- How to Convert 3D AVCHD MTS to 3D Tablet for Watching?