Friday, April 24, 2015

Convert iMovie Files to MP4 on Mac OS X with Two Solutions

If you wanna make the iMovie exported movies save in MP4 in order to edit or playback well on Mac OS X, you come to the right place! Especially for solving the iMovie to MP4 issues, we here can offer you two efficient ways to import iMovie files to Mac in MP4 format. Just follow the steps.

Method 1.Convert iMovie to MP4 for Mac OS X QuickTime
Firstly, we are going to teach you how to transfer iMovie videos to MP4 via using the features of iMovie itself---QuickTime item. Follow the steps to learn the instructions on converting iMovie to MP4 nicely on Mac OS X.
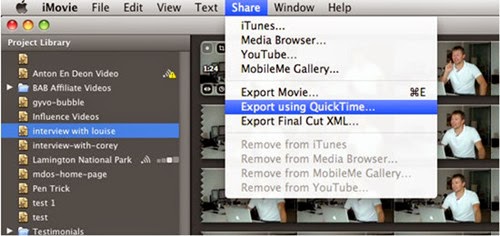

Launch the iMovie and get into the main interface. Click "Share > Export using QuickTime" at the top menu bar.
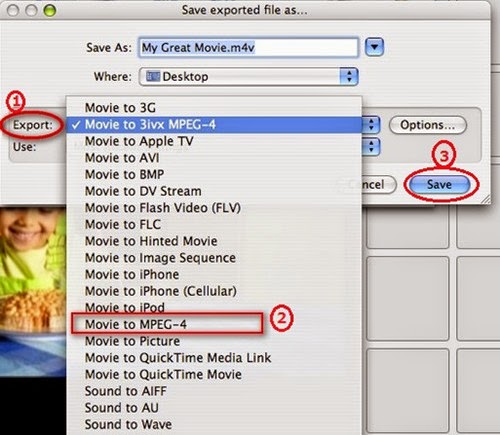

Then a window named "Save exported file as…" pops up. Click "Export" option and find "Movie to MPEG-4" in the drop-down menu. If you need to make some settings to the file video format, you can click Settings button; if not, directly hit on "Save" button to export a mp4 file from iMovie.

Method 2. Pavtube Video Converter for Mac---Easily convert iMovie to MP4 for Mac OS X.

In this way, if the exported files still cannot recognized by your devices or are rejected by the video sharing websites, we here highly suggest you to use this professional iMovie to MP4 Converter on Mac. It can convert iMovie to MP4 in HD, as well as AVI, WMV, etc. so that you can watch them on Windows computer, android devices, and more. What’s more, this program can also works well with different videos from other NLEs like FCPPremiere Pro, etc. Let’s together see how to convert iMovie to MP4 for Mac OS X.

Steps on converting iMovie videos to MP4 on Mac OS X:
Step 1.Click on Add button and go to the folder to find the videos that you want to convert to MP4 as soon as you open the main interface. Here you can import multiple videos.
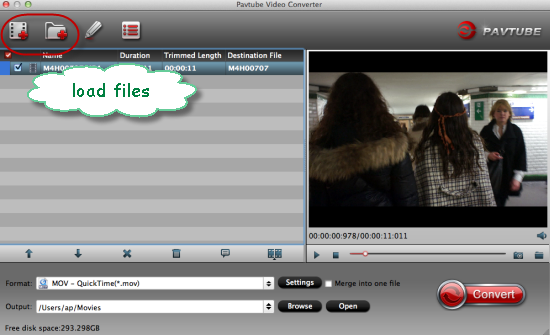

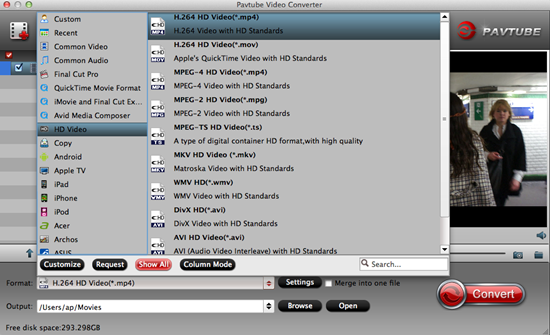
Step 2. When you come to the output list, just drop down the list and select the ‘HD Video’>>’H.264 HD Video (*.mp4)’ as the best output one with the high quality preserved. Or in the common column, you can also find the similar one.

For advanced functions?
Click the “Effect” button to open the Video Edit window to achieve editing MP4 like trim, crop, image, watermark, effect, subtitles and rotate and etc in the corresponding editing pane.
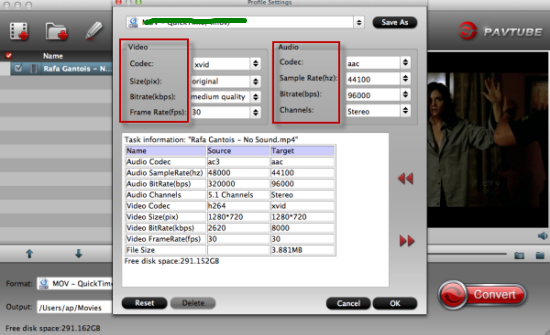
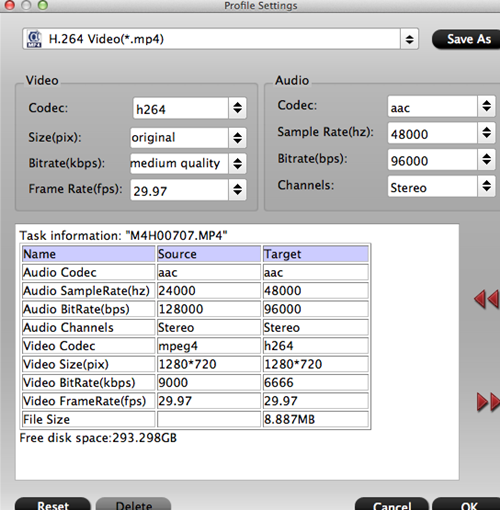
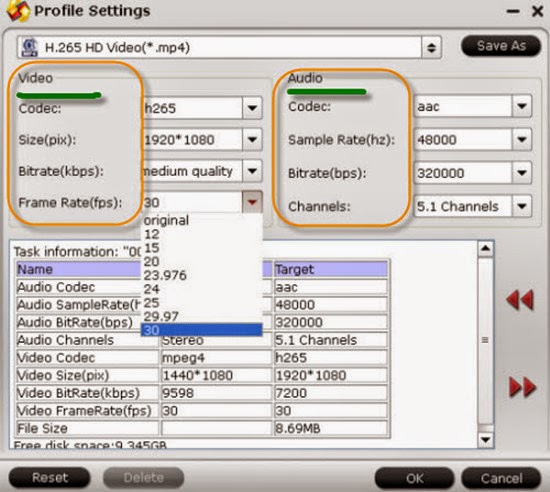
Click the “Setting…” button to open the Advanced Settings window to adjust the output video codec, resolution, bitrates, frame rate, aspect ratio, audio codec, channel, volume and etc in the advanced tab.

Finally, when specifying the output format, you can click on the ‘Convert’ button on the main interface to finish the conversion. With the high conversion speed and easy operation job, it would not be hard for us to load iMovie videos to Mac OS X in MP4 format.

Conclusion: Above are two best solutions to how to save and convert iMovie to MP4 file. In general, you can use the first way to achieve it. But if the first way can't meet your need, the software introduced in the 2nd part can help you as well. Let’s just have a try!

Further Reading:

Tuesday, April 21, 2015

Import ALEXA Mini HD/2K/4K UHD Videos to iMovie

Here is the related post written on how to smoothly import the ALEXA Mini HD/2K/4K UHD Videos to iMovie for editing without any troubles. In other words, in the following article, we are offering some good solutions to transcode the ALEXA  Mini videos to AIC MOV, which could be the best formats for iMovie. Let’s take a close look below.


Simple introduction of ALEXA Mini camera you may not know:
The ALEXA Mini is a lightweight carbon fiber cinema camera recently announced by ARRI. This camera can record 4K UHD ProRes images, facilitating real-time 4K UHD output and simple pipelines for high-resolution deliverables. What a pity it seems the output recordings cannot be suitable for iMovie directly. So if you intend to work with ALEXA Mini recordings in some hot NLEs, some third-party tools are needed there. On other words, the high definition 4K videos are not also suitable for other NLEs and media players, such as FCP XHDTVSony tablets, etc.

ARRI ALEXA Mini Features Highlights
  • 35mm format Arri ALEV III CMOS sensor
  • Maximum frame rate of up to 200 fps
  • In-camera recording to CFast 2.0 memory cards
  • 4K ProRes recording (3840×2160) or uncompressed ArriRAW format video up to 30 fps
  • Interchangeable lens mount (EF, B4 and PL)
  • Remote control via Arri’s Electronic Control System and Wi-Fi
  • Built-in motorized ND filter

What’s the best solution to transcode ALEXA Mini HD/2K/4K Videos to AIC MOV for editing in iMovie?
In order to make the ALEXA Mini HD/2K/4K videos accepted by iMovie with the supported formats, we here strongly recommend the Pavtube HD Video Converter for Mac, which can be a professional 4K video convert for iMovie that can transcode the format work well with high quality preserved. Just read on to find a step-by-step guide regarding how to transcode ALEXA Mini video for editing in iMovie with optimum performance.

Step 1: Start up HD Video Converter as a professional ALEXA Mini Video Converter for iMovie. When its main interface pops up, click ‘Add File’ to input your source media.


Step 2. Convert ALEXA Mini HD/2K/4K UHD video files for Premiere. If you are running iMovie on a Windows PC, you can from ‘Format’ bar, select ‘AIC (*.mov)’ as output format under ‘iMovie/FCE’ column.


Step 3: Custom video and audio settings
If necessary, you can click ‘Settings’ button and go to ‘Profiles Settings’ panel to modify video and audio settings like video encoder, resolution, video bit rate, frame rate, aspect ratio, audio encoder, sample rate, audio bit rate, and audio channels. 3D settings are also available.


Finally, start ALEXA Mini HD/2K/4K UHD video files to MOV Conversion. With its fast conversion speed and easy operation, you will not be confused in editing your ALEXA Mini HD/2K/4K UHD video files in iMovie. After transferring files to iMovie as usual, let’s just enjoy the work!

Further Reading:

Friday, April 17, 2015

Enable 4K XAVC to Sony Vegas Pro 13 from Sony PXW-FS7?

No more worries about how to import the SonyPXW-FS7 4K XAVC recordings to Sony Vegas pro 13 for editing now, in the following guide, what we are talking about is the efficient solutions to remove the troubles of XAVC files and Sony Vegas Pro. Then we can get a good mood in editing FS7 XAVC files in Sony Vegas Pro.


"Captured some videos via Sony PXW-FS7 under XAVC-I mode. The video is much outstanding, but the problem is that I cannot open XAVC files in Vegas for editing. What's the issue? Does that mean I cannot even start my workflow?"

Hot Search: XAVC to FCP | XAVC to iOS | XAVC to Common Videos

The newly released Sony PXW FS7 has won lots of attractions from videographers in that it delivers long-form recording capabilities with 4K resolution, which as the big highlight attracts most users’ eyesight. Although it can deliver outstanding videos to users, its incompatibility with Premiere or other NLEs becomes a big issue just as mentioned above. Many users are suffering from this trouble. Fortunately, we will offer a simple way to edit Sony PXW-FS7 XAVC clips in Sony Vegas Pro 13. You can take some good XAVC tips here.

As a matter of fact, all you need is a best program named Pavtube Video Converter for Windows which can easily transcode Sony PXW-FS7 XAVC to Sony Vegas Pro 13 friendly format-MPEG-2 without quality loss. What's more, this powerful video converter offers other professional codec for NLEs, such like the FCP supported Apple ProRes codec, AIC for iMovie/FCE, DNxHD for Avid and more. With the simple conversion steps, we can easily transcode the FS7 XAVC to MPEG-2 mpg for Sony Vegas Pro 13 as below:

Step 1.Launch the XAVC to Sony Vegas Converter and click "Add File" button to locate the Sony PXW-FS7 XAVC file(s) you want to add. Or you can drag&drop the files into software window list directly. 


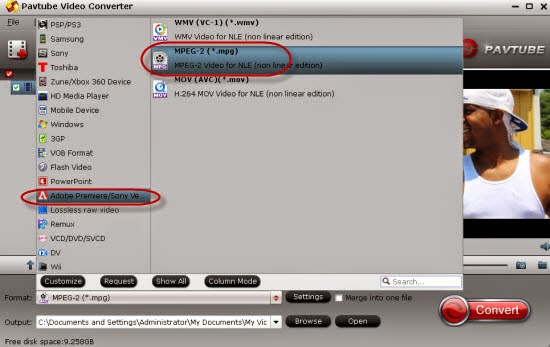
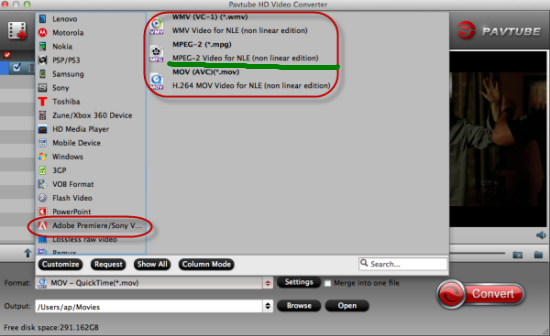
Step 2. Click "Format" pull down list to select Adobe Premiere/Sony Vegas> MPEG-2(*.mpg) as the best video format for Sony Vegas Pro. WMV, MOV formats are the good choice as well. 


Step 3. Click "Settings" to fix the frame rate, bitrate, video size, etc to your needs. To have a smooth editing with Sony Vegas Pro, you need create the files with the appropriate resolution and frame rate that matches your source footage. 


Click the big "Convert" button at the bottom right corner to finish encoding Sony PXW-FS7 XAVC to MPG, MOV for Sony Vegas Pro 13 on Mac OS X. When the conversion is done, you can find the output files by clicking "Open" button on the main interface, then you can transfer the encoded XAVC files to your Sony Vegas Pro 13 to play and edit without any problem. Just enjoy it!

Further reading:

Thursday, April 16, 2015

Can't read WAV files with Premiere Pro on Yosemite

To get the high quality editing effects, we sometimes need to convert the audio clips into Premiere Pro for a further dispose, right? So in this article, if you find that we have issues when importing the WAV audio files to Premiere Pro on Yosemite, just read this guide and you will know more details on how to easily let Premiere Pro read the WAV files without troubles.


According to Adobe official site or the Premiere Pro supported video/audio formats, Adobe Premiere Pro can import lots of compressed and uncompressed audio formats including MP3, WAV, AAC, AC3 (including 5.1 surround), AIFF, ASND (Adobe Sound Document), BWF (Broadcast WAVE format), M4A (MPEG-4 Audio) and WMA (Windows only). Adobe Premiere Pro will not import audio in other audio formats such as FLAC, CAF, OGG, Apple Lossless ALAC, APE, VOX, 3G2, AUD, MP2, etc.

Why we are always failed when importing WAV audio files to Premiere Pro on Yosemite? Adobe Premiere is sensitive to audio formats and audio sample rate. If supported compressed audio files are improted, such as audio in MP3, WMA, AAC, M4A, AC3, are imported, Adobe Premiere will conform the audio to editting audio in coresponding sample rate to the sequence that will be used in. That’s way many people successfully use MP3 or WMA files, however some people experience problems.

Hot Search: WAV to QuickTime | FCP to Premiere Pro | Videos to Premiere Pro

How to convert the WAV audio files, etc to Premiere Pro natively supported audios and sample rates?
For converting the WAV or other incompatible audio files to Premiere Pro supported ones, we here strongly would like to introduce you the Pavtube Video Converter for Mac, which matches with your sequences for fast import without confirming process. Not only for audio conversion, this program can also support the video conversion with a higher speed and easy operation work.

Steps on converting WAV to supported audio formats for Premiere Pro on Yosemite:
Step 1.Press on “Add File” button to load your source audio file to the program. You can simply drag & drop your audio files to load to the audio converter.


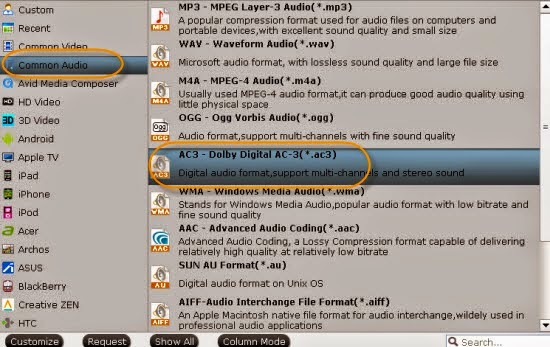
Step 2. Come to the output list to choose the right audio items for Premiere Pro as we mentioned above, just click the ‘Common audio’ to select the ‘MP3-MPEG Layer-3 Audio (*.mp3). Some other suitable ones you can also choose as a try.


Step 3. Then don not forget to custom our audio encoder, in ‘Settings’ button, could you see the audio settings there? Here, we can adjust the output file audios as we like. Do you wanna a try?


In the end, just g to the main interface and hit the ‘Convert’ to start converting WAV files to suitable ones for Premiere Pro. When conversion is finished, on the Adobe Premiere, select File > Import from the main menu. Locate and select the converted audio file, then click Open. The file will be immediately added to the Premiere Project window.

More guides:

Monday, April 13, 2015

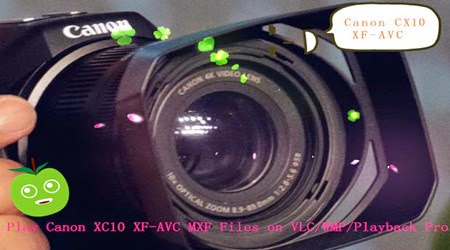
Add Canon XC10 XF-AVC 4K MXF to VLC, WMP, Playback Pro

‘The latest Canon XC10 XF-AVC 4K camcorder seems not bad to take the higher images but I got some troubles when importing the XC10 MXF recordings to VLC for playback. ‘Errors’ always appeared there on the screen. The files were broken or incompatible problems? I need some help.’


Why Windows Media Player or VLC Won’t Play MXF Files?
If you familiar with HD Video format, you may know the main reason is the MXF video codec. Most MXF files are encoded with a non-Microsoft codec or with a codec not installed on your Windows computer, you will fail to play this kind of MXF video. Such this situation often happens in other media players like VLC and Playback Pro. What efficient measures should we take to solve these problems?

Hot Search: MXF to FCP X | Convert MXF Audios | MXF to Premiere Pro | MXF to iMovie | MXF to YouTube

Analysis and methods to play MXF recordings so nicely.
For those users who wanna play MXF video on different media players such like QT, WMP or Playback Pro, etc, today here we are going to seek a professional MXF converter to make the original MXF recordings to compatible codecs for these players. We need some MXF tips to make this workflow works well right? Pavtube Video Converter for Windows fortunately can be the best MXF transcoding program to help us a lot.

How to rewrap XC10 MXF to suitable MP4, MOV for playback VLC, WMP and Playback Pro?

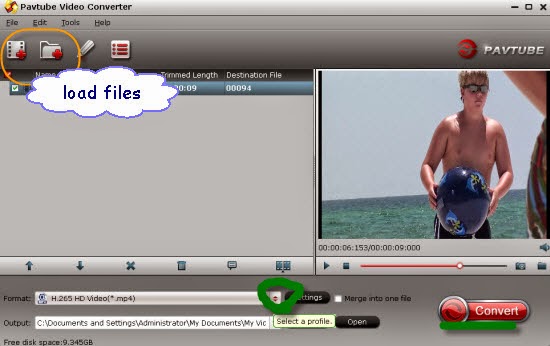
Step 1: Download, install and run this XC10 MXF Video Converter as a professional MXF to VLC/WMP Converter. When its main interface pops up, click ‘Add File’ button to import mxf video files to it. Directly drag the files in is also not a bad idea.


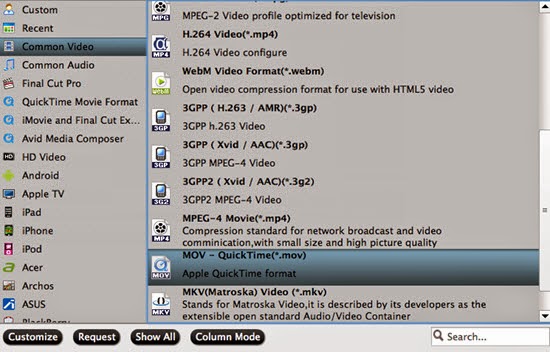
Step 2. Click Format bar and choose best output format for output. Click and choose common video -> MOV-QuickTime (*.mov). You can also choose other formats for output as you want. While for VLC media player and Playback Pro, though there is no ‘VLC’ item, we can choose the ‘H.264 HD Video (*.mp4)’ in the ‘HD Video’ column.


Step 3. (Optional Functions) Generally speaking, the default settings will ensure you a good balance between file size and image quality. But you can still click ‘Settings’ button to modify video and audio settings like codec, resolution, bit rate, frame rate, sample rate, and audio channels in your own way.


When ready, click ‘Convert’ button to begin format conversion. As soon as the conversion is complete, you can click ‘Open Folder’ button to get the generated MOV files that are ready for playing with VLC, QuickTime, Windows Media Player, and Playback Pro. Welcome to comment below if you still have other issues when you have tried this way of playing Canon XC10 MXF recordings to VLC, Windows Media Player and Playback Pro for watching.

Read More:

Thursday, April 9, 2015

VOB to iMovie---Convert VOB for Editing in iMovie Nicely

VOB files usually exist on DVD discs ad when you are trying to import the VOB files to iMovie for editing, you may find that all VOB files in the Video-TS folder are just greyed out. So you may need to find the answers to how to edit the VOB footage in iMovie smoothly, right? The following article is going to offer the best solutions to make VOB files accepted by iMovie.


Overview and relationship of VOB and iMovie:
A VOB file (Video Object) is a container format in DVD-Video media. It is the file type to store video on a DVD disc. The main reason why you can not transfer VOB video files from to iMovie, incuding iMovie 8/9/11 is that iMovie still can’t recognize VOB format. As far as I know VOB is basically a MPEG-2 video file which is stored in Video_TS folder in a DVD. As this kind of video file usually contains one or several audio tracks and subtitle tracks that are multiplexed together into one stream form, it is not so easy to playback or edit. That’s the cause why we often meet troubles in adding VOB files in iMovie.

Hot Search: MTS to iMovie   MXF to iMovie   MOV to iMovie

Find best method to import VOB to iMovie without issues
If you’re in such a situation, there is an easy way to fix the issue. Since Apple InterMediate Codec(AIC) is the most compatible codec introduced by Apple which ensures maximum editing quality and efficiency when working with iMovie, the common practice for VOB to iMovie workflow is, get a VOB to AIC Converter and transcode the .vob files to AIC MOV, which will save you both time and trouble, and all you need is to drag the result videos for prompt editing. Pavtube HD Video Converter for Mac is such an useful one which can help you a lot in this way just with several simple conversion steps.

Tutorial of converting VOB to AIC MOV for iMovie:
Step 1: Download, install and run this VOB to iMovie converter for Mac, and then click the “Add files” button to load the .vob videos. You can also use the drag-and-drop method to load the media files to the application UI.


Step 2. For seeking the suitable formats for iMovie? Click the "Format" to select output format. Choose "iMovie/Final Cut Express > Apple Intermediate Codec(AIC)(*.mov)" as the output format.


Tip: Before conversion, you can click the "Settings" icon to customize the video/audio settings including the Bitrate of Video and Audio, Audio, Video Size, Sample Rate, Frame Rate, Audio Channels, etc for iMovie, Final Cut Express.


After all the necessary setting have been done, click "Convert" button to start transcoding VOB to AIC .mov. Finally, launch iMovie. In iMovie, go to the File menu, choose Import > Movies, and then navigate to the folder that your output VOB files are saved. Select the files and click "Import". For more details, you can take the transferring tips as a good reference. Good luck!

More:

Thursday, April 2, 2015

WMV to iMovie: Solve WMV to iMovie Issues on Mac OS X 10.10 Yosemite

Download from websites or shared by friends? Wherever you got the WMV files, it would be a little hard for us to smoothly edit WMV in iMovie on Mac OS X Yosemite. The questions are listed below when importing WMV files to iMoive for editing. Furthermore, we are glad to share the solutions to make WMV accept by iMovie nicely. Join us for more?


‘I've got hours and hours of video clips and they come in WMV format. I want to put these WMV file to iMovie for editing but iMovie isn't letting me do that, saying something about they can't be imported. Any way that will let me convert wmv to iMovie file without quality too much lose?’

It has been widely accepted that iMovie is a great application which lets Mac users import and arrange the videos recorded, edit the home videos in the simplest way and turn them into a movie, or even fine-tune the cuts and transactions, fix shaky videos etc. While with the limitation of best supported video formats for iMovie, how to easily import WMV files into iMovie on Mac OS X Yosemite will become the top issues for us right?

Since we can convert the WMV to the best video format like AIC . mov for smoothly editing in iMovie, why don’t we do that? In this case, if you are looking for a way to import your WMV movie clips from media collection and into iMovie, Pavtube HD Video Converter for Mac is just the one for you! It would convert WMV videos and almost any other files to an editable format before bringing them into Apple iMovie. AIC. mov is also included.

Hot Search: MXF to iMovie  MTS to iMovie  H.264 to iMovie

What you'll need to do for converting WMV to iMovie file on Mac OS X Yosemite:
Click "Add File" button to browse for and select the WMV file you want to convert for iMovie. Alternatively, drag & drop WMV videos to the project area. If you want to combine several files into one for better enjoyment, you can choose "Merge" option.


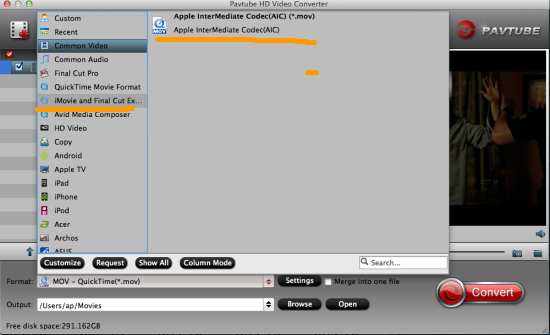
Select "iMovie" profile in the output format area. When you come to the output list, just drop down it and select the ‘iMovie/Final Cut Express’>>’Apple Intermediate Codec (AIC) MOV ‘ as the best one.


For advanced functions?
Click the “Effect” button to open the Video Edit window to achieve editing MP4 like trim, crop, image, watermark, effect, subtitles and rotate and etc in the corresponding editing pane.
Click the “Setting…” button to open the Advanced Settings window to adjust the output video codec, resolution, bitrates, frame rate, aspect ratio, audio codec, channel, volume and etc in the advanced tab.

Back to the main interface, it’s time to hit the ‘Convert’ button to end the work. Then you need to easily transfer the files into iMovie as usual as before, we can enjoy editing the WMV files in iMovie on Mac OS X Yosemite so nicely.