Tuesday, May 28, 2013

Canon 50D gains video recording through Magic Lantern RAW hack


It may be time to dust off that Canon 50D you purchased back in 2008. The folks behind the Magic Lantern firmware add-on have pulled yet another rabbit out the proverbial hat (or is it lantern?) by enabling RAW video recording on the APS-C-based DSLR. What's even more impressive is that the 50D lacks video support out of the box, so this new-found functionality is truly magical. This hack comes hot on the heels of the Magic Lantern team coaxing the Canon 5D Mark II / III into capturing 24 fps RAW video.

With the firmware add-on installed, the 50D is capable of shooting video up to 1592 x 1062 pixels at 30 fps. There are some caveats, though. First, there's no audio recording since the camera lacks a microphone input and associated electronics. Second, capturing RAW video requires fast CF cards (at least UDMA 6). Third, we now fully expect to see the 50D skyrocket in value on the used market. Hit the break for a few sample videos.

See more video tips:
Edit T2i/550D MOV in FCP X
Convert 650D/T4i MOV to Prores for FCP
Import/Edit Canon EOS T4i MOV in iMovie

Monday, May 27, 2013

Import/Edit/Play Canon C100 MTS on Mountain Lion/Lion/Snow

Summary: Want to find the best way to transcode Canon C100 AVCHD video for importing/editing/playing on Mac Mountain Lion/Lion/Snow? Read this article below and you will know it.
 
The Canon EOS C100 Digital Video Camera is the latest addition to the Cinema EOS family. It is the little brother of Canon's popular C300; employing the same Super 35mm Canon CMOS Sensor and Canon DIGIC DV III Image Processor, the C100 records full HD at 24Mbps to SDHC/SDXC cards using an AVCHD codec. Dual memory card slots allow users the advanced option of recording to two memory cards simultaneously, or recording HD footage to one slot while at the same time recording SD footage to the other. Other features include uncompressed HDMI output (with time code), impressive low light sensitivity and built in ND filters.
                   
To transfer Canon EOS C100 AVCHD videos to Apple hard drive, you can use the Apple iMovie, Final Cut Pro, Adobe Premiere and Avid Media Composer, or work with QuickTime. But you shall make sure that you at least have iMove 8 or iMovie 9, FCP 6 on your Mac with Intel processor. However, if you have iMovie 6 or first copy AVCHD files from camera by looking for PRIVATE -> AVCHD -> BDMV -> STREAM on SDHC/Micro SDHC card, or copy MTS file from AVCHD -> BDMV -> STREAM on built-in HDD, however you may find it difficult to import to Mac Mountain Lion/Lion/Snow for editing or playing.

To edit, play,import Canon C100 MTS videos on Mac, you will need to convert Canon C100 videos to best compatible format for Mac OS. Only by converting can you avoid video playback, editing and importing problems due to the recorded AVCHD format. Here we recommend a decent Canon Video Converter on Mac platform - Pavtube HD Video Converter for Mac, to help you get it done.


Convert Canon C100 MTS videos for importing, playback, editing on Mountain Lion/Lion/Snow

1.Load AVCHD files.

After install and launch the Pavtube Canon AVCHD Converter for Mac, drag and drop Canon C100 AVCHD MTS file. You can drag several files to the program directly.


2. Click format column and choose the output format.

You can choose Final Cut Pro -> Apple ProRes 422 (*.mov), this codec is optimized for FCP editing;


You can also choose Avid Media Composer -> Avid DNxHD (*.mov), it's for Avid editing;

For playback, you can choose HD Video -> QuickTime MOV;

For sharing on website like YouTube, you can choose MP4 format for output.

3. Do some settings as you want. 


Tip:
You can edit the Canon C100 AVCHD files in this program before converting to other formats on Mac Mountain Lion/Lion/Snow. Trim, crop, add watermark or adjust effect as you want.

4. Start converting Canon C100 AVCHD video on Mac.

At last, hit the "Convert" button to transcode Canon C100 AVCHD MTS to Mac.

This best Mac Canon AVCHD converter will convert Canon C100 recorded videos on Mac at top speed, you can choose rich formats for output on Mac, and then you can use C100 recorded MTS footages for importing, playback or editing on Mountain Lion/Lion/Snow.

If you need to edit C100 AVCHD on Windows platform, you can try Video Converter Ultimate. Please take a try now, it will do a great favor for you.

Read More:

Encoding Canon C500 MXF to MOV for Premiere Pro 6 editing smoothly

If you encountered problems with Canon C500 MXF when importing to Premiere Pro CS6 on Mac, please follow this post below to know how to import Canon C500 mxf to PPro CS6 for editing without rendering.

Canon EOS C500 offers a Super 35mm, 8.85-megapixel CMOS image sensor. The professional 4K video camera output that it promised at the NAB trade show in April. A continuation of the concept of the C300, it can capture Raw 4K video footage and offers frame rates of up to 120fps in compressed 4K. It also captures 2K footage (2,048 x 1,080 pixels) at 12-bit, with 4:4:4 Y'CbCr chroma sub-sampling for high colour resolution.


While Canon C500 MXF recordings brings better quality and convenient for broadcasting, but most users usually occurred some error messages during the editing process as the MXF still cannot fully supported by some video editors like Adobe Premiere Pro CS6. So if you are using Adobe Premiere Pro for editing just like me, the best workaround for us is to convert Canon C500 MXF to Adobe Premiere Pro CS6 MOV, which is the most compatible format for Premiere Pro CS6, and it will make the editing work much smooth and easier.

Preparation for C500 to Adobe Premiere Pro CS6 conversion:

You can use the best Canon MXF Converter for Mac, which was a great C500 MXF Converter for Mac users. It can not only convert Canon C500 MXF videos to Premiere Pro without quality loss, but also can make it easy for merging multiple video clips.


Convert Canon C500 MXF to MOV for Premiere Pro CS6 editing smoothly on Mac 


Step 1. After downloading, install and run this MXF to Premiere Pro Converter, just copy the C500 MXF files from the CF cards right to your hard drive, import the files to the software.


Step 2. Click "Format" bar to choose the output format.

Click and choose "Format > Adobe Premiere/Sony Vegas > MOV (AVC)(*.mov) or MPEG-2 Video (*.mpg)" as output format. The MXF Converter for Premiere Pro will convert Canon C500 MXF videos to MOV/MPG with the original video resolution.


Step 3. You can click "Settings" button to adjust the parameters, such as resolution, bitrate, etc.

Step 4. Click "Convert" button to start converting Canon C500 MXF to MOV/MPG for importing to Premiere Pro CS6 on Mac.

After the conversion is finished, just run Adobe Premiere Pro CS6 and import the .mpg or .mov files for editing. You will find the output video work perfectly on Adobe Premiere Pro CS6.

If you do not know how to import video to Adobe, please reference the following guide:

Adobe Premiere Pro workflow: How to import Media Files to Premiere Pro on Mac


Read More:

Thursday, May 23, 2013

Canon XF105 Compatible with FCP? -Edit Canon XF105 MXF in FCP

By transcoding Canon XF105 MXF to ProRes MOV format, you can easily import & edit XF105 recorded MXF footage in Final Cut Pro 6/7 and FCP X smoothly without rendering.

The XF105 utilizes Canon's XF Codec – a file-based MPEG-2 compression with an MXF File Wrapper that ensures the widest compatibility with existing industry infrastructure, metadata and non-linear editing (NLE) systems. The codec's 4:2:2 color sampling provides ultra-fine transitions in tone and color for maintaining the highest image quality needed for advanced post production processing. But you maybe you must be disappointed when the FCP failed to import recordings from Canon XF105..


I am a photography enthusiast. I have a Canon XF105 camcorder and shoot the videos recently, it supports Full HD 1920×1080 resolution with Canon XF codec, up to 50Mbps bit rate and 4:2:2 color sampling. After shooting some .mxf clips on the Canon XF105, I want to merge multiple mxf videos into one and edit .mxf clip in FCP . But I find the problem that FCP does not recognize the .mxf videos? It does not even support importing mxf videos ?

I just bought a converter last month so I could edit my XF105 MXF files on Final Cut. But it seems tracks is missing when converting. Have you had this problem arise before? Can you assist? How to convert Canon XF105 MXF files to FCP with all the original audio tracks in the MXF container preserved?    

So how to solve the the problem when you wanna edit XF105 MXF footages in Final Cut Pro? Here is the easy way to fix it, namely, converting Canon XF105 MXF to MOV, say, the Apple ProRes encoded MOV format on Mac.

If you are interested doing likewise, check out Pavtube's MXF to FCP MOV Converter for Mac. The program is an easy-to-use and intuitive Mac tool for camcorder users. It is good at batch converting MXF recordings shot by Panasonic P2 camcorders, Canon XF series cameras to ProRes/AIC MOV formats compatible with your Mac Video editing software like Final Cut Pro (x), iMovie, Final Cut Express. Now follow the guide below to convert Canon XF105 MXF to FCP ProRes MOV easily on Mac.

Good News! Pavtube Release a New Site - multipelife.com with Product Migration and Name Change.
Its bestselling software products DVD Ripper has now become DVDAid, and Blu-ray Ripper has been renamed as BDMagic. And to thanks for your continued support all along our previous site and the new www.multipelife.com, we are holding a 'New Site Special' with fantastic discounts up to 40% off. You can get 20% off BDMagic, 30% off ByteCopy, 40% off DVDAid and 20% off Video Converter Ultimate on Windows/Mac platform:
https://www.facebook.com/pavtubefans/app_209569249055691

Read more:

http://1080p-video-tool.blogspot.com/2014/05/pavtube-new-site-release.html


Guide- Convert Canon XF105 MXF to MOV ProRes for FCP editing smoothly on Mac

Step 1. Free download and run Pavtube iMedia Converter for Mac, add MXF captured videos to the program. You can not only click "add video" button to import Canon mxf files, but also you can click "add from folder" button to add MXF folder.


Step 2. Select output profile. If you want to edit MXF file in Final Cut Pro 6/7 or FCP X, suggest you choose Final Cut Pro > Apple ProRes 422(*mov).

convert-avchd-prores-422-hq-mov

Tips: For editing in iMovie/FCE, you can choose iMovie and Final Cut Express > Apple InterMediate Codec(AIC)(*mov).

Step 3. Click Convert" button to start transcoding Canon XF105 MXF to ProRes MOV for Final Cut Pro.

Tips: By default, Pavtube MXF Converter for Mac exports files with all the original audio tracks in the MXF container preserved, thus there are no additional steps required for keeping multiple audio tracks in the generated files.

Some more helpful features of the batch MXF to MOV Converter for Mac:

1. Settings- click to set video resolution(1920×1080/1440×1080/1280×720/720×480), bitrate (from 1Mbps to 20Mbps), frame rate (24p/30p)

2. Editor (next to "Add" icon)- click to set deinterlace, denoise, mute, volume up, trim, crop, etc.

Once the MXF to MOV Conversion is done, you can go to the output folder to find the converted video files. Now you are free to import Canon XF105 MXF files in Final Cut Pro for editing under Mac without problems.

Read More:

Tuesday, May 21, 2013

Convert XAVC files to MOV, MKV, AVI, MPG, MP4, WMV, FLV for editing, playing or sharing

Here offers you an easy-to-use XAVC Converter which can losslessly convert Sony XAVC video to MOV, MKV, AVI, MPG, MP4, WMV, FLV for editing, playing or sharing.
 
XAVC is introduced as an open format, to serve as a driver to promote and establish 4K content production infrastructure,a video recording format that covers both of professional and consumer market it has been widely adopted in the marketplace.


As XAVC is a new video format, many new users don't know how to deal with the Sony XAVC format, like how to edit/play/share Sony XAVC files.

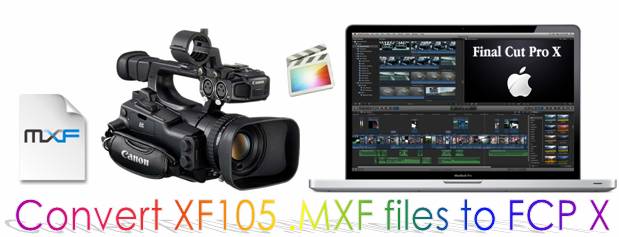
"Hello, I'm attempting to import XAVC files (from F5) into FCP X but i got an answer exactly where there are no files valid to become imported... iMovie/FCE can't recognize it too. Am I undertaking a thing incorrect ?"

"I have shot several video from my Sony PMW-F55 camera and want to share my camera video to YouTube,Vimeo, etc. How can I do?"

"What do I need to play the Sony XAVC with Mac QuickTime, best settings? The easiest way to play XAVC video format?

Pavtube XAVC Converter for Mac offers an easy way to convert XAVC to MOV, MKV, AVI, MPG, MP4, WMV, FLV for editing, playing or sharing XAVC on Mac. With it, you will be able to import XAVC videos to your QuickTime for playback with ease, to import Sony XAVC to FCP or edit in iMovie/FCE are going to be a piece of cake.

Besides, by converting XAVC to H.264 MP4, you can transfer XAVC files to Android, Windows 8 or IOS device like iPhone, iPad, Apple TV 3, etc to play smoothly.

If you are a Windows user, you can turn to XAVC Video Converter, which share similar functions with the Mac Version.

Convert Sony XAVC to MOV, MKV, AVI, MPG, MP4, WMV, FLV for playing and editing
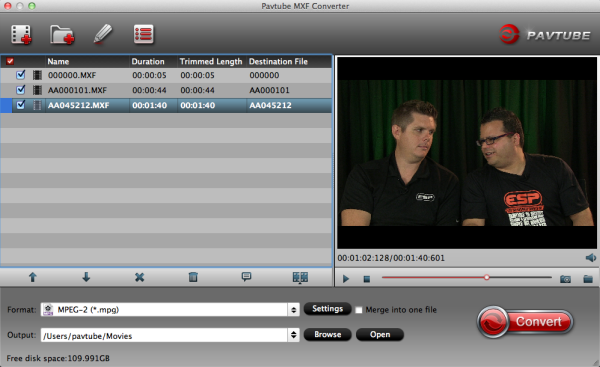
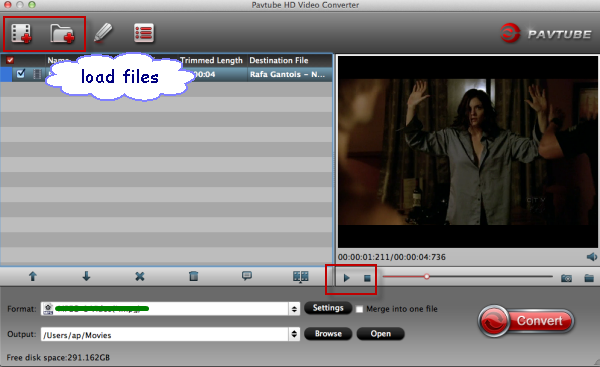
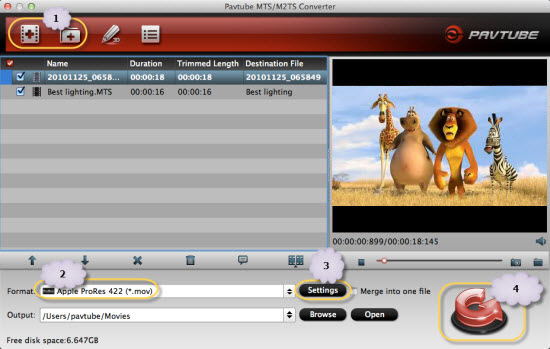

Step 1. Run Pavtube Mac Sony XAVC Converter. Click "Add file" or "Add from folder" button, browse to the footages and load them to the converter.


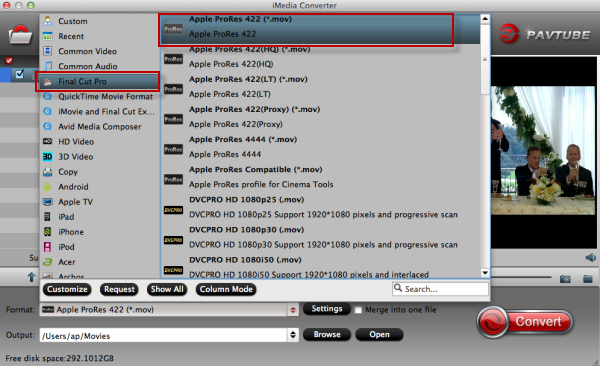
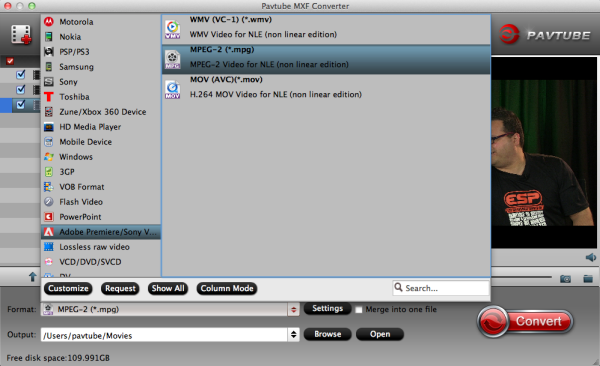
Step 2. Select the items to be converted, and click on "Format" bar.

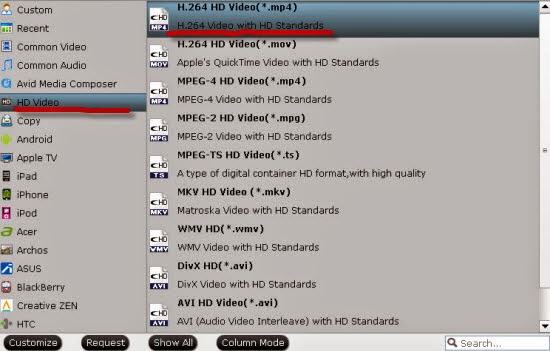
If you need to convert XAVC to MOV, MKV, AVI, MPG, MP4, WMV, FLV, you just need to select corresponding format. Just click format bar and choose the format you need.


Step 3. Click "Settings" button, then you will be able to adjust audio and video parameters on the popup window to customize the output file quality, these adjustable parameters include codec name, aspect ratio, bit rate, frame rate, sample rate, and audio channel.

To maintain original HD quality, you may set "original" in the fields of "Size", "Bitrate" and "Frame rate". To downsize the Sony XAVC files, just set a smaller bitrate.

Step 4. Click the "Browse" button next to the Output File Name field and select a location on your HDD for the output video file.

Step 5. Click the "Convert" button to start conversion. After conversion you can click the "Open" button to locate converted video files.

Aftere converting XAVC files to MOV, MKV, AVI, MPG, MP4, WMV, FLV, you can free transfer Sony XAVC video  for free editing, playing and sharing.

Read more

Sunday, May 19, 2013

Panasonic ZS30 and Final Cut -Edit Lumix DMC-ZS30 MTS in FCP 6/7

Panasonic Lumix DMC-ZS30 (TZ40 in Europe) is the latest version of the company's hugely popular travel zoom camera. Announced in January 2013, it comes exactly one year after its predecessor, the best-selling ZS20/TZ30, and like that model the ZS30/TZ40 becomes the first of the new crop of pocket super-zooms to reach the market. 


The most important specification of any super-zoom is of course the optical range, and for the new ZS30. Panasonic has however improved the image stabilization with a new five-axis correction system that claims to particularly benefit movie shooting. The compact camera DMC-ZS30 can shoot 1080p60 AVCHD/MPEG-4 video. Besides it is packed with a whole range of features that provide outstanding performance in every environment. No matter what time of the day or night, the camera guarantees outstanding results due to the 24mm Ultra Wide Angle LEICA DC lens and 20x Optical Zoom.

If you have got this WiFi enabled compact long zoom camera, you can use it to record 1080 60p AVCHD and MP4 videos. When the capturing process is over, you may want to do some post workflow with the video to make them more delicate and amusing to share with your friends. Here we share the solution to transfer Panasonic DMC-ZS30 AVCHD to FCP 6/7 on Mac with you.

Take the Lumix DMC-ZS30 and Mac compatibility into account, we find the common Mac tool Final Cut Pro 6/7 can’t ingest the 1080 60p footage from Panasonic DMC-ZS30. The best workaround is to transcode the 1080 60p AVCHD to ProRes for FCP 6. You can get the best and yet professional MTS Converter for Mac to fast convert Panasonic Lumix DMC-ZS30 video to ProRes 422 without losing quality. This tool is also can be applied for Lumix DMC-ZS25 users. Now let’s start the AVCHD to ProRes conversion on Mac OS X.

Now please follow the steps below to convert Panasonic ZS30 AVCHD to Prores .mov for  FCP 6/7 editing on Mac.

1. Go to download and install the best Mac Panasonic MTS Converter to make the transcoding task without quality loss, which offers you particular Apple ProRes profiles for Final Cut Pro. It also provides AIC codec for iMovie/FCE and DNxHD for Avid. Then launch the software to import your AVCHD clips to it.


2. Click on the Format box to select Final Cut Pro > Apple ProRes 422(*.mov) as the output format for editing ZS30 MTS in FCP. 

3. You can click the Settings icon to do some audio/video settings. We recommend 1920*1080 as video size and 30fps as video bitrate for easier editing on Mac. If you are in PAL(50p) area, you are recommended 25fps as video bitrate.


4. Hit the Convert button; it will convert Panasonic ZS30 1080p AVCHD to FCP 6/7 on Mac immediately.

When the conversion process shows in 100% with the top AVCHD to MOV Converter Mac, you can get the resulted videos from output folder easily for importing and editing in FCP.
 More related articles: 


Wednesday, May 15, 2013

RAW 24fps DNG video hits the Canon EOS 5D Mark III via Magic Lantern!


It's no secret that Canon's 5D Mark III is the go-to DSLR for videographers the world over, but things are about to become a whole lot more interesting. The people behind Magic Lantern have successfully coaxed the 5D Mark III into shooting 24 fps RAW video at resolutions up to 1,920 x 820 pixels using 1000x speed cards. If you're not familiar with Magic Lantern, it's an open source firmware add-on that brings additional functionality to Canon EOS cameras. The ability to capture RAW video at 24 fps improves dynamic range and resolution -- it also provides extra flexibility during post-production. According to the team at Magic Lantern, more work is required before the feature is ready to be deployed. So until then, you're invited to follow the via link below and watch the RAW vs. H.264 videos after the break, or if you're feeling brave, check the source for download locations.

Yes, thoungh initially the Magic Lantern team didn’t even think it was possible, they’ve now enabled 24fps RAW HD video (without sound) on the Canon EOS 5D Mark III

This is HUGE news. The dynamic range is now in the range of what people are so excited about with the Blackmagic Cinema Camera and Alexa and other cams. 


So what does this mean? As I mentioned above, the dynamic range of the video is stunning and is on par with the Blackmagic Cinema Camera and other cameras.  

Update: We just received news from Magic Lantern that Canon's Mark II is now also a go for 24 fps with the new firmware. Nic from the development team said "After some further testing it is clear the older, cheaper Mark II should be able to record at least resolutions of 1880x840 in full-frame mode (with line skipping)."

More info for you: