Tuesday, October 1, 2013

Best solution for importing Sony DSC-RX100 mts video in iMovie


Summary: Have got a Sony Cybershot DSC-RX100 and have issues with importing movies from RX100 into iMovie. Is there any solution? Just convert MTS video to AIC .mov for iMovie for editing on Mac.


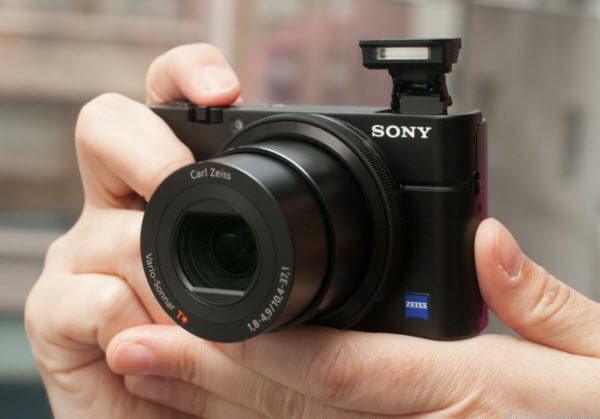
If you are planning to buy a mid-range HD camera, RX100 could be a smart choice. It is an enthusiast compact camera features with 1080 60p or 1080i video capture in AVCHD format. However, AVCHD is not friendly with iMovie, many users encounter the problem when transferring RX100 AVCHD MTS files to iMovie.

Q1: 
iMovie cannot import movies from the RX100. Anyone has a work around?

Q2: I'm using iMovie, and I'm trying to import the video from my camcorder (Sony RX100). But when I clicked the camera button, iMovie crashes. Why I can not import the clips to iMovie directly? Am I missing something? Pls help me!

Q3: I have a Macbook with Mac OS X installed. I have installed iLife 09. I have just bought a sony rx100. I can download the photos but I am unable to open mts in iMovie. They are in MTS format (AVCHD). Is there any software which I can import mts files to imovie? 

What's the problem? And then how to realize this goal for native editing RX100 1080/60p mts in iMovie? Since Apple hasn't added full supported to the 1080/60p mts recordings within iMovie, and you have to change MTS videos to iMovie acceptable AIC .mov format. This is the best Sony RX100 1080/60p AVCHD to iMovie Solution.

Hot Search: Canon MTS to iMovie | VOB to iMovie | H.264 to iMovie

For this case, a professional Sony MTS to iMovie application - Pavtube MTS/M2TS Converter for Mac comes to help you which is your first choice to transcode Sony RX100 1080/60p AVCHD footages to AIC MOV for iMovie. Here is a step-by-step tutorial for your to figure out your Sony RX100 MTS/M2TS iMovie problem:

Notes: Free MTS/M2TS Converter for Mac you can also have a try!

Preparations

1. Copy your MTS videos from Sony RX100 to Apple hard drive.

2. Free Download the best MTS to iMovie Converter on Mac, install and launch it.

Brief Steps

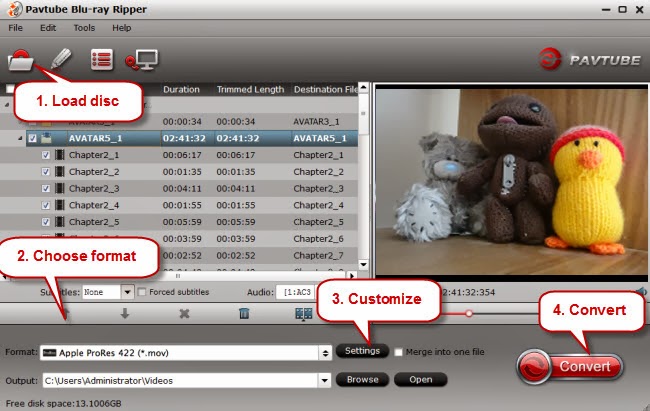
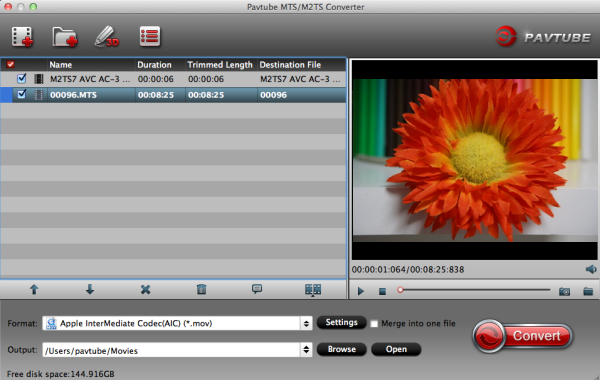
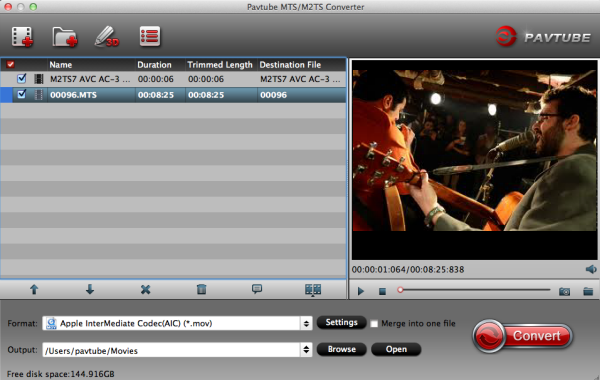
Step 1. Drag and Drop source MTS videos to Sony MTS to iMovie Converter. Or click "Add Video" to import the mts footage from RX100.


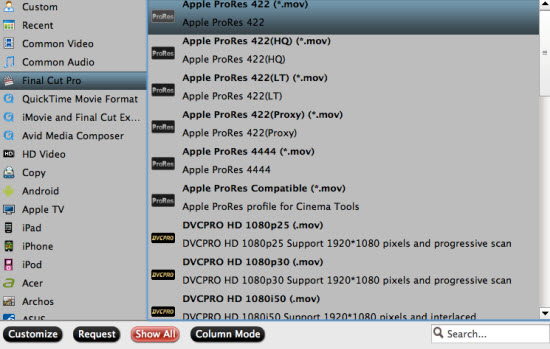
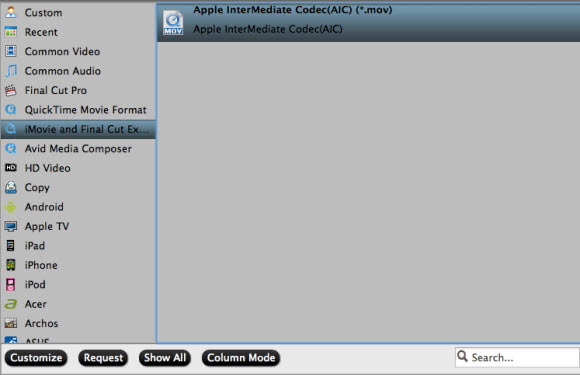
Step 2. Set up output format for AVCHD to iMovie Conversion.

From "Format" list, choose "iMovie and Final Cut Express > Apple InterMediate Codec (*.mov)" for editing in iMovie smoothly.


Step 3. Press the big "Convert" button to start transcoding Sony RX100 AVCHD MTS to AIC MOV for using in iMovie. The program adopted advanced audio and video sync technology; never let you troubled by the audio and video issues.

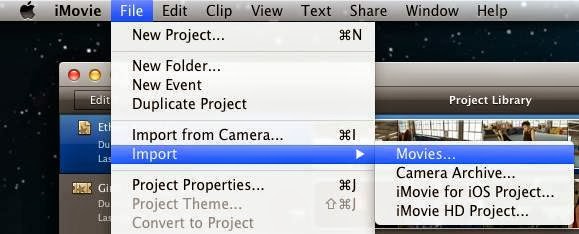
Once finished, click "Open" to get converted MOV videos. Then you could open up iMovie, and go to "File > Import > Movies…" to import converted video files to iMovie.


More Tips:
1. If you want to merge multiple MTS files into one for easy editing, please tick the box "Merge into one file" to merge all the imported clips.

2. In case the MTS footage is taken under interlacing mode, just click "Edit" to go to Video Editor, and hit Effect to select the Deinterlacing and interlacing lines will be eliminated. (Checked by default)

Read More:

Sunday, September 29, 2013

Sony's FDR-AX1 Handycam puts 4K recording in the grasp of prosumers (eyes-on)

We assure you, the camera above is not Sony's HDR-AX200.

Model Highlights: 4K/60p video Ultra HD, 1/2.3" 8.3MP Exmor R® CMOS image sensor, real-time 4K/60 fps recording, 3 ND filters and 6 paint functions, Sony G Lens with 20x (31.5-630mm) zoom, built-in mic with 2x additional Pro XLR jacks.


While it shares a similar body, this is the new FDR-AX1 that leaked this morning -- a fixed lens 4K videocamera for prosumers, priced at a cool $4,500. Although JVC beat Sony to the market with its $5,000 kit, Sony's vying to have the upper hand with the tech inside its take, namely by using its XAVC S format. It works by capturing video in MPEG-4 AVC/H.264 Long GOP and audio in linear PCM, which all gets saved in an "MP4 wrapper." To handle the massive amount of data throughput from its 4k/60p stream, the camcorder records to QXD cards (two slots are onboard) which, until now, haven't had much use outside of Nikon's D4. A 64GB card will net you two hours of 4K video, while downscaling to 1080/60p adds an extra hour on top of that.

Video gets captured by a 1/2.3-type Exmor R CMOS sensor and a 20x optical zoom (31.5-630mm) G lens, which comes equipped with a trio of ND filters and Optical SteadyShot. As you'd expect, there are a plethora of manual controls, powered stereo XLR inputs, a 3.2-inch display and a viewfinder on back. It's worth noting that while the AX1 won't be HDMI 2.0 compliant at first, Sony's planning a firmware update down the line to enable it. Until that occurs, it'll only be able to transfer HDMI video over to Sony's existing 4K TVs. We're also told that the camcorder will work with SD cards for shooting in HD.

If you don't care for the flexibility of interchangeable lenses or need something more affordable than the likes of a RED Scarlet, the FDR-AX1 can be yours this October. Sweetening the deal just a little more, Sony will also throw in a 32GB XQD card and a full copy of Vegas Pro 12 to ensure you can get started out of the box. Check out our eyes-on gallery with the prototype seen above in the meantime.

Related topics:

Sony Announces New PXW-Z100 4K Camcorder
Make Blackmagic Camera 4K footage editable in FCP
Convert 4K Video for editing with Mac in FCP, Avid, iMovie, Premiere, FCE

Saturday, September 28, 2013

Fast Way for importing Sony FS700 50/60p mts footage in Avid Media Composer

In this article, you will learn how to transcode Sony FS700 50/60p MTS to DNxHD MOV for Avid Media Composer editing without any importing problems on Mac.


The file I'm trying to import is AVCHD from my Sony NEX-FS700 at 1080p50 into Avid MC 6.5 via AMA. AVCHD-MTS AMA-plugin is installed but result in an error message. So I'm was asking here to figure out how to get the mts files from FS700 into Avid without any issue?

In fact, Avid can't import Sony FS700 recorded 1080 50/60p AVCHD video, the frame rate is so high and the codec is not friendly to AMC for editing. On Avid official website, Avid only works with standard film and broadcast formats. Although, Avid MC has added some plug-ins, actually background converters for the high-definition video format AVCHD, the importing process are unbelievably slow.

As DNxHD codec is the first choice for editing in Avid Media Composer, so in order to import the Sony FS700 50/60p AVCHD to Avid for editing, the easy workaround is to transcode MTS to Avid MC compatible DNxHD .mov format.

Here, Pavtube HD Video Converter for Mac does a good job in converting Sony FS700 50/60p AVCHD to Avid Media Composer preferred DNxHD format with best video quality. Following we will offer you a tutorial on importing and editing Sony NEX-FS700 50/60p AVCHD to Avid Media Composer on Mac.

1.Download the best Sony mts to Avid Converter, follow the prompts to install the program. Click "Add Video" to load Sony FS700 60p MTS video files or directly drag the files into file list.


2. Click "Format" bar to choose Avid Media Composer -> Avid DNXHD (*.mov), this format is best presetted for Avid Media Composer editing.


Tips:

Pavtube Sony AVCHD Converter for Mac can also convert Sony FS700 60p mts files to FCP, iMovie and FCE, QuickTime, Adobe Premiere Pro, Adobe After Effects, DaVinci Resolve or Apple Aperture 3 compatible video format for editing.

a. For FCP and Aperture 3: Click and choose "Final Cut Pro -> Apple ProRes 422(*.mov)" as the output format. FCP 6 only can support ProRes 422 and ProRes 422(HQ) codec.
b. For iMovie and Final Cut Express: Click and choose "iMovie and Final Cut Express -> Apple InterMediate Codec (AIC) (*.mov)" as the best output codec.
c. For Adobe Premiere Pro and After Effects: Click "Adobe Premiere/Sony Vegas", choose "MPEG-2 (*.mov)" or "MOV(AVC)(*mov)" or "WMV (VC-1)(*.wmv)" as the best video format.
d. For playing Sony AVCHD video on QuickTime: Choose "Common Video -> MOV-QuickTime(*.mov)" as the best video format.
3. "Settings" button in the main interface is very useful for you to customize the Video Codec aspect ratio, bit rate, frame rate,Audio codec, sampling rate, bit rate, channels.

4. After these, you can click "Convert" to start to transcode Sony FS700 50/60p MTS to Avid DNXHD codec for native editing in Avid Media Composer.

Hope this guide: "How to import/edit Sony FS700 50p/60p MTS to Avid Media Composer"can do great help to you. Happy every day!

Read More:

Wednesday, September 25, 2013

Canon MVI Video Converter- Simple way to convert Canon MVI to AVI format

Summary: This article will give you a brief guide to easily convert Canon MVI to AVI format for smooth playback and editing work. 


Hot search: Canon C100 MTS to Sony Movie Studio | Canon EOS 70D MOV to DaVinci Resolve | Canon XF for FCP X | Canon G7 X MP4 to Premiere Pro CC | Canon EOS 5DS MOV to Windows Movie Maker 

Easy question, hoping for an easy answer.Using Canon digital for videos and my clips come up in mvi format which does not work for sending etc. Does anyone know how to convert from mvi to avi format? 

MVI stands for Musical Video Interactive, a DVD based means of packing audio, video and interactive visual content (for example lyrics) onto one disk. Canon PowerShot digital cameras save recorded movie files with a name beginning with "MVI_." 

When try to import those kinds of MVI files from Canon to some video editing software for editing or media player for playback, you will encounter incompatiblity issues. In that case, the simple way to successfully play or edit Canon MVI files is converting MVI to AVI format which is a more popular and supported video format by windows or mac. 

To get better work with MVI file, you can get help with this professional Video Converter and Video Converter for Mac from Pavtube, which can convert MVI to AVI with perfect quality and fast conversion speed. What's more, it is the ideal conversion tool that offers several editing functions like cropping video dimension, trimming file length, adjust playing effects, etc. The converted AVI videos are well supported by mobile phones, different portable devices, media players and editing programs. Following is our workflow. 


Other Download: 
- Pavtube old official address: http://www.pavtube.com/video_converter/ 
- Amazon Download: http://download.cnet.com/Pavtube-Video-Converter/3000-2194_4-75734821.html 
- Cnet Download: http://download.cnet.com/Pavtube-Video-Converter/3000-2194_4-75734821.html 


Part I: Transcode MVI to HD AVI for editing or playback 

1. Run Pavtube Video Converter as the best MVI to AVI Converter. Click "Add Video" or "Add from folder" icon to load MVI material from Canon. 


2. Choose "AVI HD Video (*.avi)" as target format from "HD Video" option. 


3. (Optional) You can click "Settings" button and enter "Profile Settings" panel to adjust video and audio settings if necessary. Users are free to reset codec, bit rate, frame rate, sample rate, and audio channels. 

4. Click the big button "Convert" to start converting MVI to AVI format. 

When all conversions finished, click "Open" to locate the generated files, you may go ahead to create your own masterpiece. 


Part 2: Import converted HD AVI for editing and playing

Launch Windows Movie Maker, Adobe Premiere Pro, and other applications, import your hd .avi files into them and or transfer them to your portable devices or media players for watching. 

Pavtube MVI Converter for Win/Mac other features: 

1. It can rip and convert latest DVD and Blu-ray disc. And it is a great tool to backup discs: "Copy the entire disc" will 1:1 backup the whole movie with original structure, and "Directly Copy" can copy the main movie of the disc without menu and titbits. 

2. You are allowed to edit the video, such as trim, crop, add watermark of text, image and video, attach subtitle, etc. 

This integrated software will give you more than you have to do. 


More related tips: 


This weekend Pavtube offers up to 35% off Blu-ray/DVD Ripper & Video Converter, the best yet easy-to-use tools to convert your BD/DVD/video files into MP4, MOV, MKV, AVI, ProRes, HEVC...onto smartphone, tablet computer, media player, stream server, TV set, game console, VR headset, hard drive, etc. with multiple wanted audio/language/chapter markers! 

Pavtube Upgrade Promotion: Up to 35% Video Converters : http://videostepconvertmap.blogspot.com/2015/08/upgrade-pavtube-add-prorestvh265-mkv.html 

Tuesday, September 24, 2013

Best blu-ray ripper- Editing Blu-ray Discs with Apple Final Cut Pro


Description
: Want to import Blu-ray movies in Final Cut Pro? The following article will show you how to transcode Blu-ray to Apple Prores 422 for FCP editing on Mac.


Blu-ray is getting more and more popular for its large storage and excellent quality so that many people prefer watching Blu-ray movies at home. And what's more, digitizing your blu-ray discs collection is an ideal form of insurance against damage, theft or loss, therefore some folks will have the need to edit blu-rays in nonlinear editing programs such as FCP,  iMovie/FCE, Adobe Premiere, Avid Media Composer etc on Mac before storing or playback.

Now I am testing to import a Blu-ray disk into Final Cut Pro but only find that is the Blu-ray files are not readable by FCP (no matter the version FCP 6/7/X). So in this case, it comes with the question that how can us rip blu-rays and edit blu-ray movies in FCP?

From Apple, we know that FCP most prefers Apple Prores codec for editing. So the quick and easy way to do solve the problem is to convert Blu-rays to FCP compatible prores before importing. After lots of searching in google, finally we got this a powerful blu-ray converting program to help with ingesting blu-ray to FCP on mac. That is Blu-ray Ripper for Mac from Pavtube, which does a good job in decrypting and transcoding blu-rays to Prores so that you can easily get blu-ray discs to work with FCP perfectly.

Get the best Mac Blu-ray to FCP Ripper (30% off now) installed and follow the guide below:


How to transcode Blu-ray to Prores for editing in Final Cut Pro on Mac

Step 1. Load your blu-ray disc.

There is a disc icon on the top left which let you load from disc, folder or ISO/IFO respectively.


Step 2. Choose Output format.

For editing in FCP, the Apple Prores is preferred. Click Format and choose Final Cut Pro>Apple Prores 422 Codec(*.mov).


PS: It has various profiles and formats so that you can rip blu-ray to various formats according to your needs.

Step 3. Set up frame rate, bitrate, or other output settings and add subtitles.

a. Click Settings, you can find file details including codec, size, bitrate and frame rate. You are able to fix them according to your needs. FYI: the higher bitrate you choose, the better video quality it outputs.


b. Sometimes subtitle on Blu-ray discs is not what you want, for example, the original subtitle is in English, you may not read it exactly and you need a Francais subtitles. Now the software allows loading *.srt and *.ass subtitles files. You can download any *.srt and *.ass subtitles files you want then load in the software for output.


If you wanna add external subtitles(like *.srt, *.ass and *.ssa) in video, only click "Edit", choose "Subtitle" > "Enable", you need download a subtitle file, then click "Browse" to load it.
You can get to konw the best and top 5 Subtitle Sites to download subtitles you need here.


Step 4. Now just press the big circular "Start Conversion" button to start converting Blu-ray movies to Prores for Final Cut Pro on Mac.


Tips:

1. Refer to here to learn how to import video files into FCP.

2. Here are some step-by-step guides of how to import Blu-ray to iMoviehow to rip DVD to FCP and convert DVD for FCE.

3. If you wana to convert Blu-ray to FCP with multiple audio and subtitle tracks, please go to Pavtube Bytecopy for Mac.

Click Pavtube Special Offer page to get more discount:

ByteCopy($42) + Blu-ray Video Converter Ultimate($65) = only $80 Save $27
ByteCopy($42) + Video Converter($35) = only $60 Save $17
ByteCopy($42) + MXF MultiMixer($45) = only $70 Save $17
ByteCopy($42) + DVD Creator($35) = only $60 Save $17
ByteCopy($42) + ChewTune($29) = only $54 Save $17

Sunday, September 22, 2013

Does iMovie 9 recognise 1080p MTS video from Panasonic HC-X920?


Summary: How to get iMovie 9 to work with 1080p mts footage from Panasonic HC-X920 perfectly? The is easy workaround to convert Panasonic MTS to AIC Codec for natively using AVCHD file in iMovie.


The 2013 collection is no different, and what better place to start than the new Panasonic consumer flagship, the HC-X920.  With the WiFi-enabled X920, you can enjoy professional grade HD video you can share from anywhere. X920 records video with [AVCHD] AVCHD 3D / Progressive / [iFrame] MP4 format. If you use Panasonic HC-X920 for the 1080p 60fps mts recording and want to edit the 1080p mts files in iMovie 09. You will got problems as below: 

I also purchased X920 for the better clock rate and the newer AVCHD codec. My editing software iMovie 09 doesn't yet support the top recording standard 1080/60p. It is a easy to use camcorder, you won't go wrong with this model. So is it possible make it into reality to edit them in iMovie 09?

X920 is what I expected, have taken it to the beach, snow and have not had any issues, my children love the menu, easy for anybody to operated, no need of the viewfinder, best investment for your money. What's more, HC-X920 also supports the optional 3D lens, will recommend it to friends and family. Any suggestions for the X920 3D mts and iMovie 09 workflow?

I have a MacBook Pro Vs.10.6.8, which came with iMovie '09. I just bought a new X920 HD Camcorder 1080 it puts files in .MTS format. My iMovie does not support the files. It can't even pick them up. Do I need to upgrade to IMovie '11 to be able to edit my HD camcorder files (.MTS)? If so, that's a problem, becuase I got an error that said I can't upgrade because my Mac is too old (which it's only two years old). Or, should I just get another camera? 
iMovie 09 won't import the 1080p AVCHD (2D/3D) Videos. So, how to deal with Panasonic HC-X920 1080p AVCHD in iMovie 9? Well, as we know, iMovie native format is AIC .mov, so the best method to import 2D/3D AVCHD from Panasonic HC-920 to iMovie 9 smoothly is to convert the Panasonic AVCHD to AIC for editing along with some help from a 3rd-party Mac Pansonic AVCHD Converter. 

Fortunately, Pavtube MTS to iMovie Converter for Mac can exactly do favor for you. With it, you can convert Panasonic HC-X920 AVCHD to iMovie compatible AIC codec MOV format. There will be no problem to import AVCHD footage into iMovie 9 keeping audio and video synchronization on Mac.

With the Mac program, you can transcode AVCHD MTS/M2TS/M2T/TS files at 1080i, 1080p, and 720p to proper format for:

  • Editing on FCP, iMovie, FCE, Avid, Premiere, iPhoto and more;
  • Playing on portable devices(iPad, iPhone, iPod, Nexus 4, Nexus 7, Galaxy S4, S3, Tab 3, Tab 2, HTC One and so on);
  • Burning on Mac OS X
     
  • Uploading to YouTube, Vimeo, Facebook and more uses. 

What's more, the MTS/M2TS Converter for Mac supports adding .srt, .ass, .ssa subtitle to your videos or movies.  Aslo, it has added 3D profiles in Format menu. (Side-by-Side, Top-Bottom, or Anaglyph 3D in MKV/MP4/MOV/WMV/AVI)

In summary, it works very well in converting Panasonic HC-X920 1080p MTS files to AIC for editing in iMovie 9. You can download a free trail version: Pavtube MTS/M2TS Converter for Mac and follow the guide below:

Step 1. Add .mts files to the Mac MTS to iMovie Converter.

Launch the Mac MTS/M2TS to iMovie Converter. Click "Add Video" or "Add from folder" button to load your source .mts or .m2ts files from Panaonic HC-X920.


Tip: If you want lossless merge multiple MTS, M2TS files, pleas check the "Merge into one file" box.

Step 2. Choose iMovie native foramt as output.

To convert X920 MTS files to iMovie native foramt, please click "Format > iMovie and Final Cut Express", choose "Apple Intermediate Codec(AIC) .mov" as the best output format.


Tip: If you wanna edit the video/audio parameters, you need to go to "Settings" window.

Step 3. Start MTS to iMovie native foramt conversion.

Click the "Convert" button under the preview window, and the best Mac MTS to iMovie Converter will start converting Panasonic HC-X920 MTS clips to iMovie friendly AIC mov format on Mac OS X.

When the conversion is done, you will be directed to open the folder where you saved the converted files, and then you can import output video files to iMovie to edit.

Tips: 
1. If you want to import Panasonic MTS footage in FCP, only need to change step 2, choose "Format > Final Cut Pro > Apple ProRes 422 (*.mov)" as output format, or you can also refer to the guide.

2. If you want to edit Panasonic HC-X920 MTS footage in Avid Media Composer, only need to change step 2, choose "Format > Avid Media Composer > Avid DNxHD (*.mov)" as output format, or you can also refer to the guide

3. If you want to share Panasonic HC-X920 60p AVCHD video on Youtube, you can refer to this guide.

Editor's Recommendations

Tuesday, September 17, 2013

Why Premiere Pro and After Effects doesn't like Sony EX3 XDCAM files

Got Problems importing Sony PMW-EX3 xdcam mp4 footage into Premiere Pro/After Effects for further editing? Look no further, follow the easy workaround to achieve your goal smoothly.


Question:

I recently purchased two PMW-EX3 cameras for use here at my work, and I thought that I had them up and running perfectly but recently ran into a problem importing footage. When I shoot anything over around 13:40:00 long, PP CS4 will not import the entire length of the clip, only the first 13:40:00 (give or take a minute or two). When I play back the clips on the camera or in Sony's clip browser software I can play the entire duration of the clip. When I'm in PP using the Media Browser window to get to my footage, it even shows me the correct duration of the clip in the Duration column, but when I copy it over into my project bin, only that first 13 and a half minutes makes it. And a similar problem importing the files from EX3 into After Effects. AE only imports the first MP4 file of your clip and not the rest.

I've searched lots of other forums, and while I've seen various issues with importing XD EX footage into PPro and AE, I haven't seen this best solution yet

Sony PMW-EX3 can shoot XDCAM EX MP4 recording with true 1920x1080 resolution on dual SxS cards. As the XDCAM mp4 footage still cannot fully supported by some video editors like Adobe Premiere Pro and After Effects on Mac. So if you are using Premiere and AE for editing just like the above user, the best workaround for us is to convert Sony PMW-EX3 mp4 to Adobe Premiere Pro/After Effects most compatible MPEG-2 format, and it will make the editing work much smooth and easier. 

At first, you need to find a third party program to do EX3 files to MPEG-2 transcoding. As far as I konow, the best hd video converting program is Pavtube HD Video Converter for Mac, a powerful XDCAM Converter for Premiere/AE, which is use-to-use, capable of converting XDCAM video to various formats for editing with Premiere Pro, Avid Media Composer, Final Cut Pro, iMovie or FCE on Mac, and supports batch renaming painlessly. Download it here and get to konw the detailed steps as below.

Guide on transcoding Sony EX3 XDCAM to MPEG-2 for Premiere Pro and After Effects editing on Mac

Step 1: Install and run the best Sony XDCAM Converter for Mac. Click the “Add Video” or "Add from folder" button to import .mp4 files from the Sony EX3 camcorder. Join mp4 clips via checking the “Merge into one” box.


Step 2: Hit the Format box and select Adobe Premiere/Sony Vegas --> MPEG-2(*.mpg) as output format for editing EX3 XDCAM video in Premiere Pro and After Effects natively.


Step 3: Click the “Settings” icon to do some audio, video parameter settings like video bitrate, frame rate, audio sample rate, audio channel, etc. (Optional)

Step 4: Click the "Convert" button under the preview window, the Mac XDCAM Converter will start the conversion from EX3 to Adobe Premiere Pro/Adobe After Effects immediately.

After the conversion, you will be able to get the output files via clicking on “Open” button effortlessly. Afterwards, you can import Sony EX3 MP4 footages to Premiere Pro CS and After Effects for further editing easily.

XDCAM Related: