Wednesday, December 4, 2013

Join M2TS files and convert to MKV (Xvid) without quality loss

The article illustrated below is an exhaustive process to elaborate step by step procedure for M2TS to MKV (Xvid) conversion without quality loss for playing. 

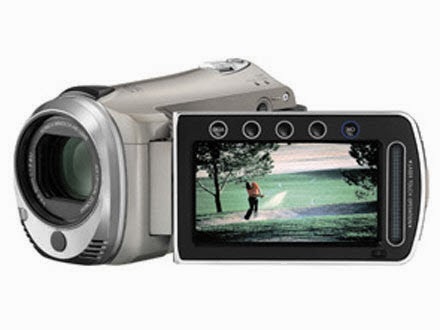
M2TS: This innovative file format is available with the video/audio files created by Sony Camcorder models. This is most likely a Sony high definition video file type and recorded using Sony, Panasonic, Canon and other brands of camcorders. However, playing M2TS file is troublesome. In order to view the M2TS footage on HDTV, you need to connect your camera with HDTV via cable. For playing blu-ray movie, you got to put the blu-ray disc in a blu-ray player and connect the player with you on wide screen TV. And that’s why guys like you and me would still seek for easier and flexible ways watching M2TS videos.

To copy the M2TS contents to media server and portable memory storages for playing back, converting M2TS to MKV will make it easier and more effectively.


Below is a question from one of my clients:

I am working in industrial automation and I love watching kinds of films. Now I have some M2TS collects, what I wanna do is to join these M2TS videios from Full HD video camcorder. I wonder if is it possible to get these M2TS files into MKV format without quality loss. And I prefer the Xvid codec with MKV format for playback on my HDTV.

To help him out, I did long time searching on internet and many testing (different software). And freemake video converter is the softwar I have used very good one ... Unfortunatelly it sarted to crash after some version of the program, so number of joined m2ts files was getting smaller and smaller. That convinced me to search for new program.

But finally I find Pavtube Video Converter, it works pefectly in M2TS to MKV (Xvid) conversion with fast speed. I didn't find any quality loss, also it joins videos without breaks (lag) besides converting. The Mac version is Pavtube Video Converter for Mac.

In the following guide I will show you how to convert M2TS to MKV (Xvid).

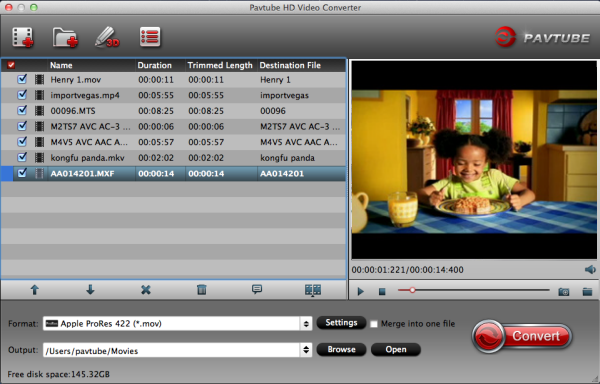
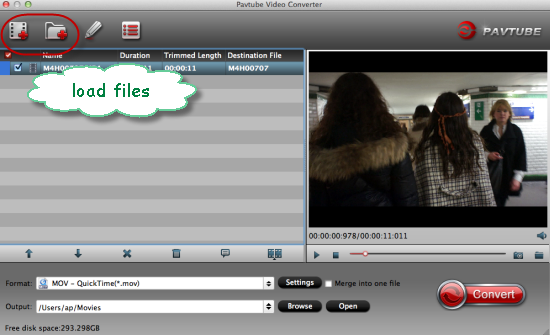
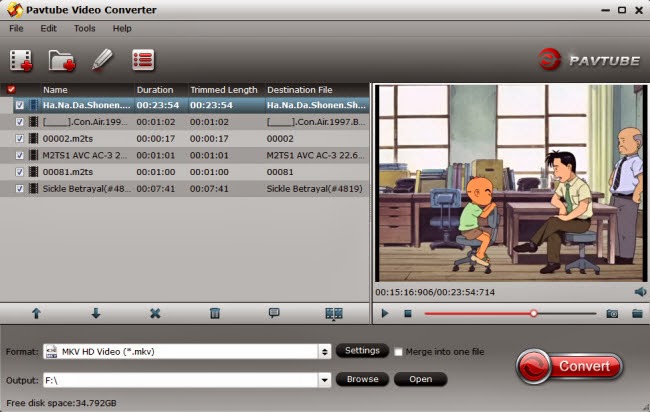
Step 1: Import the M2TS file.

Run Pavtube Video Converter as the best M2TS to MKV Converter. Click “Add Video” or “Add from folder” icon to load .m2ts video clips.


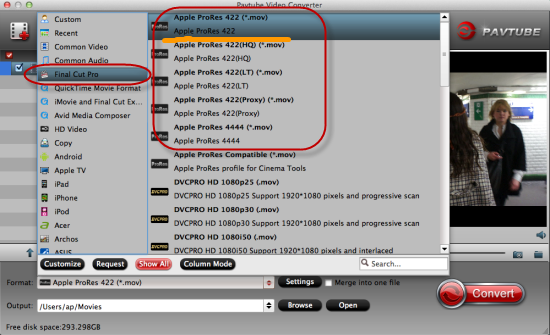
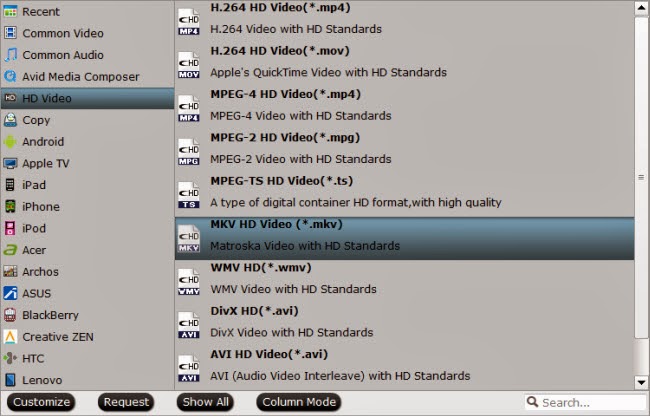
Step 2. Choose MKV as the output format

Click the “Format” bar and follow “Common Video->MKV” if you’d like to save storage. If you are unwilling to degrade the HD M2TS video quality, “HD Video”-> “MKV HD Video (*.mkv)” is a better choice for you.
  

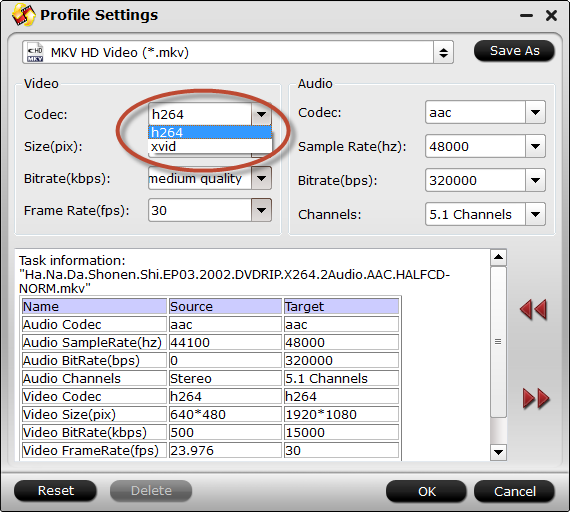
Step 3: Settings (Optional)

You can click “Settings” button and enter “Profile Settings” panel to adjust video and audio settings if necessary. Users are free to reset codec, bit rate, frame rate, sample rate, and audio channels.

Here. You can set XVID as the best video codec for your media player.


Step 3: Start converting M2TS to MKV

Click “Convert” button and the selected M2TS files will be converted to MKV files at once.

Notes: If you would like to join MKV files together, just select these files and check the Merge into one box before click “Convert” button. You may check the converting progress and set auto shutdown in the convert window.

After conveting M2TS to HD MKV, it would be easy to import the converted MKV files to media players like Western Digital TV and enjoy the videos on HDTV.

Tip1: Footage shot by some camcorders may end up interlaced. Juggled edges and ghosting occurs when you preview the M2TS files. In that case you can set deinterlace effect to eliminate the interlacing lines. Follow Edit->Effect->Deinterlacing.

Tip 2: The “Trim” facility allows you to cut out unwanted part from videos. To convert specific part of a M2TS file, you may click the “Edit” button, switch to “Trim” tab, type in desired time in ‘Start’ and ‘End’ box and click ‘Set’ button. Or you can click left square bracket and right square bracket to set start and end time when playing the video.

The M2TS to MKV Converter can help you convert recorded m2ts video files with high video quality, video and audio synchronization are perfectly guaranteed. If you would like to convert M2TS files directly from blu-ray disc, Pavtube BDMagic (30% off now) is a better choice for you, as the ripper is capable of handling encrypted commercial blu-ray discs.

Read More:

Tuesday, December 3, 2013

Cyber Monday Special Offer: Upload and Win! Half price promotion discount at Pavtube!

Cyber Monday deals are here at Pavtube, now upload your sports photos to win any BD/DVD/Video Converter with 50% off. Read on for the best Pavtube Cyber Monday Specials has to offer.  
Some of us simply aren't brave enough to face the Black Friday hordes, that doesn't mean stay-at-home shoppers aren't still looking for a bargain: Cyber Monday is upon us, and there are deals aplenty. If you skipped this weekend's brick-and-mortar discounts, read on to see Cyber Monday Deals 2013. With so many ads posted all over online and offline, are you tried of waiting in front of stores or browsing the Cyber Mondy ads? Now take a look at Pavtube Cyber Monday Specials!

Are you a photography lover? Now upload your favorite sports photos to win any Pavtube Blu-ray/DVD/Video Converting programs with 50% off on Cyber Monday. Only two days!!! Never miss!!!


Do you play any sport? Or are your kids part of a team?

Upload your kid's team photo (or yours!) for the most unforgettable moment of 2013.

Photos with most appealing content as well as title (as short explanation of the photo) will have the chance to win any Pavtube product (BD/DVD Ripper and video converter series) with 50% off! And these photos will be shared on our Facebook~

Upload photo to faq@pavtube.com via www.wetransfer.com

It will be expired on 3-Dec,2013


Saturday, November 30, 2013

Easy Way to Get mts Videos from JVC Everio GZ-HM330SAA into FCP


Summary: To make it easier for editing JVC Everio GZ-HM330SAA mts videos on FCP, you can use the best JVC AVCHD Converter for Mac to transform MTS to Prores 422 for native importing.

Where the JVC Everio GZ-HM330SAA beats most pocket video cams -- and many traditional camcorders at the budget end of the scale -- is picture quality. It uses JVC's HD Gigabrid Premium II Engine to process footage as 24Mbps AVCHD-standard files, which produces far superior results compared to the process used by lower-end models, even those that claim 'full' 1080p resolutions. Indeed, we were very pleased with our test footage. The GZ-HM330's picture was detailed and sharp, while colours were very realistic. It's easy to use, easy to carry and video quality is very high for a camera of its price.


After shooting can1080p Full HD .mts/.m2ts videos from GZ-HM330SAA, you may look for a way to help you ingest JVC GZ-HM330SAA AVCHD video clips to FCP for editing? You are likely to get some incompatible troubles, as AVCHD is a high compression format but not a good editing format on Mac. To put the MTS videos from GZ-HM330SAA in to FCP without any problem, you need to use the professional MTS to FCP Converter to transode MTS/M2TS movie from GZ-HM330SAA to a comfortable format for FCP, like ProRes.

To keep the original video quality for editing, Pavtube HD Video Converter for Mac is known as the best JVC AVCHD Converter for Mac that can help you transcode JVC GZ-HM330SAA AVCHD to Prores 422 MOV for FCP editing. Here are the simple but useful steps for you.

Good news! At Thanksgiving Big Deal 2013, if you get HD Video Converter for Mac, you can get DVD Creator free which can help you to burn mts videos on Mac with ease. Take a look now and grasp this opportunity before Dec.10, 2013! Never miss!

Step 1. Download and install the JVC Video Converter and imput the mts recordings to the program.


Drag and drop JVC GZ-HM330SAA AVCHD files to Mac MTS to Prores Converter. Then the files will be listed on the file list tab, you can choose to check the properties of the video or preview it.

Tips: You can imput a number of files to the programs, and if necessary, you can use the function "Merge into one".

Step 2. Choose the best compatible output format--Apple ProRes for FCP.

Click the Output bar, you can finsd that there are many output format there. For Final Cut Pro, Apple ProRes 422 is the first choice certainly.

format-to-fcp-supported

Step 3: (Optional) Adjust audio and video parameters in Profile Settings. You can change the default codec, bit rate, frame rate, sample rate and audio channel according to your needs and optimize the output file quality.

Tip: Video Size:1920*1080 & Frame Rate:30 fps(NTSC) or 25fps(PAL)

Step 4: Click the “Convert” button on the main interface to start JVC .mts to prores conversion.

As soon as the covnersion is over, you just need to click the "Open" button on the main interface to find your converted file. That is to say you can easily edit JVC Everio GZ-HM330SAA AVCHD in FCP for further editing without any rendering or compatibility issue.

File Importing Steps: How to import video files or projects to FCP on Mac?

Read More:

Friday, November 29, 2013

Guide on Importing Sony FS700 MTS files into Final Cut Pro 7 and FCP X

Summary: Here are tips and tricks for Sony NEX-FS700 and Final Cut Pro: In order to import and edit Sony NEX-FS700 MTS into FCP 7/X smoothly, you need transcode Sony AVCHD to FCP compatible format on Mac. 

As a high-end camcorder, Sony NEX-FS700 is definitely worth buying: professional design, large-sensor, and high quality recording. FS700 can shoot at up to 960 frames per second and now there are already quite a few cameras out there that can do this.


As FS700 records full HD 1080 50/60p MTS/M2TS files in AVCHD format. However, FCP has less compatiblity with AVCHD .mts/.m2ts files, and many users find that the AVCHD format cannot be recognized by FCP 7, for example:

Hello, I own HD video converter for MAC. I'm attempting to batch transfer 1080i HD footage from a Sony FS700 (AVCHD/MTS) to Prores. I want the footage to stay interlaced and not convert to 25P (progressive). Is there a way to do this? Can only find a 25p option. Thank you!

Why this happens just because the codec of AVCHD is not supported by Final Cut Pro. So is there any easy solution to avoid the headache "incompatibility importing problem"? Here is a simple tip for you to make Sony FS700 50/60p AVCHD editable in FCP. Some 1080/50 fps AVCHD clips grayed out in L&T or import window and we were not able to ingest them to FCP until we used third-party encoder to change these 50/60 fps MTS clips to ProRes 422.

What we use: Pavtube MTS/M2TS Converter for Mac to help you get it done.

Good news! At Thanksgiving Big Deal 2013, if you get MTS/M2TS Converter for Mac, you can get Video Converter for Mac free which can help you to edit and play flash video (flv, f4v) on Mac with ease. Take a look now and grasp this opportunity before Dec.10, 2013! Never miss!

It will not only transcode Sony FS700 mts to Prores 422 for native editing in FCP on Mac, but also keeping audio and video synchronization on Windows and Mac (including Mountain Lion/Mavericks).

Sony FS700 workflow-Load FS700 recorded 1080p AVCHD to Final Cut Pro

1.Download Pavtube Sony MTS to FCP Encoder, follow the prompts to install the program. Click "Add" to load Sony FS700 MTS video files or directly drag the files into file list.


2.And then click "Format" bar to choose Final Cut Pro -> Apple Prores 422 (*.mov), this format is best presetted for FCP editing.


3. "Settings" button in the main interface is very useful for you to customize the Video Codec, aspect ratio, bit rate, frame rate, Audio codec, sampling rate, bit rate, channels.

4. After these, you can click "Convert" to start to transcode Sony FS700 MTS to Apple Prores codec for native editing.

Now you can follow the steps and have a try, happy every day!

Read Related Articles:

Wednesday, November 27, 2013

Black Friday Big Sale 2013: $30 Amazon gift card and Free Pavtube App for Winners!

Black Friday is coming up this week, and how to prepare and make shopping plans? Come to play Sudoku and earn $30 Amazon gift card and extra coupons for any Pavtube products now.


Any plans lined up for the special day? With so many ads posted all over online and offline, are you tried of waiting in front of stores or browsing the Black Friday ads? How about having some fun: come and play Sudoku to earn $30 Amazon gift card, Free or Up to 50% OFF for any Pavtube Blu-ray/DVD/Video/iTunes programs.

Do you Sudoku?

Take"Evil level" to go~

https://www.facebook.com/pavtubefans/app_192602997444667

Difficult?
Take it easy
Click "Medium level" or "Easy level"to go!

Good luck~

* All participants will get 30% discount at least!
* Share this poster on Facebook to get 40% discount for any Pavtube product.
* Write movie review for your favorite movie to get 50% discount for any Pavtube product, or even free if your movie review is confirmed to be excellent by us.

For Sudoku players:

Losers: 30% discount for any Pavtube BD/DVD/video converter series if they send us answer by Message only via Facebook.

Lucky winners will be automatically chosen from replied persons and get bonus below:


Easy level: 100 lucky winners are allowed for 40% off for any Pavtube product
Medium level: 2 lucky winners are allowed for 50% off for any Pavtube product or USD 10.00 Amazon coupon.
Evil level: Only 1 lucky winner is allowed for any Pavtube product for free or USD 30.00 Amazon coupon.

Rules: Fill the grid so that every row, every column and every 3x3 box contains the numbers 1 to 9.

Send answer by MESSAGE only via Facebook.
***DO NOT reveal your answer by replying directly***

Lucky Winners will get the for Pavtube discount product or Amazon Coupon after the exact need is confirmed in their message.

It will be expired on 2-Dec,2013

Come on! Click here: https://www.facebook.com/pavtubefans/posts/659389654105474

From: http://pc-mac-compatibility-issues.blogspot.com/2013/11/pavtube-black-friday-giveaway.html

Friday, November 22, 2013

Best way to import 1080p /720p MKV into Final Cut Pro (X) on Mac

Summary: This article will tell you how to convert MKV to Final Cut Pro supported ProRes MOV format so that you can import MKV to Final Cut Pro (X) for editing. 
Final Cut Pro

As a major breakthrough in video editing, Final Cut Pro may be the first choice for Mac users. It makes video editing faster and better with motion graphics and file-based workflow, offers a new way to organize. As we know, Final Cut Pro(FCP) allows users to edit any QuickTime compatible video format including DV, HDV, P2 MXF (DVCProHD), XDCAM, and 2K film formats without any quality loss.

But for Mac users, what confused them most now is the importing problems with the 1080p/720p MKV video. For example, how to play MKV on Xbox?


In fact, FCP still can't support MKV format, which is similar in concept to other containers like AVI, MP4 or Advanced Systems Format (ASF), but is entirely open in specification, with implementations consisting mostly of open source software. If you want to import 1080p/720p MKV files into FCP and edit 1080p/720p MKV files with FCP, you must get the Mac MKV to FCP Converter first.

To do MKV video to Final Cut Pro mac task, you're highly recommended to get Pavtube Video Converter for Mac which can convert 1080p/720p MKV to Apple Prores 422 which is the most  most compatible codec with Final Cut Pro on Mac with fast speed by keeping the original quality. Then you can easily import the 1080p/720p MKV to Final Cut Pro X, Final Cut Pro 6, Final Cut Pro 7 for editing on Mac. This will help you import the file correctly, saving the rendering time and keep the HD quality. Why not to download this easy-to-use and useful software for you and  transcode MKV to Apple ProRes codec. 

What to do in detail?
The Steps for Converting MKV to FCP Apple ProRes 422 

1.Load MKV files
After install and launch the Pavtube MKV to FCP Converter, drag and drop MKV file. You can drag several files to the program directly.


2.Choose output format
Apple ProRes MOV is the best format for Final Cut Pro (X), here you just need to choose the target application as output format, for example, “Final Cut Pro”->”Apple ProRes 422(*.mov)”.


3. Do some settings as you want.

4.Transcode MKV to FCP (X)
At last, hit the “Convert” button to transcode MKV to FCP (X). With this MKV to Apple ProRes 422 converter, you can easily change MKV files to FCP (X) for editing, this software runs fast, so you can convert your 1080p /720p MKV footages to FCP (X) in less time, video and audio synchronization are perfectly guaranteed, after converting you can follow this guide to import videos to FCP (X) for editing.

As Apple ProRes codecs are natively supported by FCP, the rendering time is saved as well. And you can not only edit footage captured in such popular video formats, but also edit video clips such as downloaded web content or even archived video from the hard drive by converting and importing MTS to Final Cut Pro, M2TS to Final Cut Pro, MOV to Final Cut Pro, MXF to Final Cut Pro, etc. Good luck to you!

Read Related Articles:

Thursday, November 21, 2013

Canon XF100 and Final Cut Pro X Importing Tips with multi-track retaining

Description: This guide will show you how to convert multi-track XF100 MXF to Apple Prores MOV retaining multi audio channels for editing in FCP X on Mac OS X (Mavericks 10.9 included)


Question: "Hi, I filmed using Canon XF100 camera using 2 clip mics and want to edit in Apple Final Cut Pro X. I’ve tried several programs but always loss some of the audio channels. Pls I need to edit both the original two channels in my FCP X. How can I solve this?”

Solution: I also ran into this problem when editing my friend’s wedding video. Did a lot search and tried some but not very satisfied for the transcode speed, quality or audio tracks saving. Recently found a program on mac named Pavtube iMixMXF and it work well till now; it really helps in converting muti-track mxf to FCP X. Come and meet this multi-audio track MXF Converter for Mac and follow these steps to easily convert XF100 multiple video/audio track MXF to ProRes for Final Cut Pro X.

Step 1. Get this Mac multi-track MXF Converter installed, click  'Files' to load individual XF100 mxf videos; or click' From Folder'  to load the entire folder. It will recognize all the audio channels.


Step 2. Click "Format" and choose Multi-track Video>Multi-track Apple ProRes 422(*.mov) as the most compatible codec for FCP X editing.

format-to-multi-track-prores-422

Step 3. Click "Settings" to customize your video size, bitrate, frame rate and other specs; and check video channels that you want to keep.

Follow the bottom left icon to "mix into one channel"; or that it will keep all the audio tracks apart.

merge-into-one-file

Step 4. Click "Convert" to start converting multi audio channels XF100 MXF to multi-track Apple Prores 422 mov saving multi audio channels for editing in FCP X on Mac.

Tips:

1. For users don't need to deal with multi-track thing, just simple want to convert MXF to other formats, the MXF Converter for Mac (only $29) is highly recommended. And at Pavtube Thanksgiving Giveaway, get it you can free get MKV Converter for Mac.

2. If you would like to Share Pavtube Hottest Thanksgiving Activity at your Facebook page - you can get more discount:

1. 20% off ByteCopy (Windows/Mac)
2. 20% off MXF MultiMixer
3. 20% off iMixMXF

Click "Share on Facebook" button, insert "#PavtubeThanks2013", choose "Public", and click "Share Link". You will get another 20% coupon. The discounted link will be sent to your Facebook "Inbox" or "Other" within 24 hours on work days.

If don't receive message from strangers, please don't forget to contact us for the discounted link via faq@pavtube.com.


More Pavtube Thanksgiving Special Deals are available on Pavtube Thanksgiving page. Share this activity at your Facebook page and more discounts you can get.

Relate Tips:
Convert Canon C500 MXF to multi-track MOV for Avid MC
Make MXF files supported by Premiere Pro and keep Multi audio tracks
Convert and Deinterlace Canon XF100 multi-track MXF to iMovie