Sunday, February 23, 2014

Ripping "About Last Night" Blu-rays/DVDs to Surface 2 or Pro 2 playable MP4 video

Description: This step-by-step guide reveals how to rip and convert "About Last Night" Blu-ray/DVD movies to Microsoft Surface 2 or Pro 2 best video format keeping HD video quality for freely enjoyment on the go.

Blu-ray, DVD and kinds of video files boost your multimedia life, if you have a large Blu-ray/DVD files collection, it should be such a cool thing to enjoy them on Surface 2 or Pro 2 anytime and anywhere.

I'd like to create Valentine's Day gift for my girlfriend this year, so I need to backup and copy her favorite movie "About Last Night" for playing on our new Surface 2 Tablet. Do you know any tool can help?

Want to transfer "About Last Night" BD/DVD movies to Surface 2 or Pro 2 for playback?

This professional Blu-ray/DVD to Surface (Pro) 2 Converter (only $39.2) is just designed to help you convert Blu-rays/DVDs to Surface 2 or Pro 2 MP4 for playback. With its clean interface, fast converting speed and good video quality, converting BD/DVD to Surface 2 or Pro 2 will be simply finished within a few clicks.

Download a trial version here. The Mac version is Blu-ray Ripper for Mac

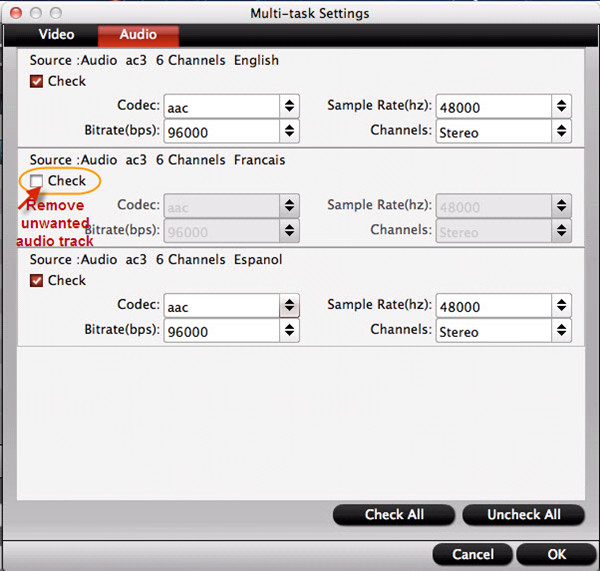
FYI: If you want to keep all the audio tracks (language) and soft subtitles, here's another choice for you: Blu-ray/DVD Converter Pro.

3 Steps to Rip "About Last Night" Blu-ray/DVD movies to Surface 2 or Pro 2 support video format

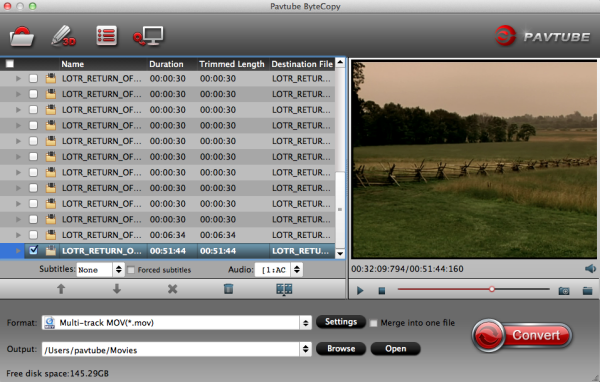
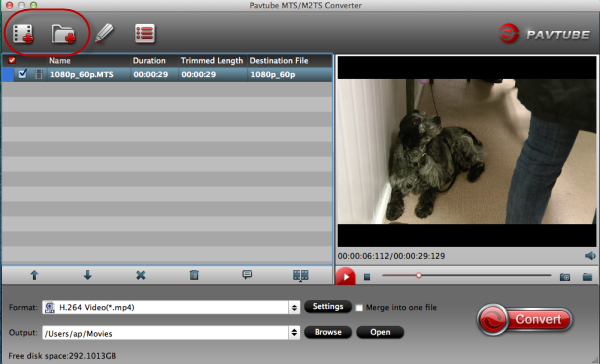
Step 1. Run this Top Blu-ray Ripper, as the BD DVD to Surface (Pro) 2 Converter.

Click "Load Disc" to  load your Blu-ray/DVD movies into it. 

Pavtube Blu-ray Ripper will detect and list the main title (the full length of this movie) and check it by default. So just keep it untouched and let’s move on to Step 2. 


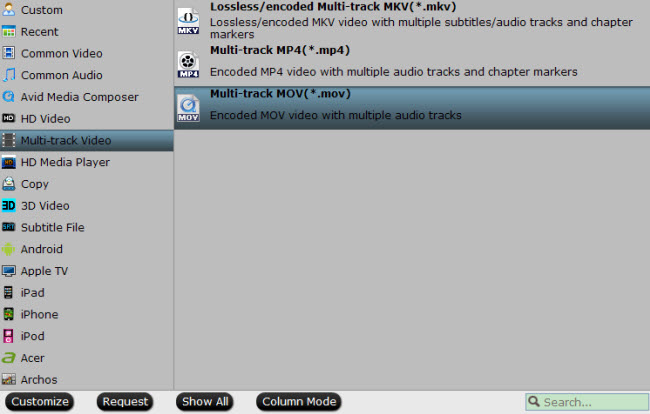
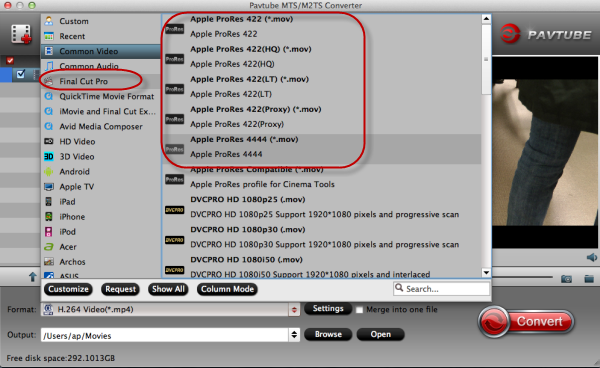
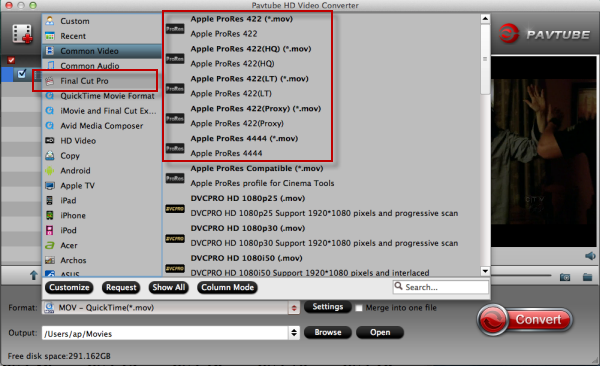
Step 2. Select Microsoft Surface 2 or Pro 2 compatible format.

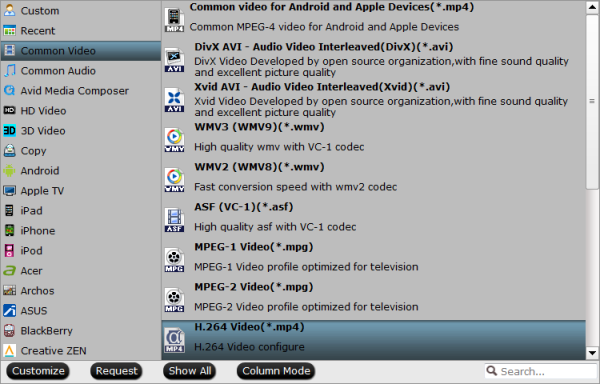
Here we select MP4 with H.264 codec for Surface 2 or Pro 2. Click the Format drop-down list, and select “Microsoft Surface Windows RT/Pro H.264 Video (*.mp4)” from "Windows" category.


Tips: Customize video specs. (Optional)

Click "Settings" to free choose output video size, bitrate, frame rate and other specs. Remember the file size and video quality is based more on bitrate than resolution which means bitrate higher results in big file size, and lower visible quality loss.


According to my experience, for watching Blu-ray/DVD movies on Surface 2 or Pro 2, 1080p with 1500~2500kbps is just all right.

Step 3. Start the BD/DVD conversion.

When everything is OK, just press the "Convert" button to start the "About Last Night" Blu-ray/DVD to Surface MP4 conversion. It will not take much time. Just wait for the conversion process to get done.

Note: Keep in mind that some of the settings can be tweaked to improve the video quality but it's a balance between quality and size. Using the settings we suggested, a 120-minute Blu-ray encoded to about a 1.3GB MP4 file.

After the conversion, you can click "Open output folder" to quick locate the converted video.

Once get the converted videos, just copy and dump them to Surface via USB. Then you are ready to play "About Last Night" Blu-ray/DVD movies on Surface 2 or Pro 2 freely.

Tip 1:Steps to transfer files to Microsoft Surface via USB wire. 

1.Copy files onto a USB flash drive or memory card on your other computer. 
2. Insert the USB flash drive or memory card into Surface. 
3.Tap or click the notification that appears in the upper-right corner of the screen. 
4.Tap or click Open folder to view files. 
5.Select the files or folders you want to add to Surface, tap or click Home, and then tap or click Copy to. 
6.Select a location. For example, choose Documents if the flash drive or memory card contains documents. 

Tip 2:

If you are looking for a powerful all-in-one ultimate video converter software to convert various 1080p/720p videos, Blu-ray and DVD movies to your tablet or phone for enjoying, simultaneously saving time and effort, the Blu-ray Video Converter Ultimate program will be a nice choice for you. If you are running a Mac OS X computer, iMedia Converter Mac is the alternative.

You may also want to read:

How to convert HD videos to Surface 2?
Ripping DVD movies to watch on Surface 2/Pro 2
Convert Blu-ray and DVD ISO/IFO image files for Surface 2/Pro 2
Download and Play Amazon Instant Video on Surface 2 and Surface Pro 2

Tuesday, February 18, 2014

Copy DVD Disc for playback on Mac with multi-track MOV format


How to play your favorite DVD disk movies with keeping multiple audio channels? Here, Pavtube multi-track Converter is a practical app helping you transcode DVD into to Multi-track mov format for playback.

Hi, a friend took some dvd discs for me- I'm able to see it in several programs but it's always playing in slow motion though the sound is normal. How can I get them played with normal speed and keeping multi-tracks in the DVDs? Thanks!

In fact, the problem may lies in the media player you choose. So at first check your computer specs, and make sure that it runs fast for work with the media player on your mac. Choose the best Mac DVD player, or else you have to convert DVD to playable format on Mac.

For people who want to play DVD movies keeping the multiple audio/video track separately as original, the problems is that whether it's possible that not losing any tracks during conversion? Can we transcode DVD to Multi-audio track mov on Mac?

Big YES!

Now, I recommend you a powerful DVD to Apple Multi-track ProRes converter for Mac – Pavtube ByteCopy for Mac. It is not only capable of helping you to transcode DVD discs to various output formats, but also it can transcode DVD to mov format with multiple audio and subtitle tracks. Suppose you are good at both English and Francia, and want to preserve both of them from original DVD discs when converting, that is what Pavtube ByteCoy for Mac can do for you. And you can select the audio you want when enjoying movies.

Now let's download and install the software and follow the guide to see how it convert DVD to  mov with multiple audio and subtitle tracks. Just refer to below details.

Step 1. Launch it and click Load Disc button to load DVD discs.


Step 2. Click "Format" to find "Multi-track Video" catalogue, select "Multi-track MOV(*.mov)" as output format for playback easily.


With output default "Settings" you can get all audio tracks preserved. In addition, if you want more customization, you can also uncheck the audio tracks you do not need to output. Just find "Audio" under "Settings" button, then uncheck the undesired audio.


Step 3. Click "Convert" to start conversion, when completed, click "Open" to find the generated .mov files.

Obviously, it is easy to use software without any audio and video out of sync issue. You may wonder what else this software can do for you. Of course, it combines all features in Blu-ray/DVD Ripper for Mac, including various output formats selection, editing options support. Worthy to point out that it also supports lossless quality output.

Tips:

1. You can choose ByteCopy for Mac if you wanna add *.srt, *.ass and *.ssa subtitle in video by clicking "Edit" button.


2. Pavtube DVD Ripper for Mac designs for users that do not need to deal with multi-track video/audio files; only $35 is needed.

In this way, you can successfully convert DVD to Multi-track format for playback on Mac with Pavtube ByteCopy for Mac. Hope this guide helps!

Read more:

Play multi-channel MP4 file on iOS devices
How to Enable iPad Mini 2 to play Blu-ray movies on Windows/Mac?
How to put DVD ISO/IFO movies on Apple new iPhone 5S/5C?

Monday, February 17, 2014

Choosing The Best 4K XAVC Xideo Converter For Converting XAVC (S) Video Files

Have heard about 4K XAVC or 4K XAVC S format? How to get the best 4K workflow on PC and Mac? Now this article will help you to choose the best 4K XAVC Video Converter for converting XAVC (S) Video Files.

XAVC has been developed as an open format, which means that manufacturers other than Sony can develop their own products based on the technology. Sony then developed another version of XAVC— XAVC S—to put 4K workflows in reach of more and more users in the consumer market as well. XAVC S supports 4K, HD, and proxy workflows, and also utilizes the MPEG-4 AVC/H.264 codec.


It's just as easy to work with XAVC and XAVCS footage in Vegas Pro 12 as it is to work with any other footage, but most media players and portable devices can't support high quality 4K XAVC or XAVC S files loading successfully, then using and external tool is the first step if you want to get any XAVC (S) Videos & Movies playable on PC and Mac.

Luckily 4K XAVC(S) Video Converter comes up to help you! Featured with the most advanced converting technology, Pavtube Video Converter provides the most reliable and professional 4K solutions to all format issues including 4K camcorders, 4K TVs and 4K movies, etc. The Mac version is 4K(S) Video Converter for Mac.

How to convert  XAVC (S) Video Files to compatible and playable format on PC & Mac?

Free Download Pavtube Video Converter Ultimate:

Step 1: Add video files.
Install and launch it the best 4K Video Converter.

Click “Add Video” to load video source. Pavtube Video Converter Ultimate supports video formats and codec like H.264, MPEG-4, MPEG-2, Xvid, TS, AVI, MP4, WMV, MKV, MOV, TOD, M2TS, MTS, MOD, VOB, TiVo and some other codecs.


Step 2: Select output format for converting video to media players and portable devices.
To convert all kinds of video for Android/Windows/iOS Device, click the dropdown list of “Format” and set a correspoding format.

You are recommend you to choose “Common Video > H.264 Video(*.mp4)” which could fit on media players perfectly.


Tip: You can click “Settings” to change the video encoder, resolution, frame rate, etc. as you wish. Keep in mind that bitrate higher results in big file size, and lower visible quality loss, and vice versa.

Step 3: Convert 4K XAVC (S) Video Files.
Click “Convert” button to start convert 4K XAVC or XAVC S videos to mp4 format for most mp4-friendly device. After conversion completes click the “Open” button to find the converted files.

Now the converted videos can be put onto Tablet or Smartphones for entertainment.

Well, this XAVC (S) Video Converter is the best app for you transfer the video or music in any format for viewing with the best video nad audio quality. By using video converter from Pavtube, you are able to play 4K XAVC & XAVC S video files perfectly. It is know as the best 4K XAVC Video Converter.

More:
Top 5 Free Video Converters for Mac OS X
Guide on Sony HDR-AS100V XAVC S/MP4 to iMovie/FCE
Comparison with MP4 and XAVC S from Sony HDR-AS100V

Thursday, February 13, 2014

Enjoy Sweet Valentine's Day with Free and 50% OFF Specials at Pavtube

Get free and 50% off Special Valentine’s Day Gifts and Warmest Wishes from Pavtube now! Valentine’s Day Giveaway begins from Feb 13 to Feb 18, 2014. Never miss!!!
Valentine's Day is the ideal occasion for the modern man or woman to express their love, but it's also one of the biggest gift-giving holiday challenges for many men. There are as many possibilities of romance as there are people in the world, so what you've got for your sweet other half?


Spending a day out dating? Sharing romantic movies? Or you can choose to make a sweet Valentine's Day greeting video or DVD for her/him.

For all these above, you should not miss Pavtube Valentine's Day Giveaway!

Let's see what are prepared for you:

Giveaway:

Media Magician for Mac

Edit videos from any source on Mac to create great video as Valentine gift with touching moments and share on YouTube, play in any players, or further edit in Final Cut Pro with Apple Prores codec.

Free Link: 

http://download.pavtube.com/retain/mediamagicianmac_retain.dmg (For Mac V10.5-V10.6)

http://download.pavtube.com/retain/mediamagicianmac_retain.pkg (For Mac V10.6-V10.8)

Media Magician for Windows

Convert great videos as Valentine gift or memory and share on YouTube, play on iPad, iPhone, or tablets, or edit further in Adobe Premiere in best format.

Free Link: http://download.pavtube.com/retain/mediamagician_retain.exe

Free DVD Creator for Mac

Combine and edit videos and photos in popular formats and create wonderful video DVD as Valentine gift or saving.

Free Link: https://itunes.apple.com/us/app/free-dvd-creator/id565884248?ls=1&mt=12

DVD Creator for Windows

Combine and edit videos and photos from any source and create wonderful video DVD as Valentine gift or saving.

Free Link: http://download.pavtube.com/retain/dvdcreator_retain.exe

Half-price Deals

ByteCopy for Windows or Mac

Backup and convert Valentine Romantic Blu-ray and DVD movies and enjoy the wonderful moments watching them with your lover.

Mac Version

Free Trial: http://pavtubecrm.pavtube.com/download/?s=3cec56a854ce63b0d99a12282301c2de&n=test

Buy Now: https://usd.swreg.org/cgi-bin/s.cgi?s=48737&p=48737-78&q=1&v=0&d=0&rc=45K2D465JE&a=fb-valentine2014

Mac Version

Free Trial: http://pavtubecrm.pavtube.com/download/?s=3aed6a8d0005e4b4bff34c00c9ae166f&n=test

Buy Now: https://usd.swreg.org/cgi-bin/s.cgi?s=48737&p=48737-81&q=1&v=0&d=0&rc=45K2D466XC&a=fb-valentine2014

Source: http://device-camcorder-tips.blogspot.com/2014/02/dont-miss-pavtube-valentines-day-giveaway.html

Wednesday, February 12, 2014

Sony Alpha 7R and iMovie/FCE Workflow- Transcode a7R MTS files to AIC for editing

This article teaches you how to easily convert and import Sony Alpha 7R MTS footage into iMovie or Final Cut Express for further editing on Mac (OS X 10.9 Mavericks included).

Sony is well known for innovating in the camera sphere, basically because it can. The A7R Full-Frame Camera is the world's lightest interchangeable lens full-frame camera. The R in the A7R's name stands for resolution, so the emphasis here is on getting the highest possible picture quality, and it facilitates a host of features including full HD video recording and a quick auto-focus algorithm.

'Our Sony a7R arrived five days ago and we, my wife and I, have had a chance to put the camera through its paces. It is excellent for capturing memories on vacations, birthdays, sports activities. And  it can capture Full 1920 x 1080 HD uncompressed clean-screen video files.' 

However, one problem makes me headache, I cannot get the video files in .MTS (AVCHD) format from my Alpha 7R into iMovie or FCE. What's the problem? How to realize this goal for native editing Sony 1080 60p/60i mts in iMovie or FCE?

Since Apple hasn't added full supported to the 1080/60 mts recordings within iMovie/FCE, and you have to change Sony Alpha 7R MTS videos to iMovie/FCE acceptable AIC .mov format. This is the best solution to import and edit Sony Alpha 7R AVCHD mts footage in iMovie/FCE.

For this case, a professional Sony MTS to AIC application - Pavtube MTS/M2TS Converter for Mac comes to help you which is your first choice to transcode Sony Alpha 7R AVCHD footages to AIC MOV for iMovie. Here is a step-by-step tutorial for your to figure out your Sony Alpha 7R MTS/M2TS iMovie/FCE problem:

Preparations

1. Copy your MTS videos from Sony Alpha 7R to computer hard drive.

2. Free Download Pavtube Sony MTS to iMovie/FCE Converter on Mac, install and launch it.

Brief Steps

Step 1. Drag and Drop source MTS videos to Pavtube Sony MTS to AIC Converter. Or click "Add Video" to import the mts footage from Alpha 7R


Step 2. Set up output format for Sony Alpha 7R AVCHD to iMovie/FCE Conversion.

From "Format" list, choose "iMovie and Final Cut Express > Apple InterMediate Codec (*.mov)" for output.


Step 3. Press the big "Convert" button to start transcoding Sony Alpha 7R AVCHD MTS to AIC MOV for using in iMovie/FCE. The program adopted advanced audio and video sync technology; never let you troubled by the audio and video issues.

Once finished, click "Open" to get converted MOV videos.

Then you could open up iMovie/FCE, and go to "File > Import > Movies…" to import converted video files to iMovie/FCE for further editing.

More Tips:

1. If you want to merge multiple MTS files into one for easy editing, please tick the box "Merge into one file" to merge all the imported clips.

2. In case the MTS footage is taken under interlacing mode, just click "Edit" to go to Video Editor, and hit Effect to select the Deinterlacing and interlacing lines will be eliminated. (Checked by default)

3. This Sony AVCHD Converter for iMovie/FCE optimized its conversion speed with multi-thread technology, so that you can convert the MTS 1.5 or 2 times faster than other similar programs. Its built-in codec will not install any codec on your computer, so as to avoid the unexpected codec problem.

Read More:

Tuesday, February 11, 2014

DNxHD Converter for Avid - Transcode Sony HDR-CX330 MTS to DNxHD for Media Composer and Xpress Pro

Summary: This guide aimed at to solve your issue with importing and editing Sony HDR-CX330 AVCHD footage smoothly in Avid MC and Xpress Pro, just follow it to get your Sony AVCHD footages working in Avid easily with native DNxHD codec.

Rounding up the bottom are the HDR-PJ275, HDR-CX330, and HDR-CX240. Sony HDR-CX330 is a new 9.2 MP Exmor R CMOS sensor Handycam Camcorder from Sony. This device boasts a 2.7 inches Clear Photo LCD display with Full HD 1920×1080 video at 60p and still images.


We were using Avid MC and Xpress Pro to cut the 60p mts footage from Sony CX330, but we had difficulty when importing the video files. Then can't handle the AVCHD files well. some the footage looks washed out and the preview is loggy. This was mainly an issue with Avid. Is there anyway to solve the problem?

As the 1080/60p frame rate is so high and the codec is not friendly to Avid for editing, to edit your Sony CX330 1080/60p MTS in Avid MC and Xpress Pro smoothly, the best solution is to transcode MTS format to DNXHD codec which is best supported by Avid.

What you need:

Pavtube MTS/M2TS converter for Mac which can be used as the best Sony AVCHD MTS Converter. It is free, clean and safe to install and use. With it, you can effortlessly transcode MTS to DNxHD MOV, ProRes, Apple Intermediate Codec, which maximum editing quality and efficiency when working with Avid Media Composer, Final Cut Pro and iMovie, and it works well and converts flawlessly. The Windows version is MTS/M2TS Converter. Below is how.

Convert Sony CX330 1080/60p AVCHD to DNxHD for Avid MC and Xpress Pro


1. Download the top Sony MTS to Avid Converter, follow the prompts to install the program. Run this program. Click "Add" to load Sony CX330 MTS video files or directly drag the files into file list.


2. Click "Format" bar to determine output format. For natively editing in Avid Media Composer and Xpress Pro, you are recommended to choose Avid Media Composer -> Avid DNxHD (*.mov), this format is best for Avid MC and Xpress Pro native editing.


3. (Optional) If you would like to customize the video and audio parameters, you can click "settings", adjust the parameters as you want, like Video Codec, aspect ratio, bit rate, frame rate, Audio codec, sampling rate, bit rate, channels.

4. Click "Convert" to start to convert Sony CX330 60p AVCHD to Avid DNxHD codec for natively editing.

Now you may have known the easy way to convert Sony CX330 MTS to Avid MC and Xpress Pro, after conversion, import the converted video files to Avid MC and Xpress Pro and you can edit it smoothly without problems.
  • Click here to learn how to load the converted DNxHD video to Avid Media Composer. 
  • Clikc here to konw how to import video files to Avid Xpress Pro.
PS:

1. If you need to know more conversion application on MTS video, such as Sony MTS to FCP, you can view Pavtube MTS column which has so many solutions.

2. If you want to watch AVCHD recording MTS videos on your widescreen TV through a regular DVD player, first you need to burn recording MTS to DVD.

Read More:

Sunday, February 9, 2014

Top MTS to FCP Converter- Fast convert Panasonic AG-HMC150 AVCHD to Prores HQ for FCP X

Description: Can't import Panasonic AG-HMC150 mts files to Final Cut Pro X? Follow the article below, you will get to know the easy way to transcode and deinterlace Panasonic AVCHD footage to Prores HQ for editing in FCP X editing.

The Panasonic AG-HMC150 is a camcorder designed to record in high definition on standard SecureDigital (SD) and SHDC memory cards. While SD-based camcorders have been gaining ground in the consumer market, the AG-HMC150 has the ability to record AVCHD images at significantly higher bitrates. The ability to record up to 24Mb/s onto a single SDHC makes the camera not only incredibly versatile, but allows users to record onto inexpensive media.

AVCHD was jointly established by Sony Corporation and Panasonic Corporation in 2006 for use in their digital tapeless camcorders. But practically speaking, importing AVCHD to FCP might be tricky, due to the version of FCP, your Mac processor (PowerPC- or older Intel-based Mac don't support AVCHD editing) , and the model of camcorder. Thus, many users report that they can't import AVCHD files from AG-HMC150 into FCP X using camera import.

I just downloaded a MTS/M2TS Video converter and I'm using it to convert Panasonic AG-HMC150 MTS files into Apple HQ prores 422, yet the converted files look damaged. I attached a photo of what the results look like. I must finish this editing project by tomorrow- please advise!

As MTS recordings are not the preferred format for Final Cut Studio, if you want to edit AVCHD video with high quality on Mac with Final Cut Pro X, you can convert AVCHD to FCP compatibel Prores .MOV before editing.

Here recommend you the top HD Video Converter for Mac which can help you to convert AVCHD to Apple ProRes 422 preserving the original quality that get MTS files to edit in FCP X successfully. Plus, this Mac AVCHD converter also supports converting AVCHD MTS footage to iMovie, Adobe Premiere, Avid Media Composer, Final Cut Express and more to meet your needs. What's more, some easy-to-use editing features like trimming, cropping, adding watermark, deinterlacing, etc are combined with the convert program.

What's more, With Pavtube AVCHD MTS/M2TS Converter for Mac, you can also add *.srt, *.ass, *.ssa subtitle to a video/movie files. Here I share a guide of how to add subtitles and some free subtitle files download website: 
Now, follow the step-by-step guide transcoding and deinterlacing Panasonic AG-HMC150 MTS video to Final Cut Pro X.

Step 1: Free Download and install MTS to FCP Converter to your Mac. It's excellent AVCHD Converter which can convert nearly all Sony/Canon/Panasonic camcorder videos to any formats you need, such as Apple Prores 422 MOV, Apple InterMediate Codec MOV, QuickTime MOV, etc. Then import your AVCHD files.

 movie-to-fcp

Step 2: Click the format bar, and move mouse cursor to "Final Cut Pro > Apple ProRes 422(HQ) (*.mov)" as output format for editing in Final Cut Pro X.


The Apple ProRes 422 (HQ) codec offers the utmost possible quality for 4:2:2 or 4:2:0 sources (without an alpha channel) and provides the following:

  • Target data rate of approximately 220 Mbps (1920 x 1080 at 60i) 
  • Higher quality than Apple ProRes 422 
Tips:

1. You can also select Apple ProRes 422(LT) which will give smaller file size.

Learn more Apple ProRes, please refer to Types of Apple ProRes Codecs
2. You can deinterlace and edit the 1080/60i mts videos in this program before converting to other formats on Mac OS. Trim, crop, add watermark or adjust effect as you want.

By the way, if you need to remove interlace for the media file, just click on "Edit", you will see a Video Editor panel where you are able to easily edit your 1080i HD video by using several powerful editing functions. Click on "Effect" tab, and check the deinterlace option.

Step 3.
Click "Convert" button to start converting/deinterlacing Panasonic AG-HMC150 AVCHD videos to FCP X on Mac OS.

After a shot conversion, you will be able to import mts videos to FCP X  for editing without rendering. With it, you can also get the mts video to recognized by FCP X. Just have a try. Good luck!

Read More: