Tuesday, April 19, 2016

Top 3 Alternatives to Freemake Video Converter for Mac (El Capitan)

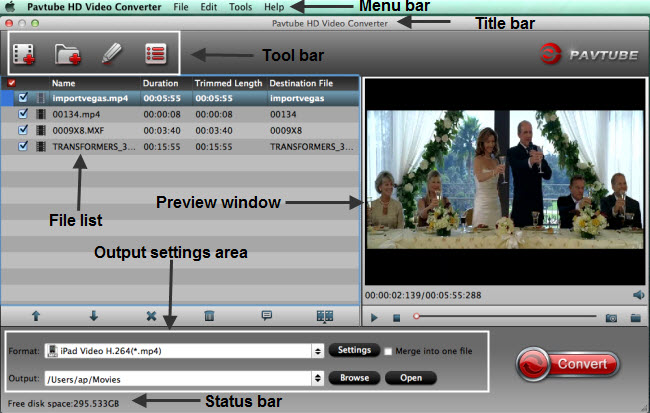
For windows users, it is easy yet excellent to convert videos freely with Freemake Video Converter; while for Mac users, you may be in a great dilemma in case of wondering to put videos on your Mac with this program as this free yet amazing video converter is only designed for Windows8/7/Vista/XP.

In this case, if you’ve dream of converting video on Mac using Freemake, you’d better download an alternative to Freemake for Mac version (El Capitan) beforehand. Anyway, to download Freemake for Mac for video conversion can be a Walkover as long as you own a video converter designed for Mac OS specifically.

SPECIAL FEATURES YOU WANT A GOOOD FREEMAKE ALTERNATIVE TO HAVE
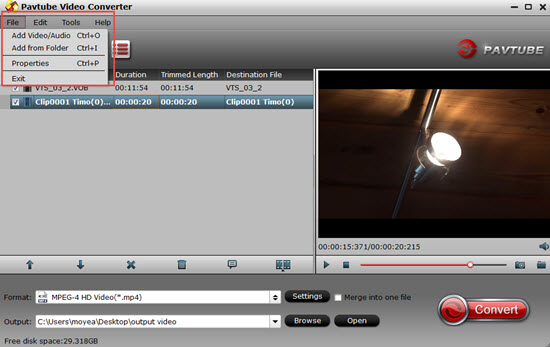
  • Able to read and process many input and output file formats
  • Extract audio from the video source and convert to the format you require
  • Batch processing – let’s you convert several videos at once
  • Profiles to select format, codec, resolution and bitrate
  • High Definition support – able to handle at least 1080p
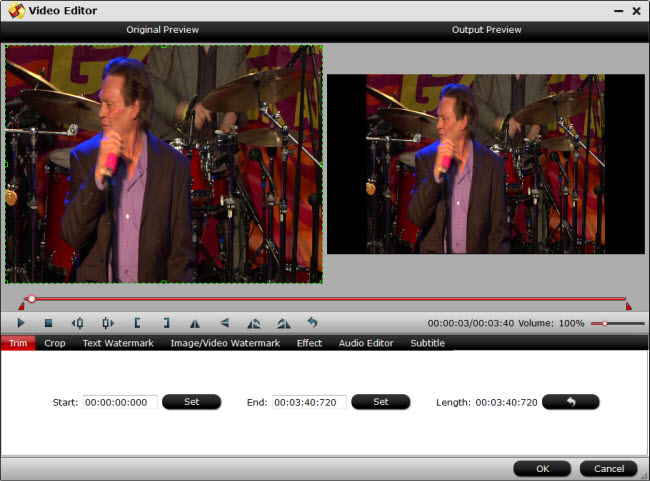
  • Trim head and tail of clips to select only the portions of a video
  • Crop video size and proportion
  • Make screen grabs of still images
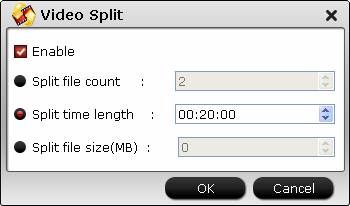
  • Merge or join files into one
  • Adjust video brightness, contrast, color saturation, etc.
  • Preview video effects prior to conversion
  • Watermarking to insert an identification graphic or text during the video
  • Graphics Processing Unit (GPU) acceleration – e.g., NVIDIA-CUDA
  • Speed of conversion – depends greatly on your computer configuration
  • Multi-pass encoding capability to help insure a better quality conversion
  • Fixed or variable bitrate selection
  • Calculator to estimate output size
  • High quality – best video and audio, no sync problems or skipped frames
  • Easy upload to YouTube, Facebook, and other social media sites
  • Able to transfer to a wide range of mobile and other playback devices
Here I'd like to share you top 3 alternative to Freemake Video Converter for Mac computer:

Alternative to Freemake Video Converter
Rank
Top 1
Top 2
Top 3
Products
Pavtube Video Converter
pavtube hd video converter
pavtune imedia converter
Download Trial
Buy
Pricce
$35
$35
$65
Input Files
Video formats (*.avi,*.divx, *.wmv, *.wma, *.asf, *.dvr-ms, *.wav, dts in wav, *.rm, *.rmvb, *.ra, *.mov, *.qt, *.mp4, *.3gp, *.3g2, *.dv, *.m4b, *.m4v, *.m4a, *.aac, *.flv, *.f4v (YouTube, Hulu, Fox, etc.), *.dat, *.mpg, *.vob, *.mod, *.tod, *.mxf (partial), *.mov,*. xavc/*.xavc-s/*.xavc-l from JVC, Panasonic, Canon, Nikon, Sony cameras and camcorders, *.m2v, *.m2t, *.m2ts (Blu-ray), *.ts, *.tp, *.evo, *.mkv, *.dv, *.tivo); Video foramt same as the former two convertes.
Also support:Blu-ray Discs, Blu-ray Folder,
DVDs, DVD Folder, DVD IFO File,DVD ISO Image File
Output Video Formats
H.265/HEVC, H.264/MPEG-4, DivX, XviD, MKV, MP4, AVI, MPEG, WMV, FLV, SWF, F4V, MOV, 3GP, 3G2, VOB, TS, DV, MPEG-2 HD Video (*.mpg), MPEG- TS Video(*.ts), Quick Time HD Video (*.mov), WMV HD Video (*.wmv), Audio-Video Interleaved HD Video (*.avi)
Output Audio Formats
MP3, AAC, FLAC, MKA (MKA(Matroska) Audio), OGG (Ogg Vorbis Audio), WAV(Nokia WAV Audio), M4A, DTS (remux),MP2, AIFF, AMR, SUN AU Format
Output NLEs support
FCP X, FCP 6/7, FCE, iMovie, Apple Aperture 3, Avid Media Composer, Adobe Premiere Pro CC, Premiere Pro CS6/5/4/3, Adobe After Effects CC, After Effects CS6, Adobe Premiere Elements 13/12, Adobe Creative Suite 6/5, DaVinci Resolve Lite(DaVinci Resolve 11), DaVinci Resolve 9, iPhoto, Kdenlive, Keynote, etc.
Output Devices Supported
Apple devices:Apple TV 4/3/2/1, iPad Pro/Air/4/3/2, New iPad Pro, iPad , iPhone 6s plus/6s/6 plus/6/5s/5/4s/4, iPod, iTouch, etc.
Android devices:Samsung Galaxy Tab Series, Galaxy S Series, Galaxy Note Series, Amazon Kindle Fire Series, Google Series, Sony Xperia Z Series, Acer, Toshiba, HTC, LG, Lenovo, etc.
Windows devices:Microsoft Surface 4/3/2, Surface RT/Pro, HTC Windows Phone Series,
Game consoles and media players:PS4, PS3, PS Vita, Xbox 360/One, Wii, WD TV Media player, Seagate Media Player
Others:BlackBerry, Nokia, VTech InnoTab tablets, Kurio, Coby, Kobo, Alcatel, PSP, Archos, Creative Zen, iRiver, etc.
Support Website
YouTube, NAS, Networked Devices, MSN, Myspace, Facebook, Google, Yahoo, Dailymotion, FOX, NBA, Youku, NAS, PowerPoint Rresentation, HTPC, Home Theater, A/V receiver, LCD Projector, Keynote, etc.
Add SRT subtitle.
Merge & Split Video
Trim & Crop Video
Adjust Video frame rate
Adjust Video codec, bitrate
Adjust Aspect Ratio
Adjust Audio codec, channel
NVIDIA CUDA Acceleration?
4K UHD Support
Make screen grabs
Merge or join
Preview video
Watermarking
Speed of conversion
4.8
4.8
4.8
Buy

Conclusion: As the awesome Freemake Video Converter for Mac alternative, Pavtube Video Covnerter for Mac, Pavtube HD Video Converter for Mac, Pavtube iMedia Converter for Mac comes with more excellent features compared with the Freemake itself. If you are eager to find the a freemake for Mac alternative, fell free to take this 3 best Freemake Video Converter for Mac alternative into your consideration.

Freemake Problems Solutions

If you are Windows users with no need of a Freemake alternative for Mac, there are some solutions for solving Freemake problems.

1. If you converted video with Freemake Video Converter and then audio and video are out of sync. The video doesn't match the sound. How to fix it?

A: First make sure you are using the latest version of Freemake video converter and the original video has no issues. If both are OK, go to File->Options->Acceleration in the program and uncheck all accelerations, which may help.

2. Freemake not working. You use Freemake to convert the videos for DVD, but the images, when being played back, disappeared from time to time. What is the problem?

A: From feedback of some users, Freemake video converter is not well compatible with Windows XP OS or 32-bit version. It works fine in WIN 7 OS, but we are not sure if it supports Win 10 or not. To prevent such problems in the very beginning, try Freemake alternative for Windows.

Read More:

Tuesday, April 12, 2016

How to Fix VLC Player Audio Sync Problems on Windows/Mac

Many of the time when we download a video clip or a movie, we find that the audio does not sync with the lips movement of the characters or the audio and video does not match in VLC Player. This kind of video clip/movie is very frustrating to watch. However we can fix such issue and make our video clip play in sync with the audio. 

How to Fix audio out of sync and syncing issues when playing a video file in VLC:

You’ll obviously need the VLC app to do this, VLC is cross platform and available for just about everything from Mac OS X to Linux and Windows and iOS, so you’ll be good to go with whatever you use.

How to Fix vlc audio sync on Windows laptop:

– Open the downloaded Video Clip in VLC. Right click on the video clip and select Open With..Select VLC from the list. 

– If the Audio comes before Video, we need to slow the audio, so press fn+K key (On laptop). Each combi keystroke will reduce the audio speed by 50ms. So keep dong it until you see the video and audio are sync. 

– If the Audio comes after the video, we need to make the audio fast, so press fn + J (On laptop) key. When you invoke the shortkey the screen will show the delay amount as shown in the below image: 


How to Fix vlc audio sync on Windows desktop:

If you have a desktop, you can try the Ctrl + K and Ctrl + J key respectively for the same result. If the shortkey key does not work , we can change the settings from preferences as follows:

– Open VLC player and click on Tools > Preferences 
– On preferences window, click on All under Show settings, Select Audio from left. 
– On the right pane look for the option Audio desynchronization compensation 

Put a negative or positive value in the box towards right…depending upon the situation.

How to Fix vlc audio sync on MAC?

For fixing the issue on MAC, the solution is quite simple. We can use the shortcut keys on the MAC for slowing and speeding the audio track to align with the video:
  • F – Slow audio by 50ms
  • G – Speed audio by 50ms
When you press F Key, the Decrease Audio Delay in milliseconds will get in work, while the G Key will Increase Audio Delay in milliseconds. So, depending on the delay or ahead of audio with the video, all you need is to press the keys and get the work done easily. G Keys moves the Audio forward while F key will move the Audio Backward.

Once-for-All Solution to Permanently Fix VLC Audio Sync Problem

Majority of the audio and video out of sync issue are because of improper encoding format while ripping the video. The solution has been tested with downloaded video clip, so I am not sure if it will work with such issue in all videos.

Generally speaking, applying keyboard shortcut or VLC's preference can fix the usual audio not syncing with video problem in VLC. But everything happens for a surprise. Sometimes, there are also certain cases VLC can't handle, e.g., the original video itself has serious audio delay problem; the audio out of sync problem too severe to fix. 

In fact, there is simple way to solve VLC Player audio out of sync problem.

Using Pavtube Video Converter / Mac Version will be fix this problem with ease. In this app, you can choose any popular codec to avoid audio out of sync problem. And in profile settings, you can reset video and audio size, bitrate,etc to get better video quality. You can preserve 5.1 sound with it when outputting video. 

This VLC Alternative APP can easily rip all video to H.265, M3U8, AVI, MOV, MP4, etc to provide compatibility for free entertainment with various devices(iPad ProiPhone 6/6s/6 plus/6s plus, Samsung Galaxy S7/Edge), HD media players(VLC, Windows Media PlayerQuickTime), as well as free access to video editing software(FCPiMovie,PremiereAvidSony Vegas).

The trail-before-purchase Pavtube Video Converter(windows/mac version) is supported, just feel free to try it, it is 100% clean and safe:


Pavtube Video Converter is not only a video converter program, but also a simple and easy video/audio editor. In Audio Editor, you can either replace/remove original audio, or set audio fade in/out effects.


For more details on how to load files, preview & take snapshots, select output format, merge & split, edit video and start conversion. Please turn to Pavtube Video Converter Getting Started Tutorial(Win/Mac).

If you have any question or problem about our products, or get the Bundles& Deals for saving money, please feel free to contact us with the email below:
Money Saving Bundles&Deals

If you are a shutterbug and have got yourself kinds of videos or have a large collection of your favorite video, the below two tools should be take into your consideration when handle with the video clips, for playing, for editing, for sharing...


iMixMXF/MultiMixer + Video Converter

iMixMXF/MultiMixer Key Features:

-Import/preserve/mix multi-track MXF in MKV/MP4/MOV formats. 
-Output multi-track Apple Prores MOV for further editing in Final Cut Pro (X). 
-Support DVCPRO/HDV/Avid DNxHD/AIC output 
-Convert MXF to any other formats for editing, playing, or broadcasting. 
-Merge/split/trim/crop MXF footages. 

Video Converter Key Features: 

-Convert from and to any common SD/HD video and audio format. 
-Support Apple ProRes/DVCPRO/HDV/Avid DNxHD/AIC encoding. 
-Output formats for Mac editing software, e.g. FCP, iMovie, FCE, Avid, Adobe... 
-Output formats for different playback devices.


Read More:

Tuesday, April 5, 2016

Edit QuickTime MOV, iPhone MOV, camera MOV Files to Avid Media Composer

How to import MOV files(from Apple Quicktime, iPhone video, 4k from camera) into Avid Media Composer for editing without problems. Well, although Avid claimed it supports MOV, it indicate the Avid DNxHD codec .*mov. For other codec, such as the Quicktime, iPhone video, 4k from camera .*mov files, how to import into Avid Media Composer for editing?


QuickTime MOV vs Avid Media Composer

To import QuickTime MOV files to Avid Media Composer, you will need a QuickTime AMA Plug-in, which is automatically installed when you first install your Avid editing software. The QuickTime AMA Plug-in is designed to read any Quicktime movie that will play in the QuickTime Player, however, some uncommon movies may not be supported. And the QuickTime files supported by QuickTime AMA Plug-in must meet the following specifications:

1)The QuickTime movie must contain video using only a single codec, if your timeline contains shots that use different codec, the resulting export will be mixed media and will not AMA link. If you timeline uses a single codec only, then a same as source export will create a movie of a single codec type, will will AMA link.

2) The QuickTime audio and video tracks must be the same length.

3)The file contains a maximum of 24 audio tracks.

Therefore, if the QuickTime files you are going to edit with Avid Media Composer do not comply with the above mentioned specifications, you will be not be able to get QuickTime MOV to Media Composer with QuickTime AMA Plug-in.

iPhone .*mov vs Avid Media Composer

As far as we know, the iPhone (including iPhone 6S, iPhone 6S Plus, iPhone 6, iPhone 6 Plus, iPhone 5S, iPhone 5, iPhone 5C, iPhone 4S, etc.) records in MOV files compressed with H.264 codec. The H.264 codec is a final delivery codec; it is not one you want to use for editing in Avid Media Composer. To fix the problem, the easy workaround is transcode iPhone MOV to a more editing-friendly format, such an Avid's DNxHD.

Camera .*mov vs Avid Media Composer

Well, it is good for us to take high quality images and record vivid 4k and full HD videos with a good camera. A camera may include CMOS sensor, AF system, give photographers the best balance of performance, precision and low-light ability, and it mainly encodes footage save as the MOV container format with H.264 codec. According to the different specs of the different camera brands, we usually saw the camcorder users encounter importing issues when attempting to edit MOV footage with Avid Media Composer like import it slowly, and couldn't edit videos smoothly.

All-in-one solution to import .*mov files to Avid Media Composer

To solve this problem, you can transcode QuickTime MOV, iPhone MOV, camera MOV files to Avid Media Composer native support DNxHD codec, which deliveries both high efficiency and quality without compromise. For the .*mov files to DNxHD codec task, we recommended Pavtube HD Video Converter for Mac(read the review) for you. An Avid preset “Avid DNxHD” is included in the converter, you should then be able to import the converted QuickTime MOV, iPhone MOV, camera MOV files into Avid with smooth editing without any trouble. 

Besides Avid, this video converter also provides the presets like ProRes for Final Cut Pro, Apple InterMediate Codec(best format) for iMovie and more. 


Other Download:
Download and install Pavtube HD Video Converter on Mac (compatible with Mac OS X 10.11 El Capitan, 10.10 Yosemite, 10.9 Mavericks, 10.8 Mountain Lion, 10.7 Lion, 10.6 Snow Leopard, 10.5 Leopard and lower versions). Run this program, you will find the interface is very brief, this program is very easy to use.

If you are running on Windows, please turn to the alternative Windows version - Pavtube HD Video Converter.

Steps: Convert QuickTime MOV, iPhone MOV, camera MOV to Avid DNxHD

Step 1. Add files.

Click "Add Video" button to load QuickTime MOV, iPhone MOV, camera MOV files files to the program. You can also directly drag the videos files into the program directly.


Step 2. Select output format.

From "Format" drop-down lists, you can select Avid Media Composer preferable editing codec from "Avid Media Composer" > "Avid DNxHD(*.mov)" as the output format.


Tip: If you like, adjust video and audio parameters, including the Bitrate of Video and Audio, the Codec of Video and Audio, Video Size, Sample Rate, Frame Rate, Audio Channels, etc., by clicking the Settings button on the main interface for getting the best quality.


Step 3. Start the conversion.

Finally, simply hit the big Convert button to start converting QuickTime MOV, iPhone MOV, camera MOV files to Avid Media Composer friendly video formats. 

Within several minutes, you can find the converted file on your computer by clicking the "Open" button. And then you can import the new(converted) files to Avid Media Composer easily.

Related program:

If you have the camera recorded video in MXF, AVCHD(MTS/M2TS) container or codecs, the list best two MXF Converter / MTS/M2TS Converter should be take into your consideration!

Pavtube MXF Converter / Mac Version: can handle MXF/MXF footage produced by Canon, Sony and Panasonic camcorders and convert MXF video files to various video format supported by popular devices such as iPad Air/4/3, iPhone 5S/5C/5/4S/4, Apple TV 3, Google Nexus, Samsung Galaxy Tab S/3/2, Samsung Galaxy S5/S4/S3, Surface RT/Pro, PS4/PS3, WDTV, etc. >> Import HD MXF for Avid Editing

Pavtube MTS/M2TS Converter / Mac Version:The best AVCHD(MTS/M2TS) converter on the market, which can convert AVCHD(MTS/M2TS) videos and other HD formats to FCP X Apple ProRes codec MOV format, or convert AVCHD(MTS/M2TS) to Avid Media Composer/Adobe Premiere Pro/iMovie native supported video format. >> Convert Sony AVCHD MTS/M2TS clips to DNxHD MOV for Avid

Editor's Recommendations

Friday, April 1, 2016

How-to: Edit AVI in Adobe Premiere Pro

AVI to Adobe Premiere Pro issue

Having problems importing AVI file types into my Premiere Pro project. I will go to import the folder and the yellow loading bar will come up to say that it's importing. How to deal with this problem?

When I try to import any video file (e.g. AVI files) in Adobe Premiere Pro cc, I get this error: “codec missing or unavailable”.


Hot SearchPlay AVI file through Plex | BUP, VOB, & IFO files to AVI | Play AVI on Kodi | AVI on Android

Adobe Premiere Pro supported video & animation formats

If you want to import and edit video in Premiere Pro, you need to know what video format can import into Premiere Pro on Windows and Mac. Below content will show you the some requirement common format.

AVI (DV-AVI, Microsoft AVI Type 1 and Type 2); DV (raw DV stream, a QuickTime format); FLV and F4V (excluding video encoded with the Sorenson Spark video codec);  MOV (QuickTime Movie; in Windows, requires QuickTime player); MP4 (QuickTime Movie, XDCAM EX); MPEG, MPE, MPG (MPEG-1, MPEG-2)

Why AVI files can't  import to Adobe Premiere Pro

As we know, AVI is just a container for a video format, and can contain videos encoded in different formats. The error you're seeing says that Adobe Premiere does not know how to process the video format that's within the AVI file, that is to say, AVI codec is not recogonized by Premiere Pro.

How to import AVI files to Adobe Premiere Pro

To find out the codec for the file, examine it using a tool like QuickTime or VLC and see if you can use the Inspectors in these to get the video and audio codecs for your file. If these two don't work, you would have to find a third program to transcode AVI to Premiere Pro most supported MPEG-2 format.

There are many converters available on the net, Pavtube Video Converter (Review)is high recommended here, which enables you to encode AVI to Premiere Pro compatible format without any quality loss. Besides AVI, this program can also help to convert between any popular video and audio formats as you need. Plus, with the built-in video editing feature of the program, you can trim, crop, add watermark, insert subtitles to your video files.

The trail-before-purchase is supported, just feel free to try it, it is 100% clean and safe:


How to Convert AVI Files to MPEG-2 for Adobe Premiere Pro

Download and install Pavtube Video Converter on your PC (compatible with Windows 10, Windows 8, Windows 7, Windows XP, Windows Vista, and Windows 2000). Run this program, you will find the interface is very brief, this program is very easy to use.

Step 1: Import AVI clips to the program through “Add Video” button or “Add from folder” button. If you like, check the “Merge into one” box to join AVI clips together. 


Step 2: Choose output format. This video converter offers optimized format preset for Adobe Premiere. Just click “Format” menu firstly and then follow “Adobe Premiere/Sony Vegas” to set MPEG-2, MOV or WMV format. 


Tip: If the default settings do not fit you requirement, you can click “Settings” icon to and enter “Profile Settings” panel to adjust video size, bit rate, frame rate, sample rate and audio channels. 

Step 3: Click “Convert” button to start encoding AVI to MPEG-2(.mpg) for Adobe Premiere Pro. 

When the AVI to Adobe Premiere Pro conversion task is finished, click “Open” button to get the exported files for transferring to Premiere Pro with easy playback or editing. 

Related program:

Pavtube HD Video Converter / Mac Version: It is designed for converting HD videos from HD camcorders or DVs (like JVC, Panasonic, Sony and Cannon), non-protected HD or movies, DVR files (*.tivo) to other file types for playback on popular media devices like Apple TV, PS3, Xobx, Xobx360, WD TV HD Player.

Pavtube Media Magician / Mac Version: A nice camcorder assistant manager, lossless camcorder video joiner, MTS/ M2TS/ MXF/ MOV/ MKV/ TiVo/ WMV/ AVI/ MPG converter and editor. Meamwhile it supported upload edited video to YouTube directly.

Read More:

Tuesday, March 29, 2016

Lovely Easter Deal - 20% OFF Best Video to TV/Media Server Converter

Have you planned your shopping list for the upcoming Easter? If you plan to purchase a 2D/3D Blu-ray Ripper, DVD Ripper, Video Converter or a 4K Compressor at Easter with a lower price, just consider Pavtube Video Converter Ultimate. This Pavtube product can fulfill all your needs on media processing and with Pavtube Easter Coupon, you just need to play $52. 


This discount offering is to show gratitude to valued customers and potential users of Pavtube software. If you are familiar with the Blu-ray/DVD/Video converter market, you will know that this Video Converter Ultimate discount is the biggest Pavtube can give at Easter since Pavtube Video Converter Ultimate contains the function of a Blu-ray Ripper +DVD Ripper + Video Converter + 4K Compressor + H.265 Decoder&Encoder. Its normal price is the highest among many video programs.  

What can Pavtube Video Converter Ultimate do?

1) 1:1 Backup Blu-ray/DVD without region code or protection limit in two clicks. 

2) Rip Blu-ray/DVD into H.265/HEVC, M3U8, MP4, Apple ProRes, DNxHD, MOV, M4V, MOV, MKV, AVI, Xvid, Divx, VOB, MPEG-2, SWF, FLV... for playback on smartphone, tablet, TV set, HD media player, streaming server, Hard drive, Game console, or edit in Final Cut Pro, iMovie, Adobe Premiere Pro, Avid Media Composer, etc. 

3) Convert Canon/Sony/Panasonic/Nikon/JVC/Blackmagic/Red One shooted H.265, XAVC, XAVC S/L, MXF, MOV, AVCHD, AVI, MP4, VOB footages into common video formats, so you can watch or edit them on PC/Mac. 

4) Compress 4K to 1080P, 720P and allows you to adjust video/audio bitrate, frame rate, codec, sample rate to get more compatible video for Apple TV 4Amazon Fire TV (2015)VLCPC

This Pavtube Easter coupon will expire on the ending of March, the price will go back to the original $65. But in PavtubeFacebook, you still can get Pavtube Black Friday & Thanksgiving Coupon and special offer for each weekend. 

Src: http://best-tablet-converter.com/2016/03/24/pavtube-video-converter-easter-coupon/

Pavtube Video Converter Ultimate Guides:

Monday, March 28, 2016

How to Put MP4 Footage into Avid Media Composer?

How can I put MP4 footage into Avid Media Composer?

I’m using a HP PC. I don’t know how to Import YouTube downloaded MP4 videos into Avid Media Composer. I’m not too familiar with AMA Plug-ins since it’s first time.

What’s AMA Plug-in?

Avid Media Access(AMA) is a revolutionary plug-in architecture that greatly accelerates your file-based video workflows. With it, you can simply connect a supported manufacturer's media card, disk, or device and begin viewing and cutting footage right away. No need to transcode media or use other software to view the extra clips. 

However, in Avid’s official page, we don’t find the AMA plug-in for accessing and editing MP4 files, it also means that you will need to perform a codec transcoding process before loading MP4 files into Avid Media Composer for post-production workflow.

Best video editing codec for Avid Media Composer

To achieve a high performance and high quality post-production workflow, you’re recommended to utilize the Avid DNxHD codec, which is a HD codec technology engineered to create mastering quality at dramatically reduced file size. It helps to delivery both efficiency and quality without compromise. To get the job easily completed, you can seek help with this  beneficial application called Pavtube Video Converter for Windows/Mac(support Mac OS X El Capitan) which enables you to directly encode MP4 files to DNxHD for Avid Media Composer fast and fluid post-production video working flow.

Besides MP4, the program also helps transcoding other incompatible file formats such as AVI, WMV, AVCHDMXF, XAVC/XAVC S, etc into Avid. If you plan to move your Blu-ray/DVD disc into Avid, just download Pavtube Video Converter Ultimate for Windows/Mac to get the job done.

Trim/Crop/Merge MP4 files

Before loading files into Avid Media Composer for professional editing, you can do some simple video customizing work with the program. With the trimming tool, you can cut away those segments you don’t like, with the merging tool, you can join all the separate video clips into single one, and the splitting option assist you to split large file into small ones by file size. 

Windows version


Mac version


How to Convert and Load MP4 Footage into Avid Media Composer?

Step 1. Load MP4 files into the program.
Run the program on your computer and click "File" > “Add Video/Audio” or “Add from Folder” to add MP4 files to the program.


Step 2: Choose best editing codec for Avid.

Click “Format” bar, from its drop-down list, navigate to the “Avid Media Composer” main category, from its extended list, select “Avid DNxHD 1080p(*.mov)” as the native editing codec for Avid.
http://www.multipelife.com/wp-content/uploads/2015/11/choose-output-file-format1.jpg
Output Avid best supported editing codec

Step 3: Trim/Merge/Split MP4 files.
Trim video length: Open “Video Editor” window and switch to the “Trim” tab, you can drag the slider bars to include the segment you want to remain, click the left square bracket to set start point, and click the right square bracket to set end point when previewing the video or directly input specific values to “Start” and “End” box.


Merge several videos into one: On the main interface, check  option to combine all your separate Halloween video clips into one single file.

Split file into small pieces: Click the “” button  under file list to launch the “Split” window. Checking “Enable” to enable it, and then you can split the file by file count, time length, or file size.


Step 4: Begin the video conversion process.
Go back to the main interface, hit right-bottom convert button, you can now begin the conversion from MP4 to Avid DNxHD immediately.

When the conversion is completed, click “Open Output Folder” on the main interface to pop out the folder with converted files. Now, you have no limitation to import files to Avid Media Composer for professional editing.

Related articles:

Import Panasonic HVX2000A MXF Files to Avid MC for Editing
Working with Slow Motion MXF videos in Avid Media Composer
Avid Workflow: Convert DVD for editing in Avid Media Composer
Sony F55/F5 XAVC 4K videos and Avid Media Composer, Xpress Pro workflow