Aperture is a photo editing and management computer program developed by Apple Inc. The software handles a number of tasks common in post-production work such as importing and organizing image files, applying corrective adjustments, displaying slideshows and printing photographs. Features of Aperture include non-destructive editing, organization of photographs by keyword, faces, and places, brushes for applying effects, and exporting to several popular websites such as Flickr, Facebook, SmuMug and Apple’s iCloud.
Work Sony PXW-FS5 4K XAVC/AVCHD with Aperture 3
Apture 3 works with a wide variety of video formats. But not all QuickTime-compatible video formats are supported and some other compression options, codecs and frame rates are not supported. People who have difficulty to import Sony PXW-FS5 4K XAVC/AVCHD to Aperture 3 may caused due to the incompatible codec.
Like other professional video editing programs, Aperture 3 has its own preferable editing codec. To get a fast and fluid workflow of Sony PXW-FS5 4K XAVC/AVCHD with Aperture 3, the most effective solution is transocde 4K XAVC/AVCHD to Apture 3 native compatible editing codec.
For high output file quality and fast conversion speed consideration, here, we recommended you to download Pavtube HD Video Converter for Mac (Top 5 best video converter for Mac), a reliable and high appreciated application which help you transcode Sony PXW-FS5 to Aperture 3 editable MPEG-2, WMV or MOV formats.
Since the Aperture software will be discontinued from the Mac Store, you can also move PXW-FS5 video footage to other professional editing program such as iMovie, Premiere Elements, After Effects CC, etc for best post-production workflow with the assistance of our program.

 Other Download:
- Pavtube old official address: http://www.pavtube.com/hd-video-converter-mac/
- Amazon Store Download: http://www.amazon.com/Pavtube-Video-Converter-Mac-Download/dp/B00QI9GNZS
- AppStore Download: https://itunes.apple.com/de/app/pavtube-hd-video-converter/id502792488?mt=12
- Cnet Download: http://download.cnet.com/Pavtube-HD-Video-Converter/3000-2194_4-76177786.html
Transcode Sony PXW-FS5 4K XAVC/AVCHD for best workflow with Aperture 3
Step 1: Add Sony PXW-FS5 video footage to the program.
Run the program on your computer, click “File” > “Add Video/Audio” to import Sony PXW-FS5 XAVC/AVCHD video footage to the program.
Other Download:
- Pavtube old official address: http://www.pavtube.com/hd-video-converter-mac/
- Amazon Store Download: http://www.amazon.com/Pavtube-Video-Converter-Mac-Download/dp/B00QI9GNZS
- AppStore Download: https://itunes.apple.com/de/app/pavtube-hd-video-converter/id502792488?mt=12
- Cnet Download: http://download.cnet.com/Pavtube-HD-Video-Converter/3000-2194_4-76177786.html
Transcode Sony PXW-FS5 4K XAVC/AVCHD for best workflow with Aperture 3
Step 1: Add Sony PXW-FS5 video footage to the program.
Run the program on your computer, click “File” > “Add Video/Audio” to import Sony PXW-FS5 XAVC/AVCHD video footage to the program.
 Step 2: Define output file format.
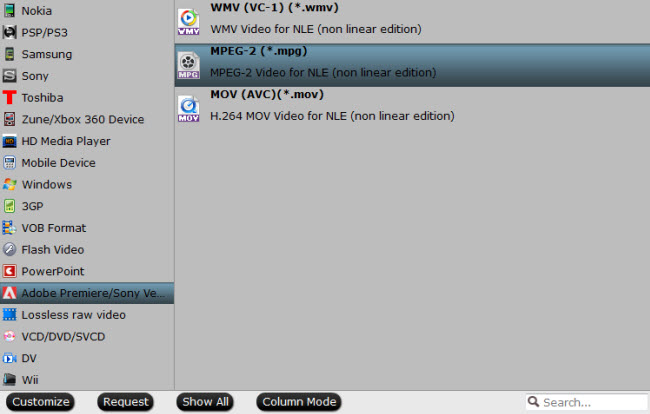
You can output Sony PXW-FS5 XAVC/AVCHD to Aperture best compatible editing format by following “Format” > “Adobe Premiere/Sony Ve...” > “MPEG-2(*.mpg)” format.
Step 2: Define output file format.
You can output Sony PXW-FS5 XAVC/AVCHD to Aperture best compatible editing format by following “Format” > “Adobe Premiere/Sony Ve...” > “MPEG-2(*.mpg)” format.
 Step 3: Edit Sony PXW-FS5 video files.
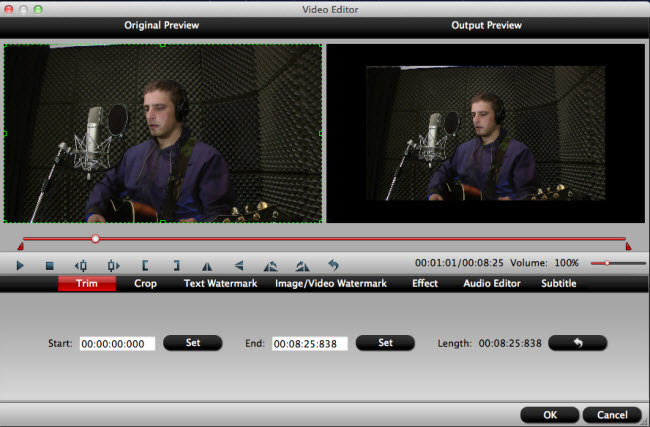
The program offers some basic video editing functions to allow you trim video length, crop video file size, add text/image watermark, insert subtitle, apply special effect, replace/remove audio, etc.
Step 3: Edit Sony PXW-FS5 video files.
The program offers some basic video editing functions to allow you trim video length, crop video file size, add text/image watermark, insert subtitle, apply special effect, replace/remove audio, etc.
 Step 4: Convert Sony PXW-FS5 XAVC/AVCHD to Aperture 3.
Go back to the main interface and hit right-bottom “Convert” button to start the conversion process.
When the conversion is done, feel free to import Sony PXW-FS5 4K XAVC/AVCHD to Aperture 3 on Mac for cinematic post workflow.
Further Reading:
How to import AVCHD/MTS/MKV/AVI/MXF to Aperture 3 on Mac
Load MP4 files from GoPro Hero 3 to Apple Aperture 3 for editing
Transfer Sony XDCAM EX MP4 footage to Aperture 3 on Mac Mountain Lion 10.8
Sony PMW-200 XDCAM Workflow: Importing MXF to FCP or Aperture 3
Import Ikegami GFCAM HDS-V10/HDN-X10 MXF to Aperture 3]/url]
Step 4: Convert Sony PXW-FS5 XAVC/AVCHD to Aperture 3.
Go back to the main interface and hit right-bottom “Convert” button to start the conversion process.
When the conversion is done, feel free to import Sony PXW-FS5 4K XAVC/AVCHD to Aperture 3 on Mac for cinematic post workflow.
Further Reading:
How to import AVCHD/MTS/MKV/AVI/MXF to Aperture 3 on Mac
Load MP4 files from GoPro Hero 3 to Apple Aperture 3 for editing
Transfer Sony XDCAM EX MP4 footage to Aperture 3 on Mac Mountain Lion 10.8
Sony PMW-200 XDCAM Workflow: Importing MXF to FCP or Aperture 3
Import Ikegami GFCAM HDS-V10/HDN-X10 MXF to Aperture 3]/url]
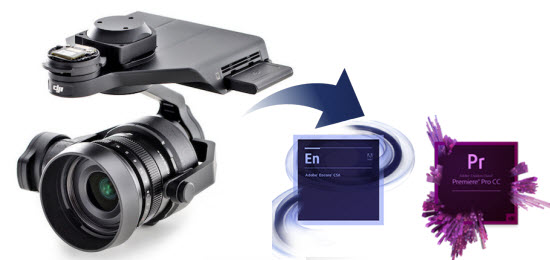
More cameras and camcorders which can recorded 4K Ultra HD videos are released this year, including the new ZENMUSE X5 series. DJI has officially launched the Zenmuse X5 and X5R, two new cameras for DJI’s Inspire One that are the world’s first commercial Micro Four Thirds (MFT) cameras designed specifically for aerial use. Featuring increased dynamic range, interchangeable lens compatibility, remote focus and aperture control, and lossless 4K RAW video recording, the ZENMUSE X5 series is ready to take on the high-performance world of aerial photography with two distinct models.
 Zenmuse X5R:
- Lossless cinema 4K RAW video
- Record at 4096x2160 (24fps) or 3840×2160 (30/25fps)
- Average 1.7 Gbps bitrate (2.4Gbps maximum)
- Removable 512GB SSD
- 16MP photographs
- 12.8 stops of dynamic range
Zenmuse X5:
- 4K video at up to 30fps
- Record at 4096×2160 (24fps) or 1920x1080 (60fps)
- 16MP photographs
- 12.8 stops of dynamic range
What if ZENMUSE X5R or ZENMUSE X5 owners would like to import and edit their 4K videos in editing software including Premiere Pro CC on Mac for sharing with your family and friends. But you should know 4K videos can’t be added into Premiere Pro CC or other these editing software directly, in this cases, you’d better convert your Zenmuse X5 or X5R 4K videos to Premiere Pro CC supported video format on Mac.
Pavtube HD Video Converter for Mac is a powerfull All-in-One video solution software. It can solve all video-related problems efficiently, such as editing, merging, cutting, trimming and converting your 4K Videos with great image and sound quality for editing in Adobe Premiere Pro CC, Premiere Pro CS6/CS5/CS4/CS3, Affect Effects CC/CS6, Premiere Elements 13/12, Creative Suite 6/5 as well as FCP, iMovie, Avid Media Composer, DaVinci Resolve Lite(DaVinci Resolve 11), DaVinci Resolve 9, iPhoto, Kdenlive, Keynote, Aperture 3, etc., and without audio delay issues. Especially, it support conversion of over 150 Formats Including 4K/3D, more functions below:
- HD/4K/3D footages generated by DJI, Sony, Samsung, Canon, Nikon, Panasonic, and JVC can also be handled easily.
- Convert to Over 150 Formats Including 4K/3D.
- Output considerable video formats supported by different devices such as Non-linear editing system, Apple/Android/Windows series, game consoles, and media players.
- Audio and video sync technology: The adoption of audio and video technology allows you to enjoy output videos.
- Inserting SRT/ASS/SSA subtitle: Load your prepared SRT/ASS/SSA subtitle on the editing interface for better enjoyment.
- APEXTRANS technology converts files 6x faster than competitor products.
- Edit, Enhance & Personalize Your Videos File.
- The user-friendly interface can make you use it masterly without the complicated process.

 Other Download:
How to edit Zenmuse X5/X5R 4K video in Adobe Premiere Pro CC?
Step 1. Import Zenmuse X5/X5R 4K video.
Click the "Add Video" button or "Add from folder" button to import source Zenmuse X5/X5R 4K video files to the program. You can add multiple video clips at one time.
Step 2. Choose optimized video format.
Click the "Format" bar, and you will find various video formats sorted by various programs/devices. For Adobe Premiere Pro, it should be "Adobe Premiere > MPEG-2(*.mpg)" or "MOV (AVC)(*.mov)".
Other Download:
How to edit Zenmuse X5/X5R 4K video in Adobe Premiere Pro CC?
Step 1. Import Zenmuse X5/X5R 4K video.
Click the "Add Video" button or "Add from folder" button to import source Zenmuse X5/X5R 4K video files to the program. You can add multiple video clips at one time.
Step 2. Choose optimized video format.
Click the "Format" bar, and you will find various video formats sorted by various programs/devices. For Adobe Premiere Pro, it should be "Adobe Premiere > MPEG-2(*.mpg)" or "MOV (AVC)(*.mov)".
 Step 3. Edit Zenmuse X5/X5R 4K video.
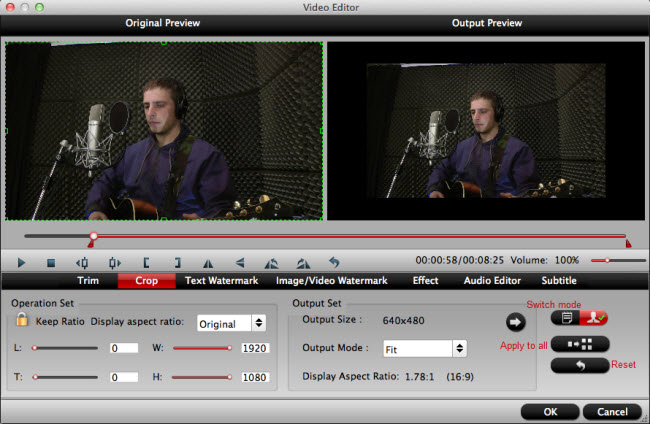
Open "Video Editor" window, here you can trim video length, crop video file size, apply special effect, add image or transparent text watermark, add subtitles, replace or remove original audio, etc.
Step 3. Edit Zenmuse X5/X5R 4K video.
Open "Video Editor" window, here you can trim video length, crop video file size, apply special effect, add image or transparent text watermark, add subtitles, replace or remove original audio, etc.
 Step 4. Convert Zenmuse X5/X5R 4K to Premiere Pro CC.
Click the "Convert" icon under the preview window, it will start to convert Zenmuse X5/X5R 4K video to Adobe Premiere supported format.
After conversion completes, you can easily import Zenmuse X5/X5R 4K video to Premiere Pro CC for smoothly editing as you want.
Further Reading:
Step 4. Convert Zenmuse X5/X5R 4K to Premiere Pro CC.
Click the "Convert" icon under the preview window, it will start to convert Zenmuse X5/X5R 4K video to Adobe Premiere supported format.
After conversion completes, you can easily import Zenmuse X5/X5R 4K video to Premiere Pro CC for smoothly editing as you want.
Further Reading:
Motorola's flagship Moto X Pure Edition (2015) is available since September, 3. The new Moto X features a large 5.7-inch Quad HD display, 21-megapixel camera, and it is powered by a 6-core Snapdragon 808 processor and 3 GB of RAM which runs Android 5.1.1 Lollipop. Total storage will come in three variants: 16 GB, 32 GB, and 64 GB. What surprises me most is its ability of capturing 4K videos, now users can not only record videos in 1080p HD video (60 fps), they can save 4K video (30fps) on the new Moto X Pure Edition in much high video quality.
Since Moto X Pure Edition can record 4K videos, if you've got some 4K footages, you may be curious how to edit those impressed 4K videos in iMovie without hassles. Currently, most 4K movies are recorded in MXF/RAW/XAVC/XAVC-S format and they're not supported by iMovie very well. If you import Moto X Pure Edition 4K video to iMovie, you may encounter the following situation: have to wait for rendering, raw footage can't be recognized by iMovie and etc.
How to import Moto X Pure Edition 4K videos in iMovie?
To get Moto X Pure Edition 4K videos imported in iMovie, we need Pavtube HD Video Converter for Mac. It is a profession 4K video converter to provideo users the most reliable and professional 4K solutions to all format issues including 4K XAVC/XAVC S, 4K MTS, 4K MP4, 4K MOV, 4K MXF and more. Pavtube 4K Video Converter for Mac not only can help you convert Moto X Pure Edition 4K videos into AIC MOV for iMovie, but also can transcode the 4K videos into other NLEs professional codecs, like Apple ProRes to FCP, DNxHD for Avid, MPEG-2 for Premiere .etc. Moreover, it can help you freely enjoy your 4K videos/movies, 4K YouTube clips, 4K camcorder recordings wherever you like, such as watching 4K videos (in any format) on 4K TV and even on mobile devices. Besides, this Mac 4K converter is also available to customize the output resolutions to any size like 1080p, 2K, 4K as users want.
Download and install the 4K Video to iMovie Converter on your Mac or iMac:
Other Download:
Guide: Import and edit Moto X Pure Edition 4K videos in iMovie on Mac OS X
Step 1. Launch the best 4K Video to iMovie Converter on Mac. Click "Add Video" button to load source 4K video files, or directly drag & drop the files onto the main interface. You can load several files at once thanks to "Add from folder" button, note that batch conversion is supported.
 Step 2. Select the right formats for editing in iMovie. Click "Format" preset and choose "iMovie and Final Cut Express -> Apple InterMediate Codec (AIC) (*.mov)" as best video format for editing Moto X Pure Edition 4K video in iMovie as well as good video quality.
 Tips: Adjust video and audio parameters, including the bit rate of video and audio, the codec of video and audio, video size, sample rate, frame rate, audio channels, etc., in the Profile Settings by hitting "Settings" button.
Step 3. Click "Convert" button to start Moto X Pure Edition 4K videos to AIC MOV conversion for iMovie on Mac. By using future-proof technology, the conversion will be finished with ultrafast speed and the best video quality kept. After the conversion, you can get the generated files by clicking "Open" button, then edit the Moto X Pure Edition 4K videos in iMovie smoothly.
Note: If you don't want to wait for the entire conversion process, you can tick off "Showdown computer when conversion completed" and go away to do other things.
Further Reading:
Tips: Adjust video and audio parameters, including the bit rate of video and audio, the codec of video and audio, video size, sample rate, frame rate, audio channels, etc., in the Profile Settings by hitting "Settings" button.
Step 3. Click "Convert" button to start Moto X Pure Edition 4K videos to AIC MOV conversion for iMovie on Mac. By using future-proof technology, the conversion will be finished with ultrafast speed and the best video quality kept. After the conversion, you can get the generated files by clicking "Open" button, then edit the Moto X Pure Edition 4K videos in iMovie smoothly.
Note: If you don't want to wait for the entire conversion process, you can tick off "Showdown computer when conversion completed" and go away to do other things.
Further Reading:
Summary: How to make MPEG-2 to WMP conversion work done beautifully on PC? For the most effective way to tackle this problem is to use a third-party program to recognize.
 MPEG-2: Transport, video and audio standards for broadcast-quality television. MPEG-2 standard was considerably broader in scope and of wider appeal - supporting interlacing and high definition. MPEG-2 is considered important because it has been chosen as the compression scheme for over-the-air digital television ATSC, DVB and ISDB, digital satellite TV services like Dish Network, digital cable television signals, SVCD, and DVD.As the default media player in Windows operating system, Windows Media Player (abbreviated WMP), makes it easy to play audio, video and view images for Windows users. However, many MPEG-2 files contain video streams that are encoded using codecs that WMP cannot normally interpret. When you attempt to playback such a file, problems may be encountered.What format does Window Media Player play?
 In order to play MPEG-2 files in Windows Media Player smoothly and to solve importing and incompatibility issues, you should choose a best codec or format for Windows Media Player playing, WMV format is the first choice. Having tested so many third-party programs, Pavtube Video Converter is highly recommended for the easy of use and lossless quality. This program offers quite effective solution for you to convert almost all the videos MPEG-2 as well as MKV, MOV, MTS, TiVo, VOB, etc. It also allows you to adjust the video, audio parameter to get a decent output video that you want. Barely several steps are enough.See also: Convert MXF to MPEG-1/MPEG-2/MPEG-4 on Mac/PC
How to Import MPEG-2 Video to iMovie on Mac?
Convert Dxtory AVI to MPEG-2 for Sony Vegas 13/12/11 Editing
 Other Download:- Pavtube old official address: http://www.pavtube.com/video_converter/- Amazon Download: http://download.cnet.com/Pavtube-Video-Converter/3000-2194_4-75734821.html- Cnet Download: http://download.cnet.com/Pavtube-Video-Converter/3000-2194_4-75734821.htmlHow to convert MPEG-2 to Windows Media Player?Step 1: Download and have a quick installation. The trial version will have a watermark on your converted files. Except for that, there are no time limitation, no virus, and no unnecessary bundle apps while downloading. After that, click “Add Video” button to load your MPEG-2 files. You can load several files at once thanks to “Add from folder” button.
 Step 2: Select the right formats for playing with Windows Media Player. Here we suggest you to go to the “HD Video” list, you will get the “WMV HD (*.wmv)” as the best output.
 Step 3: Adjust video and audio parameters, including the bit rate of video and audio, the codec of video and audio, video size, sample rate, frame rate, audio channels, etc., in the Profile Settings by hitting “Settings” button.
Step 4: Click “Convert” button to start MPEG-2 to WMV conversion for WMP playing. You can get the generated files by clicking “Open” button.Conclusion: If you don’t want to wait for the entire conversion process, you can tick off “Showdown computer when conversion completed” and go away to do other things.Further Reading:
Summary: Any suggestions as to how I can import BPAV files to Premiere Pro for editing? This tutorial is a step-by-step guide, keep reading and find something useful.
 “I have camera original stuff on a disk in a BPAV-folder. When I import video and audio of the raw BPAV clips to Adobe Premiere Pro, I found the MP4 within the BPAV file is unreadable to Premiere. I’m eager to work out the solution.”
Sony XDCAM EX camcorders write MP4 files into a folder named BPAV. Generally, in Adobe Premiere Pro, importing BPAV sources with Media Browser is usually workable. If you want to transfer BPAV folder to a hard disk, you need to copy the entire BPAV folder and its contents, not just one MP4 file at a time. Or the file would be corrupted.
If you are stuck in the trouble like the situation we mentioned at the very beginning, when importing video and audio of the raw BPAV to Premiere Pro, always found that the MP4 within the BPAV file is unreadable to Premiere, you’d better seek for an alternative way. A common practical way we recommended is to convert BPAV files to Premiere Pro best accepted one, and MPEG-2 is the optimal format.
Which software can we apply? Here the top option is Pavtube Video Converter. If you are running on Mac operating system, you can refer to Pavtube Video Converter for Mac (review). With it, you can effortlessly convert BPAV MP4 files to Premiere Pro supported MPEG-2, and it works well and converts flawlessly. Meanwhile, this video converter can create files compatible with NLEs like FCP, Avid Media Composer, iMovie, After Effects, DaVinci Resolve and etc.
Other Download:
- Pavtube old official address: http://www.pavtube.com/video_converter/
- Amazon Download: http://download.cnet.com/Pavtube-Video-Converter/3000-2194_4-75734821.html
- Cnet Download: http://download.cnet.com/Pavtube-Video-Converter/3000-2194_4-75734821.html
How to import BPAV files to Premiere Pro?
Step 1: Download, install and launch the corresponding program. Drag and drop BPAV MP4 files to the software. You can import multiple files at once thanks to batch conversion.
Step 2: Click the drop-down list in the format line to get the format box. Then choose “Adobe Premiere/Sony Vegas>>MPEG-2 (*.mpg)” as output format.
“I have camera original stuff on a disk in a BPAV-folder. When I import video and audio of the raw BPAV clips to Adobe Premiere Pro, I found the MP4 within the BPAV file is unreadable to Premiere. I’m eager to work out the solution.”
Sony XDCAM EX camcorders write MP4 files into a folder named BPAV. Generally, in Adobe Premiere Pro, importing BPAV sources with Media Browser is usually workable. If you want to transfer BPAV folder to a hard disk, you need to copy the entire BPAV folder and its contents, not just one MP4 file at a time. Or the file would be corrupted.
If you are stuck in the trouble like the situation we mentioned at the very beginning, when importing video and audio of the raw BPAV to Premiere Pro, always found that the MP4 within the BPAV file is unreadable to Premiere, you’d better seek for an alternative way. A common practical way we recommended is to convert BPAV files to Premiere Pro best accepted one, and MPEG-2 is the optimal format.
Which software can we apply? Here the top option is Pavtube Video Converter. If you are running on Mac operating system, you can refer to Pavtube Video Converter for Mac (review). With it, you can effortlessly convert BPAV MP4 files to Premiere Pro supported MPEG-2, and it works well and converts flawlessly. Meanwhile, this video converter can create files compatible with NLEs like FCP, Avid Media Composer, iMovie, After Effects, DaVinci Resolve and etc.
Other Download:
- Pavtube old official address: http://www.pavtube.com/video_converter/
- Amazon Download: http://download.cnet.com/Pavtube-Video-Converter/3000-2194_4-75734821.html
- Cnet Download: http://download.cnet.com/Pavtube-Video-Converter/3000-2194_4-75734821.html
How to import BPAV files to Premiere Pro?
Step 1: Download, install and launch the corresponding program. Drag and drop BPAV MP4 files to the software. You can import multiple files at once thanks to batch conversion.
Step 2: Click the drop-down list in the format line to get the format box. Then choose “Adobe Premiere/Sony Vegas>>MPEG-2 (*.mpg)” as output format.
 Step 3: Click “Settings” button to customize the output video and audio settings by yourself. But if you are not good at it, you’d better use the default parameters, they will ensure you a good balance between file size and image quality basically. You can change the resolution, bit rate, frame rate as you need.
Step 4: You can preview to check the final result. Once you are satisfied with it, click the “Convert” button to start converting BPAV MP4 to MPEG-2 .mpg format. It will take you a little while.
Conclusion: After conversion, you can get the generated files by clicking “Open” button. Now, you’ll get no troubles in editing BPAV files in Premiere Pro. Follow the steps and have a try!
Further Reading:
Summary: I’m looking for the easy solution to import Canon VIXIA HF R600 MTS to Premiere Pro CC/CS6/CS5 for editing.
 Canon VIXIA HF R600 lets you capture sharp and steady Full HD video by combining a 57x Advanced Zoom range and SuperRange Optical Image Stabilizer. It features a 3.28MP CMOS image sensor and a DIGIC DV 4 Image Processor that delivers up to 1080/60p video. Video is recorded to SD/SDHC/SDXC memory cards in either MP4 (up to 35 Mbps) or AVCHD (up to 28 Mbps) formats. A 3’’ capacitive LCD touch panel is provided for easy framing, quick playback, and intuitive operation.“I have a ton of footage a client brought in that was shot on a Canon VIXIA HF R600. I need to edit Canon HF R600 MTS in Premiere Pro CC. Everything goes south when I try to import, however. The software does not recognize the video files. Why I can’t import Canon VIXIA HF R600 video to Premiere for editing”To be frank, recently on some recording forums there are a few of Canon VIXIA HF R600 users complained that Premiere can’t recognize Canon VIXIA HF R600 recorded MTS files. If you read the detail description of Premiere on official website, you will get the info that MPEG-2 is the native codec for Premiere. Once you convert Canon VIXIA HF R600 MTS files to Premiere best accepted MPEG-2, your importing and editing problem will be solved. Here we recommend you to take a free try on Pavtube Video Converter, which is an all-in-one video program. Other Download:- Pavtube old official address: http://www.pavtube.com/video_converter/- Amazon Download: http://download.cnet.com/Pavtube-Video-Converter/3000-2194_4-75734821.html- Cnet Download: http://download.cnet.com/Pavtube-Video-Converter/3000-2194_4-75734821.htmlHow to import Canon VIXIA HF R600 MTS to Premiere Pro CC/CS6/CS5?Step 1: Download and have a quick installation. The trial version will have a watermark on your converted files. Except for that, there are no time limitation, no virus, and no unnecessary bundle apps while downloading. After that, click “Add Video” button to load Canon VIXIA HF R600 MTS files. You can load several files at once thanks to “Add from folder” button.Step 2: Click the “Format” bar to get the drop-down menu and you can get “Adobe Premiere/Sony Vegas”, we suggest you to choose “MPEG-2 (*.mpg)” as the best output format.Step 3: Click “Settings” button to customize the output video and audio settings by yourself. But if you are not good at it, you’d better use the default parameters, they will ensure you a good balance between file size and image quality basically. You can change the resolution, bit rate, frame rate as you need.Step 4: When everything is done, you can take a preview by hitting “Play” button. If you are satisfied with the final result, you can click “Convert” button to finish the conversion work.Conclusion: When the conversion is done, you can click “Open” to get your generated files. Now, you can edit Canon VIXIA HF R600 MTS files in Premiere Pro CC/CS6/CS5 without any hassles.Further Reading:
Summary: This article outlines how to import Sony HDR-AS200V XAVC S to FCP 7/X for smooth editing. Keep reading a brief how-to.
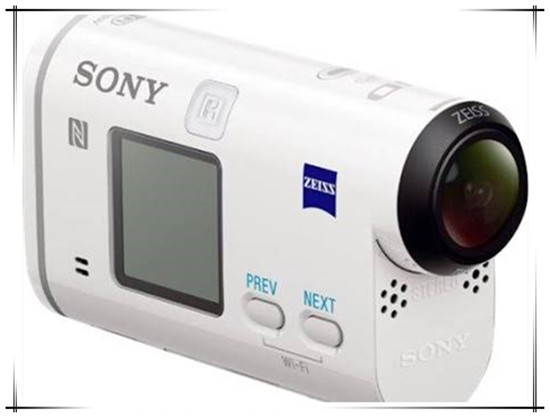 Meet the NEW Action Cam HDR AS200V, the highest image quality of all Full HD Action Cam ever. You may have got the Sony HDR-AS200V camera which recorded some full-HD footages in XAVC S format. Do you have a desire to import XAVC S to FCP 7/X for editing?XAVC S, a new format introduced by Sony with MPEG-4 AVC/H.264 level 5.2, the highest picture resolution and frame rate video compression codec is much more than a video format that FCP can support. So, it’s not strange that you have met so many Sony XAVC S to FCP import issues.First of all, let’s look at a case found online. “I have a bunch of XAVC S files from a Sony HDR-AS200V. What is the easiest way to import XAVC S to FCP? When I try to import, FCP won’t allow me to use the XAVC S files as it doesn’t have the codec for it.”As you can see, XAVC S is not among the accepted video types by FCP. To load Sony HDR-AS200V XAVC S files into FCP, you should convert Sony XAVC S to FCP best accepted ProRes MOV. Pavtube Video Converter for Mac is perfect for you to finish the conversion job on any Mac version, such as El Capitan, Yosemite. It will save you both time and trouble, and all you need to do is to drag the result videos for prompt editing. Other Download:- Pavtube old official address: http://www.pavtube.com/video-converter-mac/- Amazon Store Download: http://www.amazon.com/Pavtube-Video-Converter-Mac-Download/dp/B00QIBK0TQ- Cnet Download: http://download.cnet.com/Pavtube-Video-Converter/3000-2194_4-76179460.htmlHow to import Sony HDR-AS200V XAVC S to FCP 7/X?Step 1: Download and have a quick installation. The trial version will have a watermark on your converted files. Except for that, there are no time limitation, no virus, and no unnecessary bundle apps while downloading. After that, click “Add Video” button to load your Sony XAVC S videos. You can load several files at once thanks to “Add from folder” button.
 Step 2: Click the “Format” bar to get the drop-down menu and you can get “Final Cut Pro>>Apple ProRes codec”, including ProRes 422, ProRes 422 (HQ), ProRes 422 (LT), ProRes 422 (Proxy) and ProRes 4444. Choose the proper one you want. Here, we suggest you to choose “Apple ProRes 422 (*.mov)” as the best output format.
 Step 3: Click the “Settings” button and set proper video/ audio parameters. My advice is to set the video size, bit rate and fame rate to be exactly as the footages so that you will suffer least quality degradation. If you would like to use default settings, simply skip this step.Step 4: After all necessary settings, hit the “Convert” button to start the XAVC S to FCP best supported ProRes MOV conversion.Conclusion: If you have added quite a bunch of XAVC S files, it would take some time to convert. In such case, you can click “Option” and tick the box “Shut down the computer after conversion”.Further Reading:
Summary: In order to play YouTube videos on Samsung Galaxy S6 Edge+ more easily, converting YouTube videos to MP4 can be a great idea for you.
 “Can Samsung Galaxy S6 Edge+ play YouTube videos? My Samsung Galaxy S6 Edge+ won't play YouTube videos at all and I keep hearing that flash player doesn't support mobiles. If yes, what is the best way to play and watch YouTube videos on Samsung Galaxy S6 Edge+?”Method 1: Play YouTube Videos on Samsung Galaxy S6 Edge+ Using YouTube App.Connect your Samsung Galaxy S6 Edge+ to the computer, go to Google Play app store on PC, type "YouTube app" into the search box, and click "Install" to finish the YouTube app download to mobile. Here you go, open up the app and you can freely watch YouTube videos on Samsung Galaxy S6 Edge+. Or you can directly download YouTube app via the app center on Samsung Galaxy mobiles.However, playing YouTube videos on Samsung Galaxy S6 Edge+ without a hitch may not as easy as you imagine, for aperiodic problems: "Sometimes, about 50% of the times, the back button doesn't work and I have to restart YouTube. Then after a while, the back button will stop working again", "Samsung Galaxy YouTube app can't change quality".Method 2: Best Software to Convert YouTube Videos to Galaxy S6 Edge+ Supported MP4.Pavtube Video Converter, being a multi-purpose media software, enables users to convert YouTube videos to Samsung Galaxy S6 Edge+, Samsung Smart TV, iPhone 6/6 Plus, iPad Air 2/mini 3, Apple TV, Surface, WP8, Amazon Kindle Fire HD, Chromecast, PS4, etc for fluent playback. With support for 160+ formats, you are allowed to convert any YouTube videos to Galaxy S6 Edge+ compatible formats as below at ultra-fast speed. If you are running on Mac operating system, you’d better refer to Pavtube Video Converter for Mac.See also: Upload DJI Phantom 3 4K Video to YouTube
Enable 3D YouTube Video on Samsung S5 with Zeiss VR One
Upload Canon C300 MXF to YouTube/Vimeo for Sharing Other Download:- Pavtube old official address: http://www.pavtube.com/video_converter/- Amazon Download: http://download.cnet.com/Pavtube-Video-Converter/3000-2194_4-75734821.html- Cnet Download: http://download.cnet.com/Pavtube-Video-Converter/3000-2194_4-75734821.htmlHow to play YouTube videos on Samsung Galaxy S6 Edge+?Step 1: Download and have a quick installation. The trial version will have a watermark on your converted files. Except for that, there are no time limitation, no virus, and no unnecessary bundle apps while downloading. After that, click “Add Video” button to load your YouTube videos. You can load several files at once thanks to “Add from folder” button.Step 2: Click “Format” drop-down list, and then select “H.264 HD Video (*.mp4)” from the “HD Video” category. Step 3: Adjust video and audio parameters, including the bit rate of video and audio, the codec of video and audio, video size, sample rate, frame rate, audio channels, etc., in the Profile Settings by hitting “Settings” button.Step 4: Click “Convert” button to start the conversion. You can get the generated files by clicking “Open” button.Conclusion: If you don’t want to wait for the entire conversion process, you can tick off “Showdown computer when conversion completed” and go away to do other things. Good News! During 2015 Label Day, Pavtube provides big sale with up to 50% off for some products.Further Reading: