Showing posts with label 4K Video Converter. Show all posts

Monday, March 26, 2018

Can't Edit DJI Mavic Air 4K with After Effects? Fixed!

DJI has announced Mavic Air for many days, many DJI lovers are hesitating to buy this drone or not. The new $799 Mavic Air shares a lot of similarities with both the DJI Spark and the Mavic Pro and Pro Platinum. Like those models, it’s a compact drone with a 12-megapixel camera and a handful of different flying and shooting modes. The Air also has a couple of new tricks, like new obstacle avoidance technology. The another attractive trick is the Air shoots 4K video at 30 fps with a 100Mbps bitrate, compared to Pro's 4K footage at 60Mbps.

On the one hand you can enjoy the super clear picture of the 4k video, on the other hand you may be painful when you try to edit the 4k footage with Adobe Affter Effects. Below is a question a friend asking for help in a forum, let's go check what's he saying.

Why does your DJI Mavic Air 4K video look horrible in After Effects?

"Hello, I just purchased a DJI Mavic Air camera, when I import the 4k video into After Effects, it looks blurry and pixely. However, when I view the same video out of the folder that it resides in, the video looks amazing. What am I doing wrong? I'm assuming I'm doing something wrong during the import process. Any suggestions? Thank you!"

The DJI Mavic Air shoots 4K video in MP4 or MOV (H.264/MPEG-4 AVC), which is acturally included in Adobe After Effects supported video formats list, so the reasons that you fail to edit DJI Mavic Air 4k footage are in two version: the video format is not the best native editing codec for After Effects, the other one is the 4k footage compressed with MPEG-4 AVC/H.264 still have big file size, and it takes a lot of time for After Effects to render those 4k footages.

To ensure a smooth workflow of DJI Mavic Air 4K video with After Effects, it is ideal for you to transcode DJI Mavic Air 4K video to After Effects editing codec - HEVC (aka H.265) codec footage in a QuickTime(.MOV) container, which is a video compression standard designed to substantially improve coding efficiency when compared to its precedent, the Advanced Video Coding (AVC), or H.264. HEVC promises a 50% storage reduction as its algorithm uses efficient coding by encoding video at the lowest possible bit rate while maintaining a high image quality level.

You can performing DJI Mavic Air 4k video to After Effects transcoding process on Windows with Pavtube Video Converter Ultimate | for Mac, it allows you to output 4K MOV, 4K MP4, 4K MKV, 4K XAVC even any 4K video formats to QuickTime(*.mov), H.264 MP4, H.264 M4V, MPEG-1, MPEG-2, MPEG-4 for After Effects. Moreover, this software take full advantage of the NVIDIA CUDA technology and AMD® Accelerated Parallel Processing (APP) to largely accelerate video encoding speed. The GPU acceleration saves users time when encoding Blu-ray/DVD disc or digital video files to H.264 codec or H.265 codec.

Related topics: Best DJI Video Converter You Need Have One | Best Editing Workflow of DJI Osmo 4K Video with iMovie/FCE on Mac

How to import and edit DJI Mavic Air 4K video with After Effects?

Step 1: Transfer DJI Mavic Air 4K recorded footage to your computer.

The DJI Mavic Air records footage on an SD card, you can remove the SD card from the camera, insert the SD card to a card reader, then plug in the card reader into your computer SD card Port for transferring the video footage to your local hard drive.

Step 2: Import DJI Mavic Air Professional 4K videos.

From "File"drop-down option, select "add Video/Audio"to add source DJI Mavic Air 4K video files to the program.

load 4k

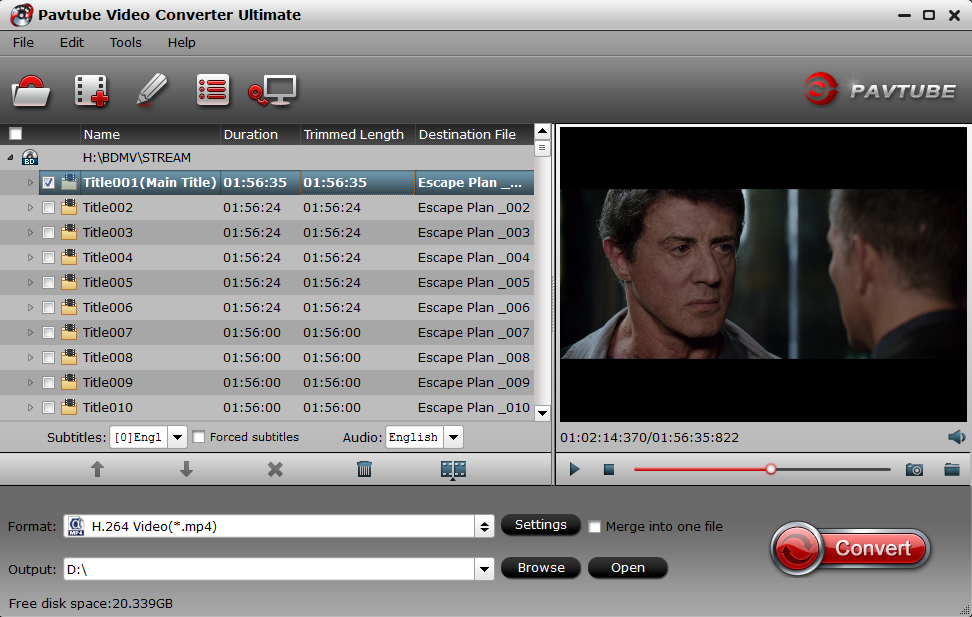
Step 3: Select output file format.

Click "Format"bar, from its drop-down list, select "Common Video"> "MOV - QuickTime(*.mov)"as your desired output file format. H.264/H.265 MP4, H.264 MOV, H.264 M4V, MPEG-1, MPEG-2, MPEG-4 almost all After Effects supported video formats could be find in its formats list, go check by yoursevles.

Image result for site:multipelife.com ultimate h.264 mov quicktime

Tips: After you have defined the output format, then cilck the Settings on the UI, in the pop-up window, you are able to adjust video/audio codec, resolution, bit rate, frame rate, channels, etc. To compress DJI Mavic Air 4k to 1080p by changing resolution from 3080*2160 to 1920*1080. To get smaller video file by lowering the video bit rate.

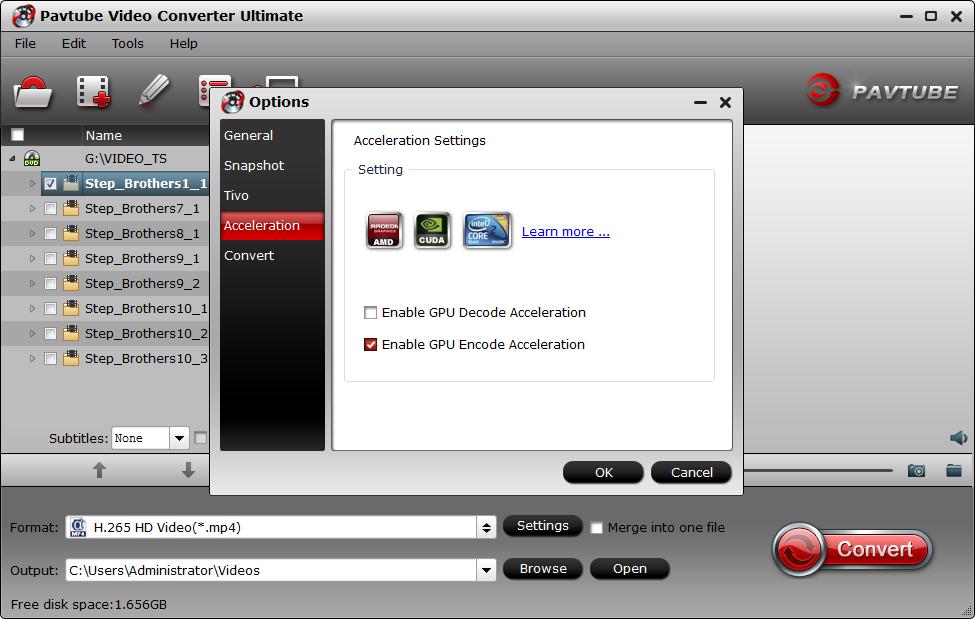
Tips: Enable GPU Encode Acceleration

When you want to enjoy the acceleration, you need to do some settings: Click "Tools" > "Options", in the opened "Options" window, click "Acceleration" menu, then check "Enable GPU Encode Acceleration" option so that the program will accelerate conversion speed when you are encoding DJI Mavic Air 4K to H.265/H.264 codec.

NOTE: You need to make sure your PC configuration supports the GPU acceleration, you can refre to this: Nvidia Cuda Speed Up.

Enable GPU Encode Acceleration

Step 4. Start the conversion

Start the DJI Mavic Air 4k to QuickTime MOV conversion by pressing the red button Convert on the UI, wait for a while, go click "Open the Output Folder" to get the generated file. Now you are free to input the covnerted DJI Mavic Air 4k with After Effects for postproduction without any obstacles.

Video and animation file formats - After Effects

Format
Import/Export support
Format Details
MXF/ARRIRAW
Import only
ARRIRAW codec in an MXF container file
H.265 (HEVC)
Import only
HEVC (also known as H.265) codec footage in a QuickTime (.MOV) container
3GPP (3GP, 3G2, AMC)
Import and Export
 
Adobe Flash Player (SWF)
Import only
Note: SWF files are imported with an alpha channel. Interactive content is not retained. Export functionality of SWF files is supported by versions earlier than After Effects CC 2014.
Adobe Flash Video (FLV, F4V)
Import only
 
Animated GIF (GIF)
Import and export
 
AVCHD (M2TS)
Import only
 
DV
Import and Export
In MOV or AVI container, or as container-less DV stream; requires QuickTime on Windows
H.264 (M4V)
Import only
 
Media eXchange Format (MXF)
Import only
 
MPEG-1 (MPG, MPE, MPA, MPV, MOD)
Import only
 
MPEG-2 (MPG, M2P, M2V, M2P, M2A, M2T)
Import only
Some MPEG data formats are stored in container formats with filename extensions that are not recognized by After Effects; examples include .vob and .mod. In some cases, you can import these files into After Effects after changing the filename extension to one of the recognized filename extensions. Because of variations in implementation in these container formats, compatibility is not guaranteed.
MPEG-4 (MP4, M4V)
Import only
 
Open Media Framework (OMF)
Import and Export
Raw media [or essence] only; Windows only
QuickTime (MOV)
Import and Export
 
Video for Windows (AVI)
Import and Export
Export is on Windows only.
Windows Media (WMV, WMA)
Import only
Windows only
XDCAM HD and XDCAM EX (MXF, MP4)
Import only
 

Thursday, September 24, 2015

Import Zenmuse X5/X5R 4K Videos to Premiere Pro CC for editing

More cameras and camcorders which can recorded 4K Ultra HD videos are released this year, including the new ZENMUSE X5 series. DJI has officially launched the Zenmuse X5 and X5R, two new cameras for DJI’s Inspire One that are the world’s first commercial Micro Four Thirds (MFT) cameras designed specifically for aerial use. Featuring increased dynamic range, interchangeable lens compatibility, remote focus and aperture control, and lossless 4K RAW video recording, the ZENMUSE X5 series is ready to take on the high-performance world of aerial photography with two distinct models.


Zenmuse X5R:
  • Lossless cinema 4K RAW video
  • Record at 4096x2160 (24fps) or 3840×2160 (30/25fps)
  • Average 1.7 Gbps bitrate (2.4Gbps maximum)
  • Removable 512GB SSD
  • 16MP photographs
  • 12.8 stops of dynamic range

Zenmuse X5:
  • 4K video at up to 30fps
  • Record at 4096×2160 (24fps) or 1920x1080 (60fps)
  • 16MP photographs
  • 12.8 stops of dynamic range

What if ZENMUSE X5R or ZENMUSE X5 owners would like to import and edit their 4K videos in editing software including Premiere Pro CC on Mac for sharing with your family and friends. But you should know 4K videos can’t be added into Premiere Pro CC or other these editing software directly, in this cases, you’d better convert your Zenmuse X5 or X5R 4K videos to Premiere Pro CC supported video format on Mac.

Pavtube HD Video Converter for Mac is a powerfull All-in-One video solution software. It can solve all video-related problems efficiently, such as editing, merging, cutting, trimming and converting your 4K Videos with great image and sound quality for editing in Adobe Premiere Pro CC, Premiere Pro CS6/CS5/CS4/CS3, Affect Effects CC/CS6, Premiere Elements 13/12, Creative Suite 6/5 as well as FCP, iMovie, Avid Media Composer, DaVinci Resolve Lite(DaVinci Resolve 11), DaVinci Resolve 9, iPhoto, Kdenlive, Keynote, Aperture 3, etc., and without audio delay issues. Especially, it support conversion of over 150 Formats Including 4K/3D, more functions below:
  1. HD/4K/3D footages generated by DJI, Sony, Samsung, Canon, Nikon, Panasonic, and JVC can also be handled easily.
  2. Convert to Over 150 Formats Including 4K/3D.
  3. Output considerable video formats supported by different devices such as Non-linear editing system, Apple/Android/Windows series, game consoles, and media players.
  4. Audio and video sync technology: The adoption of audio and video technology allows you to enjoy output videos.
  5. Inserting SRT/ASS/SSA subtitle: Load your prepared SRT/ASS/SSA subtitle on the editing interface for better enjoyment.
  6. APEXTRANS technology converts files 6x faster than competitor products.
  7. Edit, Enhance & Personalize Your Videos File.
  8. The user-friendly interface can make you use it masterly without the complicated process.
          

Other Download:

How to edit Zenmuse X5/X5R 4K video in Adobe Premiere Pro CC?

Step 1. Import Zenmuse X5/X5R 4K video. 

Click the "Add Video" button or "Add from folder" button to import source Zenmuse X5/X5R 4K video files to the program. You can add multiple video clips at one time.


Step 2. Choose optimized video format. 

Click the "Format" bar, and you will find various video formats sorted by various programs/devices. For Adobe Premiere Pro, it should be "Adobe Premiere > MPEG-2(*.mpg)" or "MOV (AVC)(*.mov)".


Step 3. Edit Zenmuse X5/X5R 4K video.

Open "Video Editor" window, here you can trim video length, crop video file size, apply special effect, add image or transparent text watermark, add subtitles, replace or remove original audio, etc.


Step 4. Convert Zenmuse X5/X5R 4K to Premiere Pro CC. 

Click the "Convert" icon under the preview window, it will start to convert Zenmuse X5/X5R 4K video to Adobe Premiere supported format. 

After conversion completes, you can easily import Zenmuse X5/X5R 4K video to Premiere Pro CC for smoothly editing as you want.

Further Reading:

Tuesday, September 2, 2014

Discussion about Import Panasonic Lumix GH4 4K Videos to DaVinci Resolve 9


Unable to import Panasonic Lumix GH4 4K Video to DaVinci Resolve for editing? With the limitation video formats, it is not strange that we usually meet troubles of adding 4K videos to DaVinci Resolve 9 for editing. Now are talking about thre related issues.


‘Hello, guys! In order to make a high-definition recording of my brother’s wedding, I have chosen Panasonic Lumix GH4 to record the moment. However, when I wanna import the videos to DaVinci Resolve for editing, it showed error. I have only used DaVinci Resolve for a long time so is there any answer to solve this problem?’—From a customer.

Hot Search: MXF to DaVinci | MP4 to DaVinci Resolve | MTS to DaVinci Resolve

Although  DaVinci Resolve 11 can handle much more native video formats and camera files than any other real time editing system, it doesn’t mean that you can import every piece of video into this world famous color corrector and amazing editor, including Panasonic 4K videos. Here is an article about the main video formats that fails to be edited in DaVinci Resolve. But today I will show you an efficient way to realize your hope. Can you trust me?

Pavtube HD Video Converter for Mac - a friendly 4K video converter to make your wedding footage accepted by DaVinci Resolved for editing from 4K to the best supported format Avid DNxHD MOV. What’s more, other functions you’ll find in following steps.

Step 1.Import your files with ‘Add Videos’ or ‘Add From Folder’ button.or on the other way, just drag your files in is not a bad idea for us.


Step 2.As is mentioned above, Avid DNxHD is well supported by DaVinci Resolve 11. So just click the format bar to follow “Avid Media Compose” > “Avid DNxHD 720p (*.mov)” or “Avid DNxHD 1080p (*.mov).”


Step 3. One button called ‘Settings’ can offer you more. Such as for vdieos and audio parameters, we can find more there to do with our output files. Would you like to have a try?


Step 4. ‘Click “Convert” on main interface to start conversion

Additional Tip: Before importing output videos to DaVinci Resolve 9 for professional and further editing, you can use the video editor designed in this video converter to edit your 4K videos. Click “Edit” to get to the “Video Editor” interface, and edit your videos by trimming (get/cut off video clips), cropping (remove unwanted areas), adding text/image/video watermarks, inserting subtitles, adding special effects, etc.


It’s a pleasure if we have indeed helped you in this discussion. After transferring videos in DaVinci Resolve as ususal, are you now still have any troubles of importing Panasonic Lumix GH4 4K Videos to DaVinci Resolve 9? Let's have a try!

More guides:

Sunday, July 6, 2014

Best 4K Ultra HD Video Converter to Convert/Compress 4K Videos on PC or Mac

If you've got some 4K Ultra HD videos, this article will give you the best 4K Ultra HD Video Converter to Convert/Compress 4K Videos on PC or Mac in a simple way.


4K is the hottest buzz word in the tech world right now, and it's rewriting the rulebook when it comes to image quality. It affects not just the world of 4K TV and cinema, but also cameras and image capture, smartphones and tablets, computer monitors and PC games - practically anything that displays images or records video. For example, play 4K videos on VLC could not be an easy workflow.

Hot Search: 4K to QuickTime | 4K to FCP X | 4K to Xbox

4K Ultra HD is a much more intimate viewing experience than Full HD. In many respects, the best way to view 4K is analogous to the way we view films in a cinema. Old style cinemas were shoe-box shaped and most patrons sat typically 3-5 screen heights away, because that was the most comfortable viewing distance.

However, it is also costly to achieve 4K Ultra HD, for the data amount of each frame is as big as 50MB. That is to say, the facilities of top configuration are required for both decoding, playing and editing a 4K Ultra HD video.

The optimal tool I prompt here is Pavtube HD Video Converter. (Mac version) Just like the way it is dealing with 1080p HD videos, this all-in-one converting tool is surely in the support of converting 4K UHD videos in any formats faultlessly. As the best 4K Ultra HD Video Converter, it can 4K Ultra HD videos in MP4 (AVC coder) or other extension not only for playing on portable devices like iPad, iPhone, Galaxy Tablet, Surface Tablet, Kindle Fire HDX, but also for editing in Sony Vegas, Adobe Premiere Pro, Windows Movie Maker, Pinnacle Studio, Cyberlink Powerdirector, etc.. 

Follow the steps below, and you can get the easiest way to edit convert/compress 4K Videos on PC or Mac with the top 4K Ultra HD Video Converter. And the mac workflow it here. First, download or buy Pavtube Video Converter Ultimate as the 4K Ultra HD Video Converter.

Notes:

1. The free trial version is provided for you to see if it would be able to convert your 4K UHD to your required file type with expected quality.

2. The trial version will create videos with PAVTUBE logo standing in the center of the output image. To bypass the watermark, you should purchase its full version.

Step 1. Follow the installation wizard to install the program onto your computer. After transferring 4K Ultra HD Video files to hard disk, run 4K HD Video Converter. Click the "Add video" icon. button to import 4K UHD video to the program.


Step 2: Choose an output format on a smaller window of this 4K video converter which accords the format you want the output 4K Ultra HD video to become, be it AVI, MOV, MPEG, WMV, FLV, etc.


Step 3: Make any other personal settings you need and click the "Convert" button under the preview window, and the 4K Video Converter will start converting any 4K YouTube Ultra HD videos. When the conversion is finished, you enjoy the compressed 4K Ultra HD video easily.

P.S. Can 4K UHDTV play original HD videos? The answer is yes. The principle is almost similar to that of playing a standard video on an HD TV. 4K UHDTV is 2016p and 3840 pixels wide, having an aspect ratio of at least 16:9

Good News is that Pavtube HD Video Converter allows you to change video resolution, as well as the aspect ratio, from 4:3 to 16:9, to faultlessly fit the 4K Ultra HD TV. After converting ,you can freely transfer the video to 4K UHDTV for watching by use of HDMI or the like. Now just have a try. 

Read more: