Showing posts with label Final Cut Pro. Show all posts

Friday, November 22, 2013

Best way to import 1080p /720p MKV into Final Cut Pro (X) on Mac

Summary: This article will tell you how to convert MKV to Final Cut Pro supported ProRes MOV format so that you can import MKV to Final Cut Pro (X) for editing. 
Final Cut Pro

As a major breakthrough in video editing, Final Cut Pro may be the first choice for Mac users. It makes video editing faster and better with motion graphics and file-based workflow, offers a new way to organize. As we know, Final Cut Pro(FCP) allows users to edit any QuickTime compatible video format including DV, HDV, P2 MXF (DVCProHD), XDCAM, and 2K film formats without any quality loss.

But for Mac users, what confused them most now is the importing problems with the 1080p/720p MKV video. For example, how to play MKV on Xbox?


In fact, FCP still can't support MKV format, which is similar in concept to other containers like AVI, MP4 or Advanced Systems Format (ASF), but is entirely open in specification, with implementations consisting mostly of open source software. If you want to import 1080p/720p MKV files into FCP and edit 1080p/720p MKV files with FCP, you must get the Mac MKV to FCP Converter first.

To do MKV video to Final Cut Pro mac task, you're highly recommended to get Pavtube Video Converter for Mac which can convert 1080p/720p MKV to Apple Prores 422 which is the most  most compatible codec with Final Cut Pro on Mac with fast speed by keeping the original quality. Then you can easily import the 1080p/720p MKV to Final Cut Pro X, Final Cut Pro 6, Final Cut Pro 7 for editing on Mac. This will help you import the file correctly, saving the rendering time and keep the HD quality. Why not to download this easy-to-use and useful software for you and  transcode MKV to Apple ProRes codec. 

What to do in detail?
The Steps for Converting MKV to FCP Apple ProRes 422 
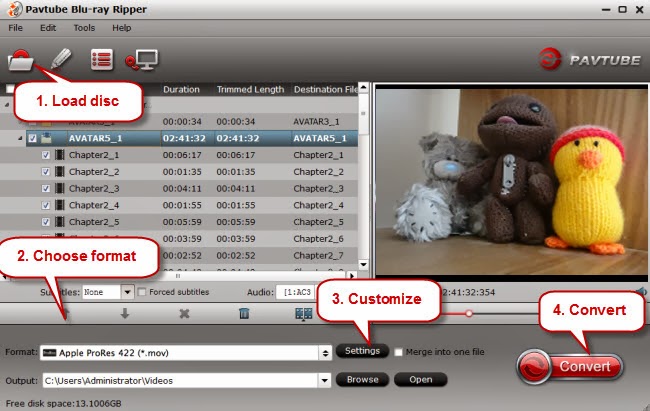
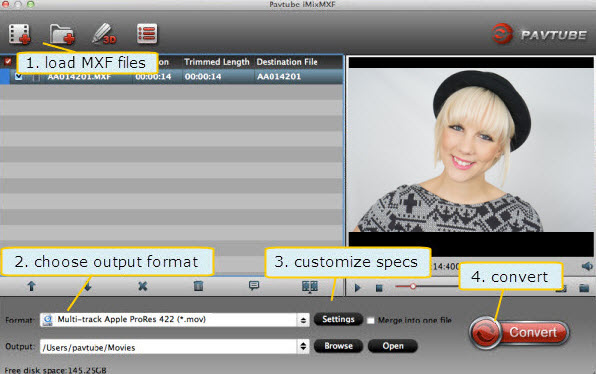
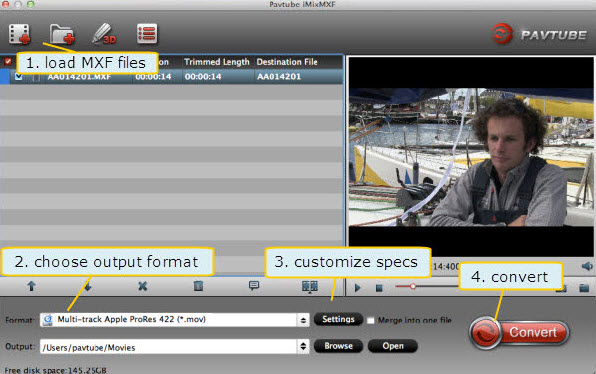
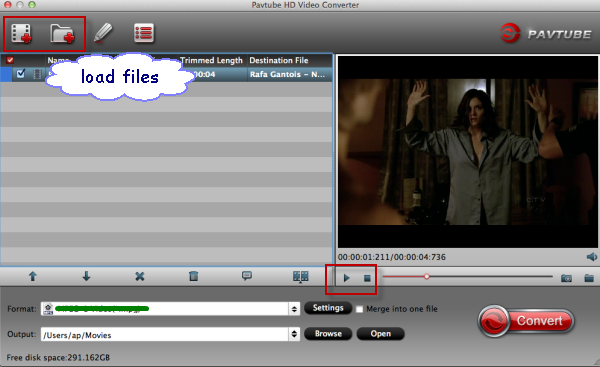
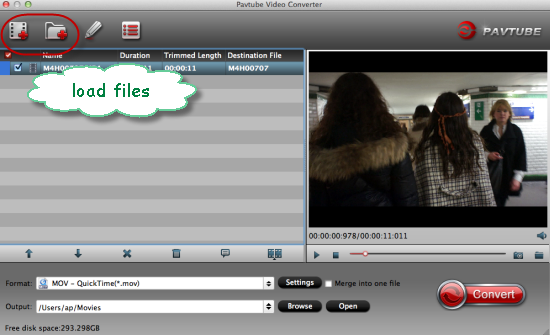
1.Load MKV files
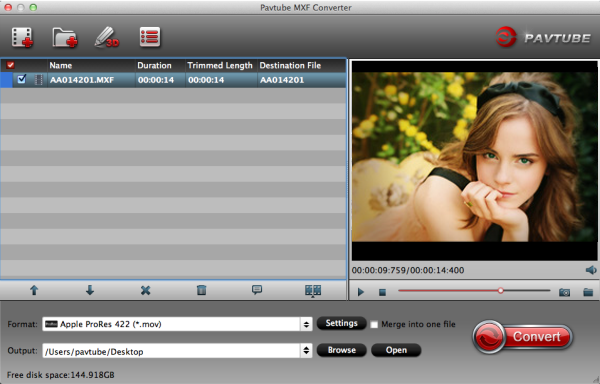
After install and launch the Pavtube MKV to FCP Converter, drag and drop MKV file. You can drag several files to the program directly.


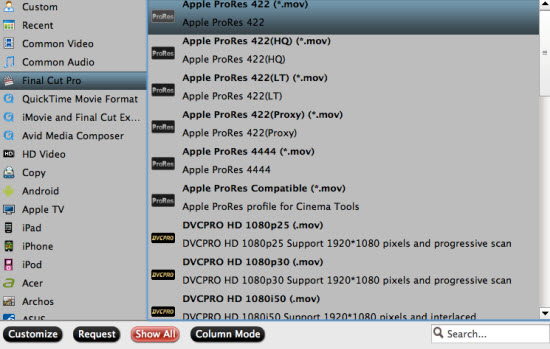
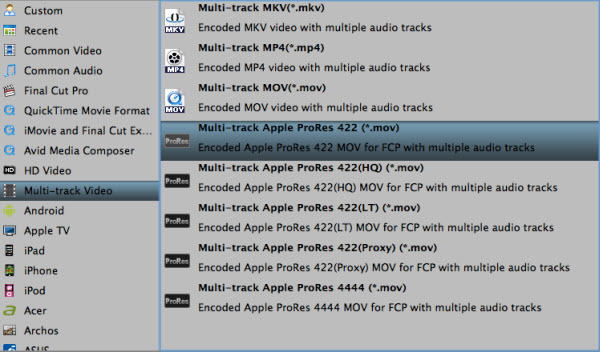
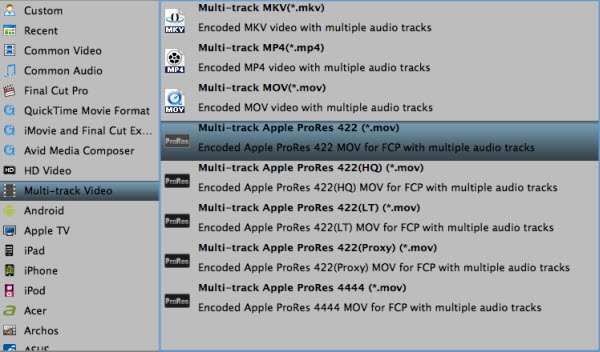
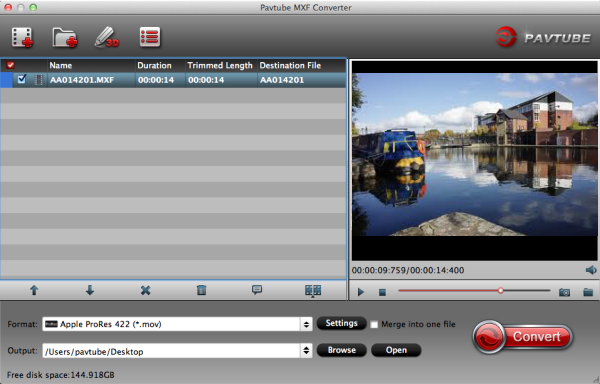
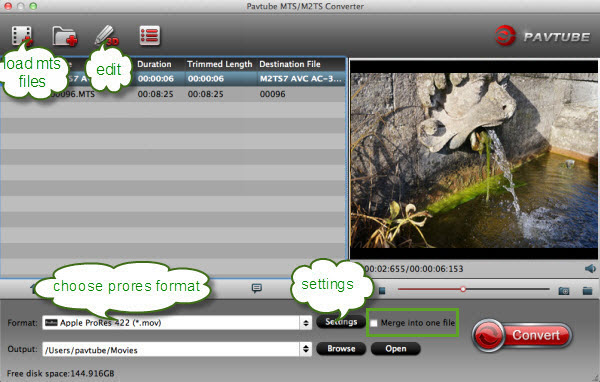
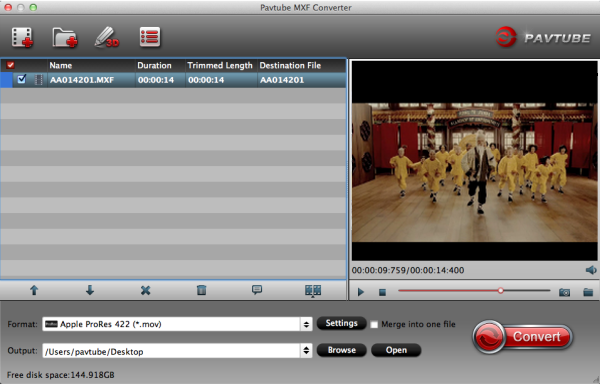
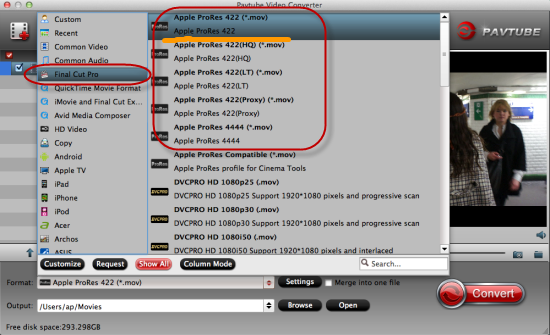
2.Choose output format
Apple ProRes MOV is the best format for Final Cut Pro (X), here you just need to choose the target application as output format, for example, “Final Cut Pro”->”Apple ProRes 422(*.mov)”.


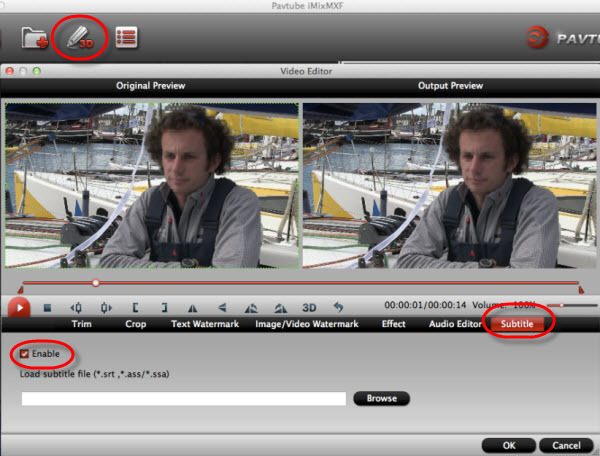
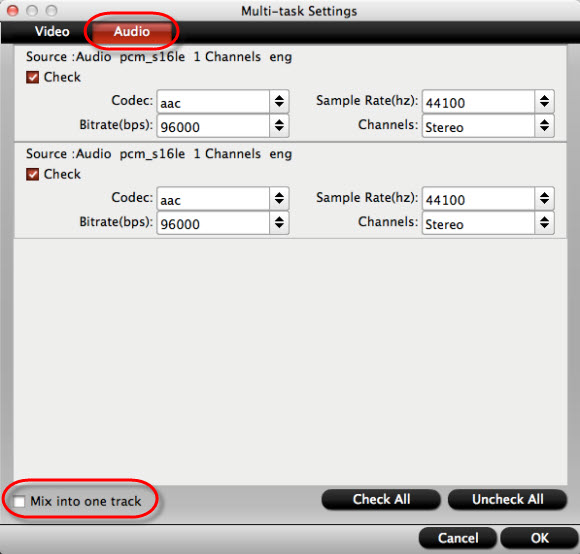
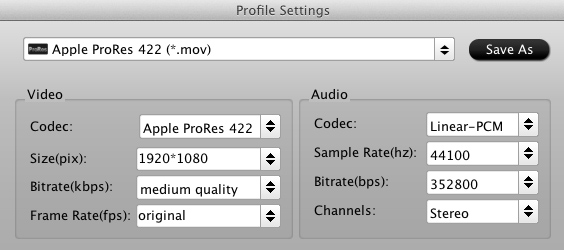
3. Do some settings as you want.

4.Transcode MKV to FCP (X)
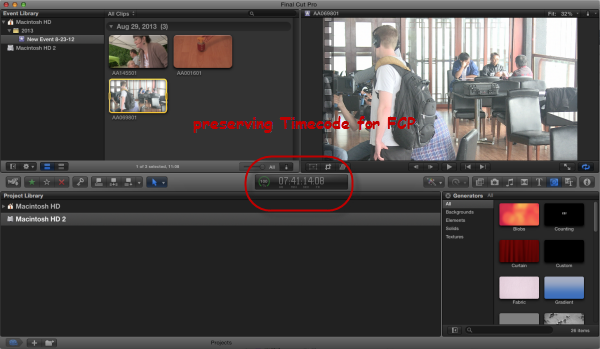
At last, hit the “Convert” button to transcode MKV to FCP (X). With this MKV to Apple ProRes 422 converter, you can easily change MKV files to FCP (X) for editing, this software runs fast, so you can convert your 1080p /720p MKV footages to FCP (X) in less time, video and audio synchronization are perfectly guaranteed, after converting you can follow this guide to import videos to FCP (X) for editing.

As Apple ProRes codecs are natively supported by FCP, the rendering time is saved as well. And you can not only edit footage captured in such popular video formats, but also edit video clips such as downloaded web content or even archived video from the hard drive by converting and importing MTS to Final Cut Pro, M2TS to Final Cut Pro, MOV to Final Cut Pro, MXF to Final Cut Pro, etc. Good luck to you!

Read Related Articles:

Thursday, November 21, 2013

Canon XF100 and Final Cut Pro X Importing Tips with multi-track retaining

Description: This guide will show you how to convert multi-track XF100 MXF to Apple Prores MOV retaining multi audio channels for editing in FCP X on Mac OS X (Mavericks 10.9 included)


Question: "Hi, I filmed using Canon XF100 camera using 2 clip mics and want to edit in Apple Final Cut Pro X. I’ve tried several programs but always loss some of the audio channels. Pls I need to edit both the original two channels in my FCP X. How can I solve this?”

Solution: I also ran into this problem when editing my friend’s wedding video. Did a lot search and tried some but not very satisfied for the transcode speed, quality or audio tracks saving. Recently found a program on mac named Pavtube iMixMXF and it work well till now; it really helps in converting muti-track mxf to FCP X. Come and meet this multi-audio track MXF Converter for Mac and follow these steps to easily convert XF100 multiple video/audio track MXF to ProRes for Final Cut Pro X.

Step 1. Get this Mac multi-track MXF Converter installed, click  'Files' to load individual XF100 mxf videos; or click' From Folder'  to load the entire folder. It will recognize all the audio channels.


Step 2. Click "Format" and choose Multi-track Video>Multi-track Apple ProRes 422(*.mov) as the most compatible codec for FCP X editing.

format-to-multi-track-prores-422

Step 3. Click "Settings" to customize your video size, bitrate, frame rate and other specs; and check video channels that you want to keep.

Follow the bottom left icon to "mix into one channel"; or that it will keep all the audio tracks apart.

merge-into-one-file

Step 4. Click "Convert" to start converting multi audio channels XF100 MXF to multi-track Apple Prores 422 mov saving multi audio channels for editing in FCP X on Mac.

Tips:

1. For users don't need to deal with multi-track thing, just simple want to convert MXF to other formats, the MXF Converter for Mac (only $29) is highly recommended. And at Pavtube Thanksgiving Giveaway, get it you can free get MKV Converter for Mac.

2. If you would like to Share Pavtube Hottest Thanksgiving Activity at your Facebook page - you can get more discount:

1. 20% off ByteCopy (Windows/Mac)
2. 20% off MXF MultiMixer
3. 20% off iMixMXF

Click "Share on Facebook" button, insert "#PavtubeThanks2013", choose "Public", and click "Share Link". You will get another 20% coupon. The discounted link will be sent to your Facebook "Inbox" or "Other" within 24 hours on work days.

If don't receive message from strangers, please don't forget to contact us for the discounted link via faq@pavtube.com.


More Pavtube Thanksgiving Special Deals are available on Pavtube Thanksgiving page. Share this activity at your Facebook page and more discounts you can get.

Relate Tips:
Convert Canon C500 MXF to multi-track MOV for Avid MC
Make MXF files supported by Premiere Pro and keep Multi audio tracks
Convert and Deinterlace Canon XF100 multi-track MXF to iMovie

Tuesday, September 24, 2013

Best blu-ray ripper- Editing Blu-ray Discs with Apple Final Cut Pro


Description
: Want to import Blu-ray movies in Final Cut Pro? The following article will show you how to transcode Blu-ray to Apple Prores 422 for FCP editing on Mac.


Blu-ray is getting more and more popular for its large storage and excellent quality so that many people prefer watching Blu-ray movies at home. And what's more, digitizing your blu-ray discs collection is an ideal form of insurance against damage, theft or loss, therefore some folks will have the need to edit blu-rays in nonlinear editing programs such as FCP,  iMovie/FCE, Adobe Premiere, Avid Media Composer etc on Mac before storing or playback.

Now I am testing to import a Blu-ray disk into Final Cut Pro but only find that is the Blu-ray files are not readable by FCP (no matter the version FCP 6/7/X). So in this case, it comes with the question that how can us rip blu-rays and edit blu-ray movies in FCP?

From Apple, we know that FCP most prefers Apple Prores codec for editing. So the quick and easy way to do solve the problem is to convert Blu-rays to FCP compatible prores before importing. After lots of searching in google, finally we got this a powerful blu-ray converting program to help with ingesting blu-ray to FCP on mac. That is Blu-ray Ripper for Mac from Pavtube, which does a good job in decrypting and transcoding blu-rays to Prores so that you can easily get blu-ray discs to work with FCP perfectly.

Get the best Mac Blu-ray to FCP Ripper (30% off now) installed and follow the guide below:


How to transcode Blu-ray to Prores for editing in Final Cut Pro on Mac

Step 1. Load your blu-ray disc.

There is a disc icon on the top left which let you load from disc, folder or ISO/IFO respectively.


Step 2. Choose Output format.

For editing in FCP, the Apple Prores is preferred. Click Format and choose Final Cut Pro>Apple Prores 422 Codec(*.mov).


PS: It has various profiles and formats so that you can rip blu-ray to various formats according to your needs.

Step 3. Set up frame rate, bitrate, or other output settings and add subtitles.

a. Click Settings, you can find file details including codec, size, bitrate and frame rate. You are able to fix them according to your needs. FYI: the higher bitrate you choose, the better video quality it outputs.


b. Sometimes subtitle on Blu-ray discs is not what you want, for example, the original subtitle is in English, you may not read it exactly and you need a Francais subtitles. Now the software allows loading *.srt and *.ass subtitles files. You can download any *.srt and *.ass subtitles files you want then load in the software for output.


If you wanna add external subtitles(like *.srt, *.ass and *.ssa) in video, only click "Edit", choose "Subtitle" > "Enable", you need download a subtitle file, then click "Browse" to load it.
You can get to konw the best and top 5 Subtitle Sites to download subtitles you need here.


Step 4. Now just press the big circular "Start Conversion" button to start converting Blu-ray movies to Prores for Final Cut Pro on Mac.


Tips:

1. Refer to here to learn how to import video files into FCP.

2. Here are some step-by-step guides of how to import Blu-ray to iMoviehow to rip DVD to FCP and convert DVD for FCE.

3. If you wana to convert Blu-ray to FCP with multiple audio and subtitle tracks, please go to Pavtube Bytecopy for Mac.

Click Pavtube Special Offer page to get more discount:

ByteCopy($42) + Blu-ray Video Converter Ultimate($65) = only $80 Save $27
ByteCopy($42) + Video Converter($35) = only $60 Save $17
ByteCopy($42) + MXF MultiMixer($45) = only $70 Save $17
ByteCopy($42) + DVD Creator($35) = only $60 Save $17
ByteCopy($42) + ChewTune($29) = only $54 Save $17

Sunday, September 15, 2013

Get FCP X work with Panasonic AG-HPX300 preserving multi-tracks

Summary: Anyone figured out how to import Panasonic AG-HPX300 MXF footage to FCP X? FCP X support P2 mxf files or not? The easy workaround aims to tell you how to get HPX300 MXF P2 mxf recognised by FCP X with preserving multi audio tracks.


I have some files recorded with a Panasonic AG-HPX300. They are MXF recordings in AVC-Intra and DVCPRO HD codec. How can import them to FCPX 10.4? The key point is I don't want to loss any of the audio channels that I recorded with two microphones. Is that any work flow for this?

Panasonic AG-HPX300 recording files in MXF format. Although FCP X says they have native support for MXF files, in fact, is doesn't support P2 MXF files well from AG-HPX300. And many users will fail to import Panasonic AG-HPX300 P2 MXF footage in FCP X directly as above.
 
To 
my knowledge, the simplest way to solve the incompatibility problem is just to convert Panasonic AG-HPX300 P2 MXF file to FCP X compatible format like Prores. mov. And in order to accomplish the goal without losing any tracks during conversion, come and meet this multi-audio track MXF Converter for Mac which can easily convert Panasonic AG-HPX300 MXF to Prores will all audio tracks preserved. And follow the step-to-step guide as below.

1. Connect your AG-HPX300 P2 camera to Mac and keep it on; get this multi-track MXF to FCP Converter installed. Now follow the top left two icons to load individual mxf or in batch. 


Tips:

Please make sure you have the entire MXF file structure as it saved on your camcorder’s P2 card. See MXF file structure on Panasonic’s P2 card as below. Pavtube iMixMXF is able to recognize audio tracks from ‘AUDIO’ folder automatically, which ensures the generated Prores .MOV files have both image and sound correctly.


2. Click "Format" and choose Multi-track Video>Multi-track Apple ProRes 422(*.mov) as the most compatible codec for FCP X editing.


3. Click "Settings" to free select needed video/audio tracks.

Check the tracks you need and left others unchecked, thus you can get Multi-track MOV with your needed audio streams. Note there’s a mix into one track icon on the bottom, it will combine all your checked audio tracks into single one.


With this Pavtube iMixMXF program, you can also add some personal subtitles in it like this which makes the play backing much easier:


4. Click the red "Convert" to easily convert Panasonic AG-HPX300 multiple video/audio track MXF to ProRes for FCP X. 

Just let it go and wait for a while to get this fresh hot multiple audio track ProRes MOV for FCP  X editing on Mac. 

P.S.

Pavtube also have a Mac MXF to FCP converter program for users that do not need to deal with multi-track video/audio files; only $29 is needed atm. Refer to here to quick look this MXF Converter for Mac.

Read more:
Import Panasonic AJ-HPX3100 P2 MXF into iMovie
Edit Panasonic AG-HVX200 P2 MXF in Avid MC
Premiere Pro and Panasonic P2 MXF Workflow 

Monday, September 9, 2013

Trouble with importing .mov files from Canon 6D into FCP X

In this article, you will know how to import Canon EOS 6D H.264 mov recordings to FCP X on Mac OS X, and edit with best Prores 422 codec.

Canon EOS 6D is the world's smallest and lightest full-frame DSLR. If you're in the market for a full-frame DSLR for ultimate technical quality and super-fast autofocus for action, but don't want to pay extra for (or carry the weight of) the 5D Mark III, the 6D is about 95% of the 5D Mark III for a lot less money. The EOS 6D is built around a new Canon CMOS sensor, which offers a pixel count of 20.2MP. In concert with the DIGIC 5+ processor it offers a standard ISO range of 100-25600, expandable down to 50 and up to 102,400.


The MOV files Canon 6D outputs in encoded by H.264 high-def streams, which is different from QuickTime mov or others. Many traditional nonlinear editing programs on mac do not support H.264 codec directly, such as FCP, iMovie, Adobe premiere and so on. To load Canon 6D H.264 MOV to FCP X, you need to convert them into FCP  preferred video format firstly.

Now come and meet this Canon MOV Converter for Mac. I downloaded the Trial Version of Pavtube and converted some clips taken with Canon 6D .mov. After that, I have successfully import the converted clips to Final Cut X.

This Canon MOV to FCP Converter is not only able to convert organized videos files, but also able to deal with various videos and audios in batch. No need to install third party plug-in, no need to fix the settings manually; just import, choose FCP preset, and click Convert. It's just as simple as that. The software does a good job in editing H.264 .mov files directly in FCP and also easily convert Canon 6D MOV video to iMovie/FCE etc. You can also remux, Trim, cut, split, mix videos, overlays, also add 3D effect to Canon 6D H.264 footages. Now mac 10.8.3 is supported, feel free to have a try!

How to Convert Canon 6d HD MOV to iMovie/FCE with AIC MOV

Step 1. Connect your Canon 6D camera to Mac with USB cable or use card reader to transfer the MOV files to Apple hard drive disk.

Step 2. Add Canon 6D 1080p H.264 MOV videos to Mac Canon Video Converter.

Download, and run this iMedia Converter for Mac, and click the "Add Files"button to load individuals mov videos; or you can click "Add from folder"to load the entire folder.


Step 3. Choose FCP X ompatible format.

Click the "Format "option, you can choose Final Cut Pro>Apple Prores 422 Codec(*.mov). 

convert-format-to-prores-422

Step 4. Now click the big red Convert botton and wait for a while to get the fresh hot converted video. Click Browse to locate them directly. Ok now the transcoded files now are ready for editing Canon 6D MOV in Final Cut Pro X.

Editor's Recommendations

Wednesday, September 4, 2013

Convert Canon MXF to Final Cut Pro X keeping multi audio channels

Description: Here we will offers you an easy and step-by-step workflow to convert and mix Canon multi audio channels MXF to Apple ProRes for FCP X editing.


Question: "Hi, I filmed using Canon xf305 camera using 2 clip mics and want to edit in Final Cut Pro X. I’ve tried several programs but always loss some of the audio channels. Pls I need to edit both the original two channels in FCP X. How can I solve this?"

Answer: I also ran into this problem when editing my friend’s wedding video. From Apple official website I know that apple prores codec is best for FCP editing on Mac. So before importing Canon MXF clips to FCP 6/7/X, I tried to convert Canon MXF to Final Cut Pro X compatible format ProRes 422 .mov.

Did a lot search and tried some editing applications but not very satisfied for the transcode speed, quality or audio tracks saving.  Recently found a program on mac named iMixMXF from Pavtube and it work well in converting Canon multi audio channels MXF to Final Cut Pro X till now. It is the best Mac multi-track MXF Converter and MXF Mixer.

Follow this step-by-step guide; you can easily accomplish the task within a few clicks.

Step 1. Get this Mac multi-track MXF Converter installed, click "Add video" to load individual mxf videos; or click "Add from folder" to load the entire folder. It will recognize all the audio channels.


Step 2. Click "Format" and choose Multi-track Video>Multi-track Apple ProRes 422(*.mov)


Step 3. Click "Settings" to customize your video size, bitrate, frame rate and other specs; and check video channels that you want to convert.

Follow the bottom left icon to let the selected audio tracks "mix into one channel"; or that it will keep all the audio tracks apart.


For non-multi-track converting, it's also supported to add .srt/.ass soft subtitles as you like; click Edit and switch to "Subtitles" tab, and click Browse to locate your prepared subtitles.

Step 4. Click "Convert" to start converting multi-audio channels Canon MXF to multi-track Apple ProRes for FCP X.

Tips: In Pavtube converted video, we can see both the audio tracks saved separately as original, and we will also find the timecode is kept for FCP X.


Pavtube iMixMXF
($45) is a powerful MXF Converter for Mac program will all audio tracks preserved in MKV, MP4, MOV for playing and Apple ProRes for FCP editing.

If you prefer to work with single audio channel and do not need to multi-track integration feature, you are suggested to try Pavtube MXF Converter for Mac (only $29).

Editor's Recommendations

Tuesday, August 27, 2013

Encode/Render Canon T3i .mov files to Prores 422 for Final Cut Pro 7

Q1: Ok I'm really interested in buying the Canon T3i beacuse it has great video quality and its fairly cheap....I'm a newbie to FCP and shoot videos with a Canon Rebel T3i. Obviously, I can copy the .mov files from the SD card to my Mac and edit in Final Cut Pro 7, but it's a bear (slow rendering time and whatnot) and I'm never impressed with the video quality output once I'm done rendering. The files are 1280x720 format, 60 fps. How to import without rending? Any compressor to convert my files to a more FCP-friendly file?

Q2: Canon T3i is perfect and I'd rent one for a wedding, and I am stuck with working with Final Cut Pro 7. Cause as it stands now any time i go to Log and Transfer and try to import files i get messages like FCP doesn't recognize format or something like that. What I'm wondering is their a program out there that can convert the video files of a T3i to a file format that can be read in Final Cut Pro 7.


The Canon EOS Rebel T3i/600D is new of the remarkable digital SDL cameras. And reading previus discussions, we learn that many folks are eager to find a best Canon T3i video converter to get the T3i camera recognized in FCP 7.
 
At first you should know that Canon T3i records its movies as .MOV files using variable bitrate H.264 compression, which is much more conservative of memory card space, but not fit for editing in FCP 7. To help you to get Canon T3i mov files editable in Final Cut Pro 7, Pavtube Canon MOV Converter for Mac is the first choice for you to make smooth videos for editing in FCP 7. It makes it easy to convert Canon T3i MOV footage to ProRes 422 for FCP.

Encode/Render Canon T3i H.264 mov video to Apple ProRes 422 Codec for FCP 7

In order to process Canon T3i MOV footage fast and seamless in Final Cut Pro, it requires that the H.264 .mov videos to be transcoded into Apple ProRes codec, which is the best intermediate codec developed specifically for seamless Final Cut workflow.

Step 1. Load H.264 .mov footage to Canon H.264 MOV Converter.

Transfer h.264 encoded .mov files from Canon T3i camera to your Mac HDD via USB cable. Run Pavtube HD Video Converter for Mac as the best Canon MOV to FCP Converter, and click the "Add" button to load .mov footage.


Step 2. Set a FCP friendly codec (e.g. Apple ProRes 422) as export format.

Click on "Format" bar and set a FCP friendly codec in dropdown-list. You are advised to follow "Final Cut Pro" template and choose "Apple ProRes 422 (*.mov)" as export format.


Tips:

1. H.264 codec has a much higher compression ratio than Apple ProRes, so the ingested files are significantly larger than the original files.

2. If you prefer smaller file size, choose "Apple ProRes 422 (LT) (*.mov)" instead.

3. The "Apple ProRes 422 (Proxy) (*.mov)" format offers file size at SD levels and is recommended for 480i/p and 576i/p shootings.

Step 3. Set possible best quality for FCP 7 editing.

Click the "Settings" button and customize proper video/ audio parameters if necessary. Video size, bitrate and fame rate are flexible and can be adjusted as you like.

E.g. Set video size to 1920*1080 when you feel like to keep 1080p as the source file features. Or set "original" in video bitrate drop-down list to keep best quality. You may skip this step as well as default format works well with FCP too.

Step 4. Start the process to convert Canon T3i mov files to ProRes 422 for FCP by clicking the big "Convert" button.


  • Before you try to do the conversion, if you are also a FCP X user, please make sure that you have installed the Apple ProRes Codec manually since the FCP X asks users to install it by themselves.


Once the conversion is finished, you can click "Open" button to get the output files effortlessly.
Now you have got it right, feel free to import and edit Canon T3i mov files to Final Cut Pro 7.


Additional editing features of the Pavtube Canon MOV to ProRes Converter:

1. Combine files together- check the files to be merged in file list and check 'Merge into one' box beside 'Settings' button.

2. Deinterlace- click 'Editor', switch to 'Effect' tab, find 'Deinterlacing' box, and check it to eliminate interlacing lines.

3. Thumbnail- click 'Snapshoot' button when previewing the video. Click 'Option' to set the image format of screenshots.

4. Trim a section of the movie- click 'Editor', switch to 'Trim' tab, and input time point in start and end box.

The Pavtube HD Video Converter for Mac supports a more variety of DSLR cameras than you expect – including Canon EOS 5D Mark III, EOS-1D Mark IV, EOS 5D Mark II, EOS 7D, EOS 60D, Rebel T4i, Rebel T2i, Rebel T5i and Nikon DSLR cams. Pavtube Video Converter reads standalone .mov files from Canon memory card. You don't need the full card structure, just pick up what you want to keep.

Read Related Articles:

Sunday, August 25, 2013

Transfer Sony PMW-320 XDCAM MXF Content to FCP X or FCP 6/7

Follow this article, you will get the best solution to convert XDCAM MXF to FCP friendly Prores 422 codec, then you can easily solve Sony PMW-320 HD422 MXF editing problems with Final Cut Pro X and FCP 6/7 on Mac.

Sony is pleased to announce the introduction of the new PMW-320 XDCAM EX Camcorder. This new ½” shoulder mount camcorder joins the award-winning XDCAM EX product family of professional Solid State Recording acquisition tools. This new camcorder inherits all of the advanced creative recording features of the successful PMW-EX1, PMW-EX1R, PMW-EX3 and the PMW-350 camcorders, and also offers several enhancements such as improved low light capability as well as SD recording as a standard feature.

Similar to the PMW-350, the PMW-320 supports multiple frame rate recording such as 59.94i, 50i, and native 23.98P and 25P as well as being 1080i/720P switchable. Sony PMW-320 XDCAM camcorders' video format is MXF, using MXF footage on Mac is a big problem.

As XDCAM MXF format is not compatible with FCP X or FCP 6/7, if you want to edit Sony PMW-320 XDCAM MXF in Final Cut Pro, you'll need to download and install the Sony XDCAM Transfer Software. While, if you haven’t install these XDCAM import Plug-in for Final Cut Pro correctly, it’s still hard task to transfer Sony XDCAM media to FCP X or FCP 6/7.

Well, here is an easier way, that is, to convert Sony PMW-320 MXF video to FCP native ProRes 422 codec. To accomplish this goal, you just need a XDCAM to FCP Converter for Mac to help you. It can fast convert Sony PMW-320, PDM700, PDM-F800, PMW-100, PWM-200 camcorder XDCAM MXF to Apple Prores .MOV for editing in FCP X or FCP 6/7 without quality loss. It is an easy-to-use while high-efficient.
  • For users who need to deal with multi-track XDCAM MXF file, refer to the guide here.
Free download and install it, and this guide will tell you how to solve Sony PMW-320 HD422 MXF editing problems with Final Cut Pro X and FCP 6/7 on Mac step by step.


1. Install and launch this XDCAM to ProRes Converter. Import Sony PMW-320 XDCAM MXF footages to the converter


3.Click Format bar to choose the output format. Click and choose Final Cut Pro -> Apple ProRes 422 (*.mov).

4.You can click "settings" to customize the output parameters, adjust the resolution, bitrate as you want.

5.Start convert Sony PMW-320 XDCAM to ProRes for FCP editing on Mac.

Click the "Convert" button to start conversion. The conversion processes will transcode Sony PMW-320 XDCAM MXF to ProRes MOV videos to be compatible with FCP X or FCP 6/7 editing.

After conversion, you can import video files and projects into Final Cut Pro without any trouble. Congratulations! You have successfully taken the first step to make your own masterpiece.

With this Sony XDCAM to ProRes Converter, you can easily change Sony PMW-320 XDCAM MXF files to FCP X or FCP 6/7 for editing, this software runs fast, so you can convert your XDCAM footages to FCP in less time, video and audio synchronization are perfectly guaranteed.

Editor's Recommendations

Thursday, August 22, 2013

Converting Canon XA25 MTS recordings to Apple FCP and Aperture 3

Summary: In this tutorial, we intend to elaborate how to enable Apple Final Cut Pro and Aperture 3 to work with AVCHD MTS clips taken by Canon XA25.                                               


The XA25 is a compact, high-performance Professional camcorder designed specifically for "run-and-gun," ENG-style shoots with enhanced I/O connectivity. The XA25 offers a unique combination of high-precision optics, outstanding image processing, multiple Recording formats, flexible connectivity and intuitive User features.

The camcorder features both MP4 (up to 35 Mbps) and AVCHD (up to 28 Mbps) codecs at up to 1080/60p Resolution for virtually blur-free, high-quality capture of fast-moving subjects. Dual-band, built-in Wi-Fi technology allows easy FTP File transfer and Upload to the internet.

I have a ton of footage a client brought in that was shot on a Canon XA25 HD camcorder. They are .MTS files. I don't see any timecode on them. I need to get them into FCP and Aperture 3 to edit with. But FCP/Aperture 3 does not see this kind of format and will not import. Anyone have an efficient workflow for this?

Why would you meet the trouble? Because FCP, including FCP 6/7 and FCP X, and Aperture 3 cannot support the native AVCHD footages from Canon XA25. In order to transfer MTS files from the XA25 to FCP and Aperture 3, you need to transcode the MTS to ProRes 422, FCP and Aperture 3 compatible video format. 

Luckily, we found an app called Pavtube MTS/M2TS Converter for Mac, which is a versatile and professional AVCHD to FCP Converter, tired it and succeeded. 

Overall, it is not only the best MTS/M2TS Converter for Mac which can aid you to convert Canon XA25 AVCHD to ProRes 422 for FCP and Aperture, but also designed for fast transcoding, deinterlacing AVCHD MTS footage from Canon, Panasonic, JVC, and Sony full HD AVCHD camcorder/cameras that makes the MTS editing work much easier with Non-Linear Editing Systems on Mac.  

See also:

Easy Guide on Converting Canon XA25 MTS recordings to FCP and Aperture 3

1. Download Pavtube AVCHD to Prores Converter for Mac, it's an professional AVCHD converter on Mac which can convert Canon XA25 AVCHD files to different formats.

2. Install and launch this AVCHD Converter for Mac. Import the 1080p .mts footages from Canon XA25 to the converter.


3. Click "Format" bar to choose output format, you can click and choose Final Cut Pro -> Apple ProRes 422 (*.mov) as the best codec for editing in Apple Final Cut Pro and Aperture 3.


4. If you want to customize the output parameters, you can click settings button. Adjust the resolution and others as you need.

5. Click convert button to start the Canon XA25 AVCHD to ProRes 422 MOV conversion.

With Pavtube MTS/M2TS converter for Mac, you can easily convert Canon XA25 AVCHD files to Apple Final Cut Pro and Aperture 3 for editing with Prores 422 codec MOV format.

After converting, you can import videos to Final Cut and Aperture 3 for editing as you want.
Read More:

Tuesday, August 20, 2013

Import Panasonic AG-HPX170/HPX171 P2 MXF files to FCP and Burn FCP projects to DVD on Mac

Summary: Follow this post to know how to import Panasonic AG-HPX170/HPX171 P2 MXF to FCP for editing and burn FCP projects to DVD on Mac, hope it can solve you P2 mxf to FCP problem and dvd burning solution.

Every time that there is a need to hire a better camera it seems that everyone is hiring the Panasonic HVX200 and not the Sony EX1. So I have not had a chance to see how the HVX200's 4:2:2 with 720p helps with my Blue or Green Screen filming. I know that the EX1 produces a cleaner and better picture than the the Panasonic – or so I am told – but the colour decimation is 4:2:0, hmmm. But here is the Panasonic HPX170/171 that also has a much better picture but with 4:2:2 colour decimation. So this will be my best choice.


However, there cames another problem- How to import Panasonic AG-HPX170/HPX171 P2 MXF footages into FCP for editing smoothly on Mac?

The thing is, FCP does not work perfectly with the Panasonic P2 MXF codec. As far as I know, to solve the P2 MXF importing problems, the most important piece of the equation is that transcoding Panasonic P2 Card MXF files to a FCP's supported video format, like Apple ProRes (422).

If you looking for a solution for this problem likewise, check out Pavtube MXF Converter for Mac which is entitled as a top P2 MXF Converter. It supports encoding Panasonic P2 and Canon MXF files and Sony XDCAM MXF to FCP native format so that you can easily import the Panasonic AG-HPX170/HPX171 P2 MXF recordings to FCP for editing on Mac.


So follow the quick tutorial below to transcode Panasonic AG-HPX170/HPX171 P2 MXF to FCP compatible format and then edit in FCP or burn to DVD on Mac.

Part 1: How to import Panasonic AG-HPX170/HPX171 P2 MXF files to FCP? 

  • For FCP X users, pls make sure you have installed ProApps QuickTime Codecs, or you may get files only without video. You can download it from here:

    http://support.apple.com/kb/DL1396

1. Free download Pavtube MXF Converter for Mac trial version, install and launch it.


2. Click "Add video" or "Add from folder" icon to load Panasonic AG-HPX170/HPX171 MXF files into Pavtube application.


3. Select Final Cut Pro friendly output format.

Apple ProRes 422 is considered as the best format for FCP, so you are recommended to choose "Apple ProRes 422 (*.mov) as target format from "Format" > "Final Cut Pro".


4. Start Panasonic AG-HPX170/HPX171 P2 MXF to Apple ProRes 422 conversion.

Click the big "Convert" button to start encoding Panasonic AG-HPX170/HPX171 P2 MXF to Apple ProRes 422 MOV for Final Cut Pro.

When completes, locate the converted MOV files from target file path by clicking "Open" icon.

Now, open up Final Cut Pro, choose File > Import > Files…to select and load the generated ProRes 422 MOV files to FCP for editing use.


Part 2: Burn FCP projects to DVD on Mac

Pavtube DVD Creator for Mac adds support for MXF files burning, it can burn single file or folder structure videos, you can burn MXF/FCP projects to DVD disc in few steps, just follow it:

1. Install DVD Creator for Mac, connect your DVD Writer and insert a blank DVD. Add your videos into the DVD Creator for Mac

2. Edit movie clip and Customize your DVD menu. You can edit your videos with trim, crop, watermark, effect settings, audio replacing settings features.


3. Preview Created DVD-Video and click burn button to start burning.


Read More:

Sunday, August 18, 2013

Enable Sony PMW-200 XDCAM MXF to work with Final Cut Pro

Summary: From this article, you can learn the best way to import Sony PMW-200 XDCAM MXF footage into Final Cut Pro on Mac by transcoding Sony XDCAM HD422 MXF to Prores for FCP.

 
The PMW-200 is Sony's successor to the hugely popular PMW-EX1 Camcorder. It is the first handheld camera in its class to be equipped with 3 x 1/2-inch Exmor CMOS sensors for excellent sensitivity and enhanced depth of field characteristics. Sony PMW-200 can record in Full HD 4:2:2 at 50 Mb/s, delivering exceptional performance, operational versatility and workflow efficiency. Its high-quality MPEG HD422 50 Mbps recording is fully compliant with the latest EBU commendations for long-form broadcast production and is widely accepted in broadcasting stations and production houses.

After making some 50 Mbps MPEG HD422 recordings from Sony PMW-200, you may find the MXF files are not support by Final Cut Pro on Mac natively. To solve the importing problem with Sony PMW-200 MXF and FCP workflow. Of course, you can choose to get a XDCAM Transfer. While, things can be different if you get some help from third-party software.

Now come and meet this Pavtube Sony XDCAM MXF Converter, which is capable of converting Sony PMW-200 MXF footage to Prores encoded mov files for that's the most compatible format for FCP. 


How to convert Sony PMW-200 1080 50i MXF to Final Cut Pro on Mac

Step 1. Connect your Sony PMW-200 to mac and keep it on, or use a card reader to transfer your footage to mac. Get this MXF Converter for Mac installed, click top left two icons to load individual videos or the entire folder correspondingly.


Step 2. Choose best format for editing in Final Cut Pro.

Click the drop-down list besides Format, choose Final Cut Pro > Apple ProRes 422 (*.mov) as the most compatible format as well as best video quality for FCP.


Step 3. Adjust output video settings including video size, codec, bitrate, frame rate by clicking Settings, all according to your needs.


Step 4. Click the big red circle to start conversion. Wait for a while, you can get the fresh hot converted video which is compatible with Final Cut Pro.

Tips:

Pavtube MXF Converter for Mac support outputting the original one audio track separately; if you want to retain and combine all the audio tracks, the Pavtube iMixMXF is highly recommended.

Pavtube iMixMXF integrates all features of Pavtube MXF Converter for Mac and multi-track preserving and mixing features. Other than the unique multi-track preserving feature, you can also Mix the multi tracks into one track for broadcasting. And this makes the iMixMXF as a wonderful MXF Audio Mixer. And this feature enables you to mix the audios of interviewer, interviewee, surroundings, or editors'/directors' comments into one.

Read Related Articles: