Sunday, June 30, 2013

The Way for Editing Canon PowerShot S110 MOV footage in FCP 6/7/X on Mac

Summary: Follow the guide below you will get the easy way to transcode Canon PowerShot S110 MOV to FCP 6/7/X for editing with ProRes codec. 

Canon PowerShot S110:Top-quality stills and video, plus a hatful of features – our new favourite compact camera.

S110 offers a maximum ISO of 12800 at full resolution, built-in wi-fi connectivity, GPS functionality via pairing with a smartphone, 1080p movie recording at 24fps, full range of manual shooting modes, RAW format support and 10fps burst shooting.

If you have got the  S110 and often use it to record 1080P video, you may have the need to edit Canon PowerShot S100 MOV in Final Cut Pro 6/7/X on Mac. The FCP 6/7/X best supported video format is Apple ProRes 422 codec MOV format, so FCP doesn't support Canon PowerShot S110 mov footages well, you may encountered many problems, like import it slowly, and couldn't edit videos smoothly.

The best method to solve these problems is to convert S110 MOV footage to ProRes for editing in Final Cut Pro 6/7/X, you can follow the steps below to transcode Canon PowerShot S110 MOV to FCP 6/7/X for editing.

1. Download Pavtube HD Video Converter for Mac. This professional Mac HD Video Converter can help you convert Canon PowerShot S110 H.264 mov files to ProRes 422 MOV format for Final Cut Pro 6/7/X, more output formats are also supported.


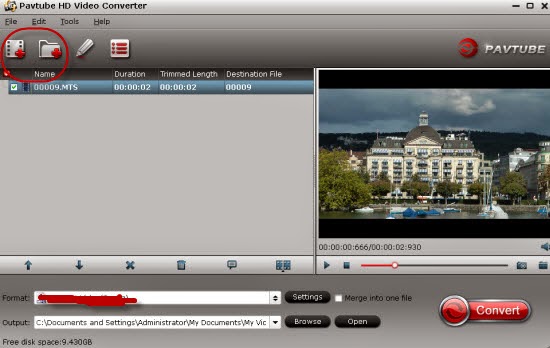
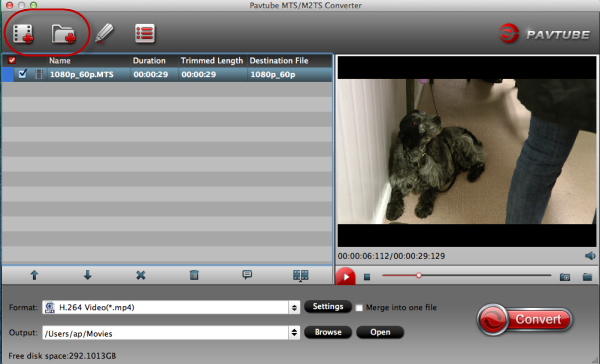
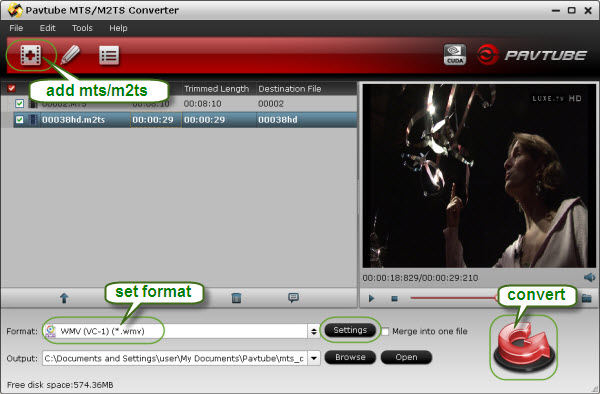
2. Install and launch this Canon MOV Converter for FCP. Import Canon PowerShot S110 .mov footage to the converter.
canon mov converter for mac Frustration with FCP X and Canon PowerShot N MOV transcoding

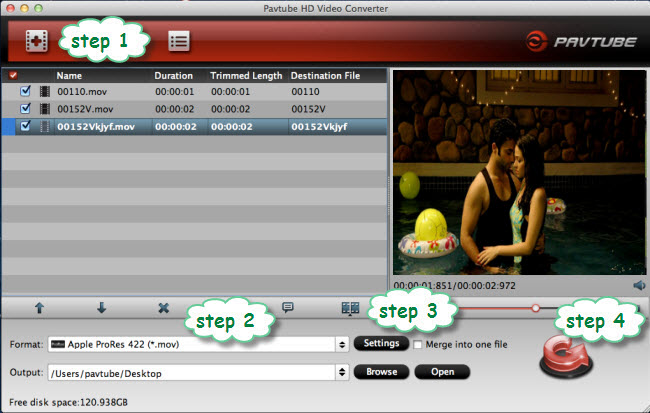
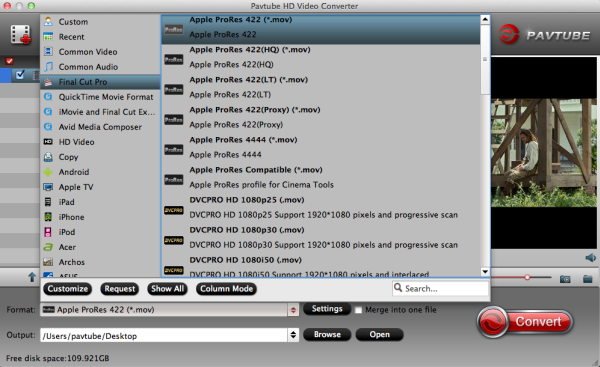
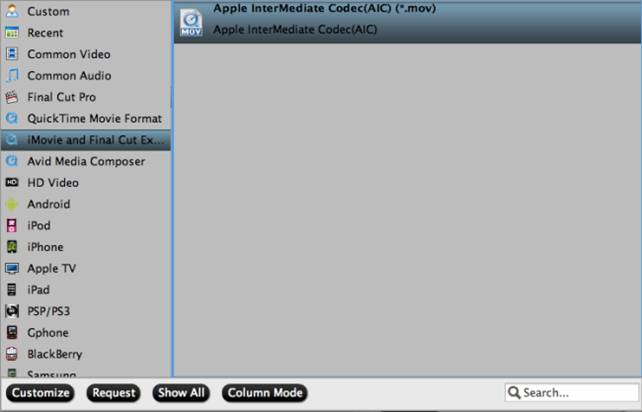
3. Click format bar to choose the output format. Click and choose Final Cut Pro -> Apple ProRes 422 (*.mov).


4. You can click "settings" to customize the output parameters, adjust the resolution, bitrate as you want.


5. Click "Convert" button to start.

Once you have finished the conversion, you can import Canon PowerShot S110 1080p mov video files to Final Cut Pro 6/7/X for editing easily.

P.S. 

This Canon MOV to Prores Converter also highlight with 
importing Canon S110 1080p mov to iMoviejust enjoy yourself. 

Editor's Recommendations

Tuesday, June 25, 2013

Using LUT’s on set and with Resolve with the PMW-F55/F5/F3 and FS700


Sony recently released a set of 4 cube LUT’s (Look Up Tables) for use with SLog2. You can download those LUT’s here: DaVinciResolve CubeFiles. In addition there are many other LUT’s that you can use with SLog2 to help create different looks. In this article I’m going to look at how you can use these both on set and in DaVinci Resolve. Currently on set you cannot upload LUT’s to the F55/F5 or FS700, so if you want to use the LUT’s to alter your monitor output you need to use some additional hardware. One of the most affordable solutions is the Black Magic Design HDLink Pro. This box has HDSDI inputs and outputs as well as other output options including DisplayPort to which you can connect either a DVI or HDMI monitor with the appropriate adapter. 


By placing the HDLink between the cameras HDSDI out and your monitor you can apply a LUT by connecting a computer to the HDLink via USB and using the HDLink software utility to import the LUT to the Black Magic box. If you don’t have a LUT you can use the HDLink software to adjust many parameters of the picture to create your desired look live on set. There is one limitation however, without a LUT, you cannot adjust the overall saturation of the image, so when shooting with SLog2 and SGamut the pictures will not have the full saturation (colour) of your final graded output. 

To compensate for this you can always turn up the saturation on the monitor, just remember to restore the saturation control back to normal before you put the monitor away at the end of the shoot! When using a 3D LUT like the cube LUT’s linked above you do get a full correction including saturation. The computer (which can of course be a laptop) does not need to remain connected to the HDLink. Once you have uploaded the LUT to the box and are happy with your look you can disconnect the computer. The HDLink will remember the LUT and settings until you power it down, so whenever you use it, it’s always a good idea to plug a computer back in from time to time to check how it is set. 

If the plan is to use the same LUT both on set and in the grade then you must set up the camera to output correctly. Most LUT’s are designed for use with Log recording, so this means that in the majority of cases the camera will need to be set to output SLog2 (Slog with the PMW-F3). If you are shooting raw using the Sony AXS-R5 recorder then you can take the AUX out from the R5 and use that to feed the HDLink box. This output is a real-time de-bayer of the raw recording with SLog2 applied. By using this output you can still use the F5 and F55′s built in LUT’s if you needed as the built in LUT’s are not applied to the R5′s AUX output. If you do use EI Gain then this will have an impact on your LUT as the recordings (and AUX output) will most likely be exposed brighter, but the result should be similar for both the on-set view via the HDLink and in post production. For FS700 users shooting raw with the R5 the additional AUX output is the only way to feed HDSDI to the HDLink as the cameras HDSDI is used to feed the raw data to the R5. 

After the shoot, to use the LUT in DaVinci Resolve, first you must place the LUT or LUT’s, in the correct library folder before opening Resolve. The LUT’s must be saved in the .CUBE format to the Cinespace folder or a new sub directory in: 

Mac: 
System Drive/Library/Application Support/Black Magic Design/DaVinci Resolve/LUT/ 

PC: 
On a PC the folder may be hidden, if so go to windows explorer and select “organize” then ”view” and click “show hidden folders”. 

Once you have installed your LUT’s you can then open Resolve and import your SLog2 footage. If you are shooting raw with the AXS-R5 then you need to open the project settings and ensure that the raw files are being correctly displayed using SLog2 and SGamut. I do this by going to the “camera raw” page and set “Decode Using” to “Project” and then change the Gamut to “SGamut” and gamma to “SLog2″. This ensures all Sony raw clips will be treated as SLog2 even if you did use an internal camera LUT.  

Next select the clip or clips that you wish to apply the LUT to and right click on the clip and select “3D LUT” and go to the “Cinespace” folder or the folder you created. There you should see your LUT’s listed. Simply choose the LUT you wish to use. You may need to add some gain or lift adjustment to tweak your images, but they should look as they did via the HDLink box. 
 

You can also use Resolve to create a .cube LUT for use on set. Simply shoot some test Slog2 clips and grade them as you wish the final image to look. Then once your happy with your look, right click on the clip and “Export LUT”. Resolve will then create a .cube LUT that you can use with the HDLink. 

Although this is really aimed at those shooting using log, this process will work with almost any camera and any gamma curve. The key thing to remember is to always use the same camera settings with LUT’s tailored to those particular settings. So for example you could use this with a PMW-200 using a Hypergamma or a Canon C300 using C-log or a DSLR. Provided the LUT was created to work with the way the camera is set up, it should work correctly. Just don’t expect a LUT designed for Log to work with a non Log camera. 

Read more: 

Monday, June 24, 2013

Convert AVCHD MTS/M2TS/TS to Avid, Premiere, Sony Vegas, Pinnacle Studio, Movie Maker and Cyberlink

Facing the problem importing MTS/M2TS/TS files in Avid, Premiere, Sony Vegas, Pinnacle Studio, Movie Maker and Cyberlink, you can fix the issues via transcoding AVCHD to Windows Editor compatible format.

  • AVCHD? What is it? Where is the format from?


AVCHD-
Advanced Video Coding High Definition is the new high definition video format for HD camcorder recording and playback (often with the file extension of mts, m2ts or mt2, ts). which is usually recording by professional digital Sony, Panasonic, Canon and more camcorders and cameras.
 

  •  AVCHD Importing on Win? Is that so easy?

If you have a HD camera or camcorder device, you have great chance to deal with AVCHD .mts/.m2ts/.ts Video. After you shot many enough videos, then you definitely want to edit these AVCHD file. However, it is not so easy to import/edit AVCHD MTS recordings on Win, as AVCHD is a highly compressed format just fit for viewing but not for editing, it can’t suported well by  many editing software like  Avid Media Composer , Adobe Premiere, Sony VegasPinnacle Studio, Windows Movie Maker and CyberLink PowerDirector.

Users' AVCHD MTS/M2TS/TS clips to MOV conversion need: 

Case 1: Hello, I have a Sony HDR-CX150 Camcorder which records H.264 MTS files. I need a tool which is able to convert MTS files into a file format I can use/manipulate on Adobe Premiere to make family movies on my PC computer? Thanks.

Case 2: I'm new to Avid. I am using Avid media composer 5.0. Can anyone help me with importing .mts files? I am using Panasonic HDC-TM700 to shoot the mts in AVCHD folder. When I import the MTS files into the project bin, it will take hours to import a 600MB file. Sometime it will just give me an error message to say that shot of storage. What should I do to speed the importing process?

Case 3: Hello,I'm running windows 7 and using Pinnacle Studio 15 for editing. The camera I shoot with is the Panasonic LX5. What format would you recommend I transcode to for Pinnacle Studio editing?

Case 4: Yesterday I got my new My Canon Vixia HF S200. I have tried shooting in AVCHD format. And I would like to transcode these mts files into something that Windows Movie Maker can manipulate. Is there anyone recommend one way to make the importing and editing more efficiently or suggest the best and fast workaround? I appreciated any help.

  • Convert AVCHD MTS recordings? What software to choose?

To edit or import AVCHD/MTS/M2TS/TS files in Avid, Premiere, Sony Vegas, Pinnacle Studio, Windows Movie Maker and Cyberlink smoothly, you will need to convert AVCHD MTS/M2TS/TS videos to best compatible format for Windows PC. By the way, “the AVCHD video software is not always as willing as AVCHD camcorder hardware”, so that decent AVCHD Converter software is necessary to be prepared at hand.

Pavtube MTS/M2TS Converter  is mainly used to effortlessly encode/re-encode AVCHD MTS/M2TS/TS video files from  Sony (3D), Panasonic (3D) and few Canon Cameras to for smoothly importing andediting in various Windows non-linear editing systems (NLE), including Avid, Premiere, Sony Vegas, Pinnacle Studio, Windows Movie Maker and Cyberlink. If youre using a Mac, please turn to its equivalent Mac version– iMedia Converter Mac, which can help you solve the AVCHD and Mac incompatibility.


  • Edit AVCHD Recordings on Windows PC? How to make it?

Step 1: Free download the best AVCHD to Windows PC Converter and run it to add the AVCHD MTS/M2TS/TS footages.


Step 2: Hit the Format box and select “HD Video” option on the dropdown menu and you can choose “AVI/WMV/MPEG-2” as output format for editing with Premiere, Sony Vegas, Pinnacle Studio, Windows Movie Maker, Cyberlink.


Besides, you can choose “Avid DNxHD 720p (*.mov)“ or "Avid DNxHD 1080p (*.mov) " for Avid MC editing.

Step 3: Adjust video and audio parameters, including the Bitrate of Video and Audio, the Codec of Video and Audio, Video Size, Sample Rate, Frame Rate, Audio Channels, etc., by clicking the “Settings” button on the main interface for getting the best quality.

Step 4: Click the “Convert” button on the main interface to start transcoding AVCHD footages to AVI/WMV/MPEG-2/MOV for editing inAvid, Premiere, Sony Vegas, Pinnacle Studio, Windows Movie Maker, Cyberlink.

When the conversion is completed, click “Open” in the main interface and get the converted files for importing and further editing.

Now transferring and editing AVCHD/MTS/M2TS/TS video files in Avid, Premiere, Sony Vegas, Pinnacle Studio, Windows Movie Maker, Cyberlink is smooth and without any problem.

Read More:

XAVC to FCP-Import Sony PMW-400 XAVC footage to FCP 7/X for editing

Following Guide on Sony PMW-400 Workflow for Getting 4K XAVC Files Into Final Cut Pro.

XAVC is the newest HD recording format announced by Sony, it uses level 5.2 of H.264/MPEG-4 AVC which is the highest level supported by that video standard. XAVC can support 4K resolution (4096 × 2160 and 3840 × 2160) at up to 60 frames per second (fps). 

Final Cut Pro is a good tool to edit videos on Mac, however, for the new XAVC users, it is a big problem to loading XAVC files in FCP (including FCP 7 and FCP X), they will get some trouble for the video clips, or rather the XAVC clips, are not supported by FCP, such files will not be shown when importing.


Now comes along with the new PMW-400, which is the latest addition to Sony's XDCAM HD422 line-up. Sony PMW-400 is capable of MPEG HD422 50Mbps recording for higher picture quality, providing diverse format selection including XAVC support for HD production. So people now are all concerning about how to import Sony PMW-400 XAVC to FCP 7/X for editing?

As FCP are not workable with XAVC files natively, if you want to load Sony PMW-400 XAVC to FCP (including FCP 7 and FCP X), first you need to convert XAVC to FCP friendly codec like Apple Prores. of course, losslessly. To do so, you need a professional XAVC Video Converter to help.

Here I'd like to recommend an excellent XAVC to FCP Converter from Pavtube, which is a great Sony XAVC Converter for Mac. It can not only convert Sony PMW-400 XAVC videos to Apple ProRes codec, but also guarantee smooth editing.

Compatible OS: Mac OS X like Tiger, Leopard, Snow Leopard, Lion, Mountain Lion.

Now get it installed and let's work it out.

How to load Sony PMW-400 XAVC videos to FCP 7/X?

Step 1: click top left icons to load your footage from PMW-400 into XAVC to Prores Converter for Mac. You can load individual videos by clicking ‘add videos', or load the entire folder by clicking ‘add from folder'.


Step 2: Choose Apple ProRes 422 codec for Final Cut Pro 7/X.

Click the "Format" option, and move mouse cursor to Final Cut Pro > Apple Prores 422 (*.mov) or Apple ProRes 422 HQ (*.mov) as output format.


To get 1080 videos, we need to click the "Settings" button and choose 1920*1080 as output video resolution.

Step 3: Convert Sony PMW-400 XAVC files for FCP.

Click the read button Convert to start transcoding Sony PMW-400 XAVC files to MOV for FCP 7/X. When the conversion is completed, click "Open" button to locate the converted Apple ProRes 422 MOV files for editing with Final Cut Pro.

See more:
Convert Sony PMW-400 XAVC to iMovie/FCE

Saturday, June 22, 2013

Best solution to edit Panasonic HS900 recorded 1080/60p AVCHD videos in iMovie/FCE

Summary: If you would like to edit Panasonic HDC-HS900 1080/60p MTS on Mac with iMovie and FCE, just follow the steps below to convert Panasonic HS900 1080/60p MTS to iMovie/FCE best codec AIC.

Panasonic HDC-HS900 features Advanced 3MOS System, 1080/60p or 1080/50p Recording (Full-HD 1,920 x 1,080, 60/50 Progressive Recording), NEW HYBRID O.I.S. (Optical Image Stabilizer), large 3.5-inch LCD with Touch Operation, and a 220GB HDD and DXC/SDHC/SD Memory Card Hybrid Recording. 3D image recording is possible with the optional VW-CLT1 3D Conversion Lens. The Panasonic HS900 weighs approx 395g, with dimensions of 67 x 72 x 146mm. Compatible with SDHC, SDXC memory cards. The HD video camera stores videos in .mts format with MPEG-4 AVC/H.264 compression.

One on friends had recorded some videos using Panasonic HDC-HS900 as part of his research. He would like to import the HS900 camcorder videos to iMovie/FCE on Mac for editing. However, the resulting HD videos are in AVCHD .mts files which is highly compressed and could not be imported to iMovie/FCE. With the 1080/60p recording mode, the videos play great on the HS900 camcorder, however, Mac is not compatible with this format, not even iMovie or Final Cut Exprees.

While looking for a solution to edit HS900 recorded 1080/60p AVCHD videos in iMovie/FCE, Mac Panasonic AVCHD Converter is recommended as the partner to Panasonic HS900 for iMovie/FCE editing. As Apple InterMediate Codec is the most compatible video format for iMovie, this superior Panasonic 60p/50p MTS to iMovie/FCE Converter will help you to convert Panasonic HDC-HS900 1080/60p AVCHD to AIC and make HS900 HD camcorder video footage editable on iMovie and FCE.

Below is a simple instruction for you to import and edit Panasonic HDC-HS900 60p/50p MTS to iMovie/FCE on iMac/MacBook Pro with Mac OS X like Mountain Lion, Lion, Snow Leopard.

Step 1. Import HDC-HS900 AVCHD MTS/M2TS files to Panasonic AVCHD to AIC Converter for Mac.

Click the add button to import the AVCHD resource files to the Pavtube AVCHD MTS/M2TS converter for Mac. Then the files will be listed on the file list tab, you can choose to check the properties of the video or preview it.


Step 2. Choose suitable output format forthe HDC-HS900 AVCHD to AIC conversion.

Click the format bar, and there will bemany output formats on the format list. You are recommended to choose iMovie and Final Cut Express > Apple Intermediate Codec (AIC) (*.mov).


Step 3. Convert HDC-HS900 AVCHD MTS/M2TS video footages to iMovie/FCE.

Click the "Convert" button and start transcode HDC-HS900 AVCHD MTS/M2TS footage to AIC for iMovie/FCE will begin at once.

When the conversion finished, you candirectly import the output AIC MOV files to iMovie and Final Cut Express for editing andmake your movies. The importing needn’t any rendering because the AIC MOV isone of the compatible video formats in iMovie/FCE on Mac OS X Lion.

Read More:

Sony Cyber-shot RX100 sequel leaks in Japanese with WiFi and tilting display

We were more than a little smitten with Sony's original RX100, a high-end Cybershot point-and-shoot housing a notable 1-inch 20.2-megapxiel CMOS sensor alongside a f/1.8 Carl Zeiss lens. It looks like there were enough customers that thought the same, because SonyAlphaRumors has gleaned several images from the manual for a sequel device.

The site has more to share, but it's checking its translations first. In the meantime, these initial images already point to some notable hardware additions. Alongside a screen that can tilt up and down (plus a light sensor to adjust brightness automatically), the mark two RX100 will apparently catch up with Sony's NEX series, adding built-in WiFi too. There's also the addition of a hot shoe for mics and other peripherals, but fear not: there's still the built-in flash to the left of it. Naming, pricing and availability are still unknowns, but according to the site's mole, the camera will get formally announced later this month on June 27.

See related video tips for Sony: 

Thursday, June 20, 2013

Deinterlace/Import Sony DSC-WX30 1080i mts to Avid, Premiere, Sony Vegas, Pinnacle and Windows Movie Maker

Sony has announced the WX30, a 5x zoom camera with 16.2MP backlit CMOS sensor.
Overview:
Professional quality in your pocket

So compact and easy to use, the Cyber-shot™ WX30 digital camera offers extraordinary imaging possibilities. Step up to high-performance imaging with detail-packed stills, 3D and smooth Full HD video. Picture Effect lets you achieve impressive creative results with ease.

Features:

  • Better looking pictures made easy 
    Not sure how to pick the perfect camera settings to suit a particular scene? Don’t worry, help is at hand. Superior Auto Mode adjusts exposure and other camera settings for optimum results in a wide range of shooting situations.
  •  Magical moviesLeft your camcorder behind? One touch is all that’s needed to shoot brilliantly crisp, detailed HD 1080i video clips. Picture quality is wonderfully clear and smooth, while efficient AVCHD video compression keeps files smaller for storing and sharing.
  • Add a new dimension with 3DDiscover an incredible world of 3D imaging. Shoot 3D stills at the touch of a button. Capture wide 3D images to enjoy on your 3D TV with Sweep Panorama. Sweep Multi Angle creates amazing 3D-like views you can explore by tilting the camera screen.
  • Sensational images, even in low light 

    Many cameras struggle to produce crisp, clear images in low light. The revolutionary Exmor R™ CMOS sensor boosts sensitivity while reducing image noise for brilliant, detail-packed pictures. 

Tips: Sony DSC-WX30 1080i AVCHD workflow on Windows PC editing program

Sony WX30 offers 1080i recordings in AVCHD and MP4 format, so if you wanna import WX30 AVCHD file to PC in video editing programs like Avid, Premiere, Sony Vegas, Pinnacle or Windows Movie Maker for editing, you may find most video editing programs does not recognize the WX30 AVCHD video footage, and that's why we need to convert Sony MTS to editable formats before editing.

Soteware Requirement:

Pavtube HD Video Converter for Mac - a powerful Sony AVCHD MTS Converter can help you easily transcode Sony WX30 1080i AVCHD to best codec for Windows platform. (Downlaod the Windows version here: )

This is the main interface of the AVCHD to AVI/WMV/MOV Converter:


You can choose rich output formats for editing on Windows.

For example, it the Format box, you can select WMV (for Adobe Premiere, Sony Vegas, Windows Movie Maker), MOV (for Avid Media Composer), AVI (for Pinnacle Studio), etc.

After encoding Sony WX30 1080i MTS to Windows PC compatible format, Sony WX30 1080i AVCHD footage can be imported to Avid, Premiere, Sony Vegas, Pinnacle or Windows Movie Maker instantly and also the 1080i is deinterlaced.

Another program Pavtube Video Converter can do the same job, it can also deal with you blu-ray, DVD and HD Videos. just have a try!

Read More: