Wednesday, August 28, 2013

Canon intros PowerShot G16, S120, SX170 IS, SX510 HS point-and-shoot cameras


Canon's got a handful of incremental updates to detail, including a selection of PowerShot point-and-shoots. Now it announced the release of four new PowerShot cameras: the PowerShot G16, PowerShot S120, PowerShot SX510 HS and PowerShot SX170 IS.


Overall, The G16 is the priciest of the bunch, ringing in at $550. This model, which is set to ship in October, replaces last year's G15, and includes a 12.1-megapixel CMOS sensor, DIGIC 6 processor, 5x 28-140mm f/1.8-2.8 optical zoom lens and 1080/60p video capture. Next up is the S120, retailing for $450, also in October. This pocketable S110 replacement includes a 12.1-megapixel CMOS sensor, DIGIC 6 processor, 5x 24-120mm f/1.8-5.7 optical zoom lens and 1080/60p video capture. The SX510 HS is the cheapest of this premium bunch, with a $250 MSRP. This superzoom, expected in September, packs a 12.1-megapixel CMOS sensor, DIGIC 4 processor, a 30x 24-720mm f/3.4-5.8 optical zoom lens and 1080p video.

These cameras feature advanced DIGIC imaging technology and the ability to achieve faster autofocusing speeds than previous PowerShots. The G16 and S120 also feature the new Star mode to capture the brilliance of a starry night sky, while the new Background Defocus mode allows users to soften the background of their images.

For the connected photographer, the PowerShot G16, S120 and SX510 HS digital cameras come with built-in WiFi that allows for outstanding quality images and video files to be wirelessly transferred from the camera to social networking sites through CANON iMAGE GATEWAY, to a PC, or on their compatible iOS or Android device through the free Canon CameraWindow app. All initial setup can be accomplished from a smart device or computer, allowing for easy photo sharing on-the-go.

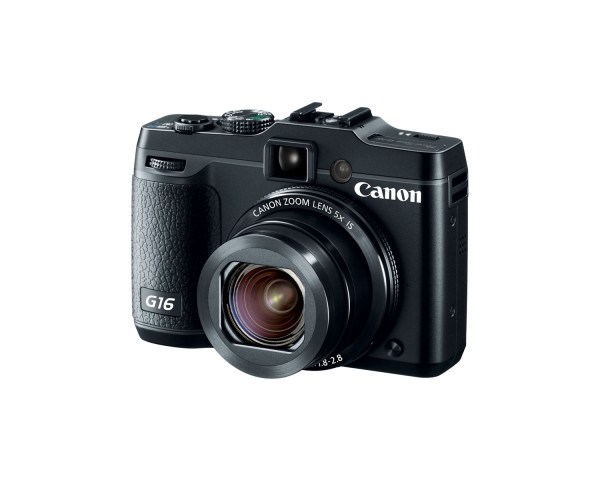
The PowerShot G16 is the first PowerShot in the G-series that comes equipped with built-in WiFi, the G16 has the ability to share images and video to Facebook, Twitter, YouTube, Flickr and email. The PowerShot G16 features a 28-140mm wide-angle lens with an aperture range of f/1.8 – f/2.8. The G16 is equipped with Canon’s HS System, which combines a DIGIC 6 image processor and a 12.1-megapixel High-Sensitivity CMOS image sensor for enhanced image quality. The PowerShot G16 also features improved AF times and reduced shooting lag over previous G-series models. The G16 has continuous shooting speeds of 9.3 frames-per-second. The G16 also captures 1080p Full HD video, and includes built-in stereo microphone and HDMI output.

In addition, the camera’s creative handheld HDR Scene mode automatically combines multiple shots of a scene to help create an image with a greater dynamic range without the necessity for a tripod. The G16 also features dials and controls similar to those on Canon’s EOS DSLRs. It’s also compatible with Canon Speedlite flashes and other accessories.

The PowerShot G16 is scheduled to be available in October for $549.99.


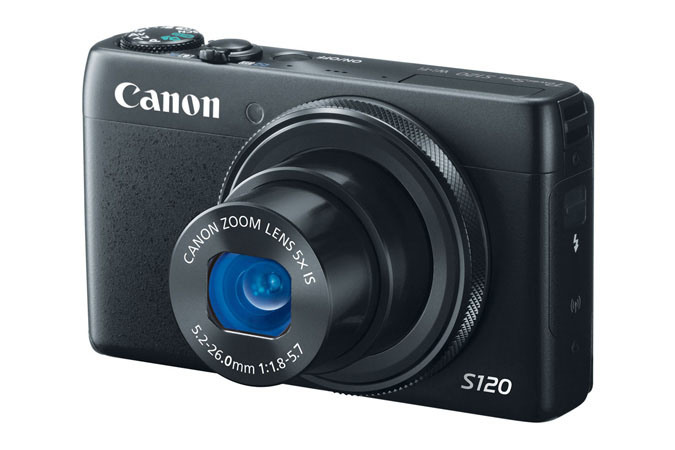
The PowerShot S120 features a 24-120mm extra-wide angle lens with an aperture range of f/1.8-f/5.7. It’s equipped with Canon’s HS System and allows for continuous capture of up to 12.1 frames per second at 12.1-megapixels. The S120 also records 1080p Full HD video and includes built-in stereo microphone and HDMI outputs.

The PowerShot S120 is scheduled to be available in October for $449.99.


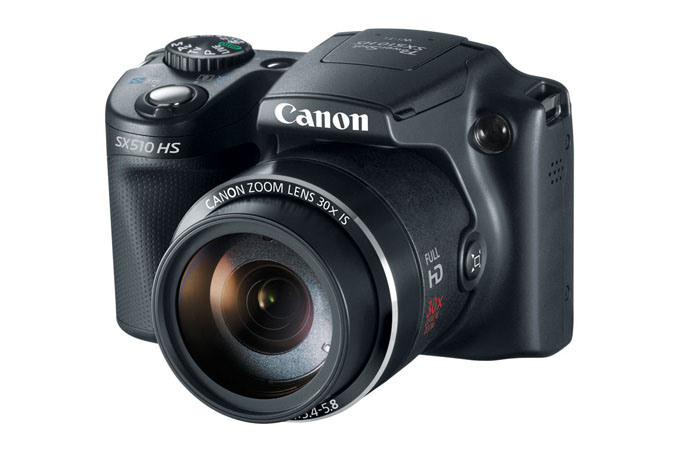
The PowerShot SX510 HS camera has a 30X optical zoom 24mm wide-angle lens, intelligent IS technology, a 12.1 megapixel CMos sensor and Canon DIGIC 4 Image Processor. The SX510 also records 1080p Full HD video and built-in WiFi. The camera’s Zoom Framing Assist automatically maintains the correct distance from a subject using face recognition.

The PowerShot SX510 HS is scheduled to be available in September for $249.99.


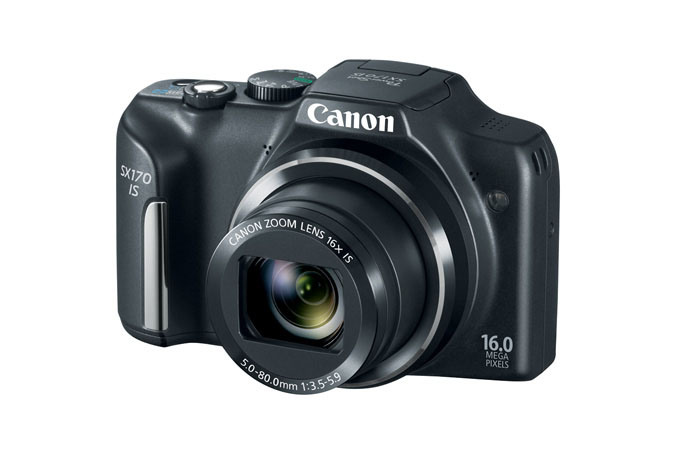
The PowerShot SX170 has 16x optical zoom with a 28mm wide-angle lens and Optical Image Stabilization. The SX170S also features high-speed AF, an intelligent IS system, a DIGIC 4 Image Processor and a 16-megapixel sensor and 720p video. The PowerShot SX170 IS also has a 3-inch LCD screen and an ergonomic bod.

The PowerShot SX170 IS is scheduled to be available in September for $179.99.

Related news:

Nikon's Coolpix L620 14x superzoom ships next month
Canon Powershot N is a Facebook Ready Digital Camera

Source: Canon

Tuesday, August 27, 2013

Encode/Render Canon T3i .mov files to Prores 422 for Final Cut Pro 7

Q1: Ok I'm really interested in buying the Canon T3i beacuse it has great video quality and its fairly cheap....I'm a newbie to FCP and shoot videos with a Canon Rebel T3i. Obviously, I can copy the .mov files from the SD card to my Mac and edit in Final Cut Pro 7, but it's a bear (slow rendering time and whatnot) and I'm never impressed with the video quality output once I'm done rendering. The files are 1280x720 format, 60 fps. How to import without rending? Any compressor to convert my files to a more FCP-friendly file?

Q2: Canon T3i is perfect and I'd rent one for a wedding, and I am stuck with working with Final Cut Pro 7. Cause as it stands now any time i go to Log and Transfer and try to import files i get messages like FCP doesn't recognize format or something like that. What I'm wondering is their a program out there that can convert the video files of a T3i to a file format that can be read in Final Cut Pro 7.


The Canon EOS Rebel T3i/600D is new of the remarkable digital SDL cameras. And reading previus discussions, we learn that many folks are eager to find a best Canon T3i video converter to get the T3i camera recognized in FCP 7.
 
At first you should know that Canon T3i records its movies as .MOV files using variable bitrate H.264 compression, which is much more conservative of memory card space, but not fit for editing in FCP 7. To help you to get Canon T3i mov files editable in Final Cut Pro 7, Pavtube Canon MOV Converter for Mac is the first choice for you to make smooth videos for editing in FCP 7. It makes it easy to convert Canon T3i MOV footage to ProRes 422 for FCP.

Encode/Render Canon T3i H.264 mov video to Apple ProRes 422 Codec for FCP 7

In order to process Canon T3i MOV footage fast and seamless in Final Cut Pro, it requires that the H.264 .mov videos to be transcoded into Apple ProRes codec, which is the best intermediate codec developed specifically for seamless Final Cut workflow.

Step 1. Load H.264 .mov footage to Canon H.264 MOV Converter.

Transfer h.264 encoded .mov files from Canon T3i camera to your Mac HDD via USB cable. Run Pavtube HD Video Converter for Mac as the best Canon MOV to FCP Converter, and click the "Add" button to load .mov footage.


Step 2. Set a FCP friendly codec (e.g. Apple ProRes 422) as export format.

Click on "Format" bar and set a FCP friendly codec in dropdown-list. You are advised to follow "Final Cut Pro" template and choose "Apple ProRes 422 (*.mov)" as export format.


Tips:

1. H.264 codec has a much higher compression ratio than Apple ProRes, so the ingested files are significantly larger than the original files.

2. If you prefer smaller file size, choose "Apple ProRes 422 (LT) (*.mov)" instead.

3. The "Apple ProRes 422 (Proxy) (*.mov)" format offers file size at SD levels and is recommended for 480i/p and 576i/p shootings.

Step 3. Set possible best quality for FCP 7 editing.

Click the "Settings" button and customize proper video/ audio parameters if necessary. Video size, bitrate and fame rate are flexible and can be adjusted as you like.

E.g. Set video size to 1920*1080 when you feel like to keep 1080p as the source file features. Or set "original" in video bitrate drop-down list to keep best quality. You may skip this step as well as default format works well with FCP too.

Step 4. Start the process to convert Canon T3i mov files to ProRes 422 for FCP by clicking the big "Convert" button.


  • Before you try to do the conversion, if you are also a FCP X user, please make sure that you have installed the Apple ProRes Codec manually since the FCP X asks users to install it by themselves.


Once the conversion is finished, you can click "Open" button to get the output files effortlessly.
Now you have got it right, feel free to import and edit Canon T3i mov files to Final Cut Pro 7.


Additional editing features of the Pavtube Canon MOV to ProRes Converter:

1. Combine files together- check the files to be merged in file list and check 'Merge into one' box beside 'Settings' button.

2. Deinterlace- click 'Editor', switch to 'Effect' tab, find 'Deinterlacing' box, and check it to eliminate interlacing lines.

3. Thumbnail- click 'Snapshoot' button when previewing the video. Click 'Option' to set the image format of screenshots.

4. Trim a section of the movie- click 'Editor', switch to 'Trim' tab, and input time point in start and end box.

The Pavtube HD Video Converter for Mac supports a more variety of DSLR cameras than you expect – including Canon EOS 5D Mark III, EOS-1D Mark IV, EOS 5D Mark II, EOS 7D, EOS 60D, Rebel T4i, Rebel T2i, Rebel T5i and Nikon DSLR cams. Pavtube Video Converter reads standalone .mov files from Canon memory card. You don't need the full card structure, just pick up what you want to keep.

Read Related Articles:

Sunday, August 25, 2013

Transfer Sony PMW-320 XDCAM MXF Content to FCP X or FCP 6/7

Follow this article, you will get the best solution to convert XDCAM MXF to FCP friendly Prores 422 codec, then you can easily solve Sony PMW-320 HD422 MXF editing problems with Final Cut Pro X and FCP 6/7 on Mac.

Sony is pleased to announce the introduction of the new PMW-320 XDCAM EX Camcorder. This new ½” shoulder mount camcorder joins the award-winning XDCAM EX product family of professional Solid State Recording acquisition tools. This new camcorder inherits all of the advanced creative recording features of the successful PMW-EX1, PMW-EX1R, PMW-EX3 and the PMW-350 camcorders, and also offers several enhancements such as improved low light capability as well as SD recording as a standard feature.

Similar to the PMW-350, the PMW-320 supports multiple frame rate recording such as 59.94i, 50i, and native 23.98P and 25P as well as being 1080i/720P switchable. Sony PMW-320 XDCAM camcorders' video format is MXF, using MXF footage on Mac is a big problem.

As XDCAM MXF format is not compatible with FCP X or FCP 6/7, if you want to edit Sony PMW-320 XDCAM MXF in Final Cut Pro, you'll need to download and install the Sony XDCAM Transfer Software. While, if you haven’t install these XDCAM import Plug-in for Final Cut Pro correctly, it’s still hard task to transfer Sony XDCAM media to FCP X or FCP 6/7.

Well, here is an easier way, that is, to convert Sony PMW-320 MXF video to FCP native ProRes 422 codec. To accomplish this goal, you just need a XDCAM to FCP Converter for Mac to help you. It can fast convert Sony PMW-320, PDM700, PDM-F800, PMW-100, PWM-200 camcorder XDCAM MXF to Apple Prores .MOV for editing in FCP X or FCP 6/7 without quality loss. It is an easy-to-use while high-efficient.
  • For users who need to deal with multi-track XDCAM MXF file, refer to the guide here.
Free download and install it, and this guide will tell you how to solve Sony PMW-320 HD422 MXF editing problems with Final Cut Pro X and FCP 6/7 on Mac step by step.


1. Install and launch this XDCAM to ProRes Converter. Import Sony PMW-320 XDCAM MXF footages to the converter


3.Click Format bar to choose the output format. Click and choose Final Cut Pro -> Apple ProRes 422 (*.mov).

4.You can click "settings" to customize the output parameters, adjust the resolution, bitrate as you want.

5.Start convert Sony PMW-320 XDCAM to ProRes for FCP editing on Mac.

Click the "Convert" button to start conversion. The conversion processes will transcode Sony PMW-320 XDCAM MXF to ProRes MOV videos to be compatible with FCP X or FCP 6/7 editing.

After conversion, you can import video files and projects into Final Cut Pro without any trouble. Congratulations! You have successfully taken the first step to make your own masterpiece.

With this Sony XDCAM to ProRes Converter, you can easily change Sony PMW-320 XDCAM MXF files to FCP X or FCP 6/7 for editing, this software runs fast, so you can convert your XDCAM footages to FCP in less time, video and audio synchronization are perfectly guaranteed.

Editor's Recommendations

Thursday, August 22, 2013

Converting Canon XA25 MTS recordings to Apple FCP and Aperture 3

Summary: In this tutorial, we intend to elaborate how to enable Apple Final Cut Pro and Aperture 3 to work with AVCHD MTS clips taken by Canon XA25.                                               


The XA25 is a compact, high-performance Professional camcorder designed specifically for "run-and-gun," ENG-style shoots with enhanced I/O connectivity. The XA25 offers a unique combination of high-precision optics, outstanding image processing, multiple Recording formats, flexible connectivity and intuitive User features.

The camcorder features both MP4 (up to 35 Mbps) and AVCHD (up to 28 Mbps) codecs at up to 1080/60p Resolution for virtually blur-free, high-quality capture of fast-moving subjects. Dual-band, built-in Wi-Fi technology allows easy FTP File transfer and Upload to the internet.

I have a ton of footage a client brought in that was shot on a Canon XA25 HD camcorder. They are .MTS files. I don't see any timecode on them. I need to get them into FCP and Aperture 3 to edit with. But FCP/Aperture 3 does not see this kind of format and will not import. Anyone have an efficient workflow for this?

Why would you meet the trouble? Because FCP, including FCP 6/7 and FCP X, and Aperture 3 cannot support the native AVCHD footages from Canon XA25. In order to transfer MTS files from the XA25 to FCP and Aperture 3, you need to transcode the MTS to ProRes 422, FCP and Aperture 3 compatible video format. 

Luckily, we found an app called Pavtube MTS/M2TS Converter for Mac, which is a versatile and professional AVCHD to FCP Converter, tired it and succeeded. 

Overall, it is not only the best MTS/M2TS Converter for Mac which can aid you to convert Canon XA25 AVCHD to ProRes 422 for FCP and Aperture, but also designed for fast transcoding, deinterlacing AVCHD MTS footage from Canon, Panasonic, JVC, and Sony full HD AVCHD camcorder/cameras that makes the MTS editing work much easier with Non-Linear Editing Systems on Mac.  

See also:

Easy Guide on Converting Canon XA25 MTS recordings to FCP and Aperture 3

1. Download Pavtube AVCHD to Prores Converter for Mac, it's an professional AVCHD converter on Mac which can convert Canon XA25 AVCHD files to different formats.

2. Install and launch this AVCHD Converter for Mac. Import the 1080p .mts footages from Canon XA25 to the converter.


3. Click "Format" bar to choose output format, you can click and choose Final Cut Pro -> Apple ProRes 422 (*.mov) as the best codec for editing in Apple Final Cut Pro and Aperture 3.


4. If you want to customize the output parameters, you can click settings button. Adjust the resolution and others as you need.

5. Click convert button to start the Canon XA25 AVCHD to ProRes 422 MOV conversion.

With Pavtube MTS/M2TS converter for Mac, you can easily convert Canon XA25 AVCHD files to Apple Final Cut Pro and Aperture 3 for editing with Prores 422 codec MOV format.

After converting, you can import videos to Final Cut and Aperture 3 for editing as you want.
Read More:

Tuesday, August 20, 2013

Import Panasonic AG-HPX170/HPX171 P2 MXF files to FCP and Burn FCP projects to DVD on Mac

Summary: Follow this post to know how to import Panasonic AG-HPX170/HPX171 P2 MXF to FCP for editing and burn FCP projects to DVD on Mac, hope it can solve you P2 mxf to FCP problem and dvd burning solution.

Every time that there is a need to hire a better camera it seems that everyone is hiring the Panasonic HVX200 and not the Sony EX1. So I have not had a chance to see how the HVX200's 4:2:2 with 720p helps with my Blue or Green Screen filming. I know that the EX1 produces a cleaner and better picture than the the Panasonic – or so I am told – but the colour decimation is 4:2:0, hmmm. But here is the Panasonic HPX170/171 that also has a much better picture but with 4:2:2 colour decimation. So this will be my best choice.


However, there cames another problem- How to import Panasonic AG-HPX170/HPX171 P2 MXF footages into FCP for editing smoothly on Mac?

The thing is, FCP does not work perfectly with the Panasonic P2 MXF codec. As far as I know, to solve the P2 MXF importing problems, the most important piece of the equation is that transcoding Panasonic P2 Card MXF files to a FCP's supported video format, like Apple ProRes (422).

If you looking for a solution for this problem likewise, check out Pavtube MXF Converter for Mac which is entitled as a top P2 MXF Converter. It supports encoding Panasonic P2 and Canon MXF files and Sony XDCAM MXF to FCP native format so that you can easily import the Panasonic AG-HPX170/HPX171 P2 MXF recordings to FCP for editing on Mac.


So follow the quick tutorial below to transcode Panasonic AG-HPX170/HPX171 P2 MXF to FCP compatible format and then edit in FCP or burn to DVD on Mac.

Part 1: How to import Panasonic AG-HPX170/HPX171 P2 MXF files to FCP? 

  • For FCP X users, pls make sure you have installed ProApps QuickTime Codecs, or you may get files only without video. You can download it from here:

    http://support.apple.com/kb/DL1396

1. Free download Pavtube MXF Converter for Mac trial version, install and launch it.


2. Click "Add video" or "Add from folder" icon to load Panasonic AG-HPX170/HPX171 MXF files into Pavtube application.


3. Select Final Cut Pro friendly output format.

Apple ProRes 422 is considered as the best format for FCP, so you are recommended to choose "Apple ProRes 422 (*.mov) as target format from "Format" > "Final Cut Pro".


4. Start Panasonic AG-HPX170/HPX171 P2 MXF to Apple ProRes 422 conversion.

Click the big "Convert" button to start encoding Panasonic AG-HPX170/HPX171 P2 MXF to Apple ProRes 422 MOV for Final Cut Pro.

When completes, locate the converted MOV files from target file path by clicking "Open" icon.

Now, open up Final Cut Pro, choose File > Import > Files…to select and load the generated ProRes 422 MOV files to FCP for editing use.


Part 2: Burn FCP projects to DVD on Mac

Pavtube DVD Creator for Mac adds support for MXF files burning, it can burn single file or folder structure videos, you can burn MXF/FCP projects to DVD disc in few steps, just follow it:

1. Install DVD Creator for Mac, connect your DVD Writer and insert a blank DVD. Add your videos into the DVD Creator for Mac

2. Edit movie clip and Customize your DVD menu. You can edit your videos with trim, crop, watermark, effect settings, audio replacing settings features.


3. Preview Created DVD-Video and click burn button to start burning.


Read More:

Monday, August 19, 2013

Best Way to convert Canon HF G30 AVCHD footage to Premiere Pro CS6 and After Effects CS6

Summary: With following this guide, you can smoothly import and edit Canon HF G30 50p/60p AVCHD footage in Premiere Pro CS6 and After Effects CS6 by transcoding Canon 50p/60p .mts to Premiere/AE CS6 most compatible MPEG-2 video.


The new Legria HF G30 (also known as the Vixia HF G30 in the US) from Canon has the same imaging system, but without the XLRs and is aimed at enthusiast videographers, such as hobbyists or film students. Their HD video system has been completely redesigned – from the lens through to the image sensor and processor – to improve imaging performance. There are various advanced shooting features and connectivity options to suit different types of applications, from news and documentaries to weddings.

This camera is awesome, I've had it almost a month now and was able to put it through it's paces on a Disney cruise to Alaska. It was amazing with great control in manual mode with auto exposure and worry free shooting in auto mode where all my settings were taken care of.

But now I have a question. I'm working on a documentary project using a Canon HF G30; I had problems working with AVCHD Progressive files genereted by HF G30 and I was very worried because both Premiere Pro CS6 and After Effects CS6 didn't support the 1080 50p/60p .mts files. To make this kind of file compatbile, I tried to convert the Canon HF30 AVCHD footage with various programs but the results was no more an HD progressive file.

Then I tried this amazing program, Pavtube MTS/M2TS Converter for Mac , and I'm very happy of the converted files: no loss of quality, the same high resolution, same colors and defitition.It works fast and with an incredible quality; I tried to compare the original files with the converted one and I could not find differences, I even analysed the two files with professional instrumens and compared the flow on a professional monitor, this program it's simply great! Now I have successfully converted Canon HF G30 50p/60p MTS footage to editable formats not only for  Premiere Pro CS6 and After Effects CS6 editing, the converted files work perfectly with these pofessional editing programs!!! Just follow the step-by-step guide I shared below to get the work done smoothly.

Convert Canon HF G30 50p/60p
.mts to Premiere Pro CS 6 and After Effects CS6 editable format

Step 1: Copy Canon HF G30 50p/60p .mts media on to the Storage Drive in a folder.

Step 2: Launch the best Canon AVCHD Converter for Mac. Click the "Add" button for adding to import the 50p/60p mts files from Canon HF G30 to the best Mac G30 MTS/M2TS Converter.


Step 3: Click on the dropdown menu of "Format", and then move your pointer to Adobe Premiere/Sony Vegas> MPEG-2 (*.mpg) which is the perfect video format for you to transfer MTS to Adobe Premiere Pro CS6 and After Effects CS6.


Then you can set the output folder by clicking "Browse" icon as you prefer.

Step 4: Click "Settings" icon to adjust audio and video parameter. You can change the default codec, bit rate, frame rate, sample rate and audio channel according to your needs and optimize the output file quality.

Note: To get original(best) video quality, you can keep original video size and bitrate.

Step 5: Click the "Convert" button and it will losslessly convert Canon HF G30 AVCHD 50p/60p mts files to MPEG-2 for editing in Premiere Pro CS6 and After Effects CS6 immediately.

Step 6: Once the Mac MTS to Premiere and AE CS6 conversion is done, you will be able to get the output files for Adobe Premiere Pro CS6 and After Effects CS6 via clicking on "Open" button effortlessly.

Now you can easily and correctly import the converted video in Premiere Pro CS6 and After Effects CS6 for editing keeping high quality.

Read More:

Sunday, August 18, 2013

Enable Sony PMW-200 XDCAM MXF to work with Final Cut Pro

Summary: From this article, you can learn the best way to import Sony PMW-200 XDCAM MXF footage into Final Cut Pro on Mac by transcoding Sony XDCAM HD422 MXF to Prores for FCP.

 
The PMW-200 is Sony's successor to the hugely popular PMW-EX1 Camcorder. It is the first handheld camera in its class to be equipped with 3 x 1/2-inch Exmor CMOS sensors for excellent sensitivity and enhanced depth of field characteristics. Sony PMW-200 can record in Full HD 4:2:2 at 50 Mb/s, delivering exceptional performance, operational versatility and workflow efficiency. Its high-quality MPEG HD422 50 Mbps recording is fully compliant with the latest EBU commendations for long-form broadcast production and is widely accepted in broadcasting stations and production houses.

After making some 50 Mbps MPEG HD422 recordings from Sony PMW-200, you may find the MXF files are not support by Final Cut Pro on Mac natively. To solve the importing problem with Sony PMW-200 MXF and FCP workflow. Of course, you can choose to get a XDCAM Transfer. While, things can be different if you get some help from third-party software.

Now come and meet this Pavtube Sony XDCAM MXF Converter, which is capable of converting Sony PMW-200 MXF footage to Prores encoded mov files for that's the most compatible format for FCP. 


How to convert Sony PMW-200 1080 50i MXF to Final Cut Pro on Mac

Step 1. Connect your Sony PMW-200 to mac and keep it on, or use a card reader to transfer your footage to mac. Get this MXF Converter for Mac installed, click top left two icons to load individual videos or the entire folder correspondingly.


Step 2. Choose best format for editing in Final Cut Pro.

Click the drop-down list besides Format, choose Final Cut Pro > Apple ProRes 422 (*.mov) as the most compatible format as well as best video quality for FCP.


Step 3. Adjust output video settings including video size, codec, bitrate, frame rate by clicking Settings, all according to your needs.


Step 4. Click the big red circle to start conversion. Wait for a while, you can get the fresh hot converted video which is compatible with Final Cut Pro.

Tips:

Pavtube MXF Converter for Mac support outputting the original one audio track separately; if you want to retain and combine all the audio tracks, the Pavtube iMixMXF is highly recommended.

Pavtube iMixMXF integrates all features of Pavtube MXF Converter for Mac and multi-track preserving and mixing features. Other than the unique multi-track preserving feature, you can also Mix the multi tracks into one track for broadcasting. And this makes the iMixMXF as a wonderful MXF Audio Mixer. And this feature enables you to mix the audios of interviewer, interviewee, surroundings, or editors'/directors' comments into one.

Read Related Articles: