Thursday, January 9, 2014

How to get Nikon D610 footages readable by Apple Aperture 3

Summary: Wonder if Aperture 3 has add support for Nikon D610 mov files? In this article, you will get the way to smoothly import Nikon D610 footages to Apple Aperture 3 with no need to worry the incompatible issue.

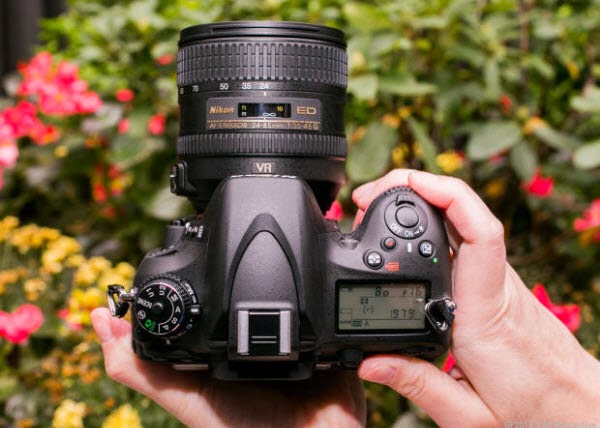
Nikon D610 Packed with features that rival cameras costing nearly twice as much, the Nikon D610 is the least expensive full-frame 35mm sensor DSLR that Nikon makes and is a great way to enter full frame photography. Shoot 1080p HD videos with selectable frame rates of 30p, 25p or 24p and MPEG-4 AVC/H.264 compression in highly compressed MOV format.


Cant open D610 RAW files in Apple Aperture 3. Does anyone know if Apple Aperture will be supporting the D610 movie format? Appreciate any help!

After testing, we find that Apple Aperture 3 can't support Nikon D610 MOV video footages well due to codec reason. To get Nikon D610 footages readable by Apple Aperture 3, it's a good choice to convert Nikon D610 MOV to Aperture best supported video formats, such as Apple ProRes codec MOV, and then you can edit the Nikon D610 video in Apple Aperture 3 smoothly. Now, you can follow the easy steps below.

The easy way to import and edit Nikon D610 108p MOV in Apple Aperture 3

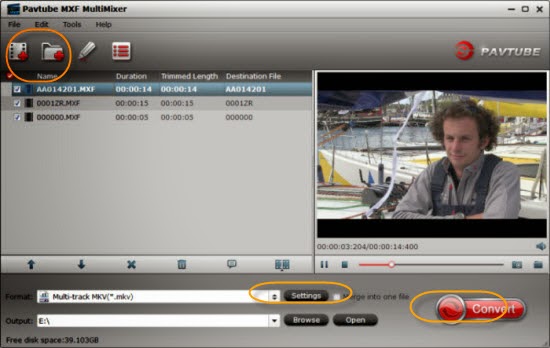
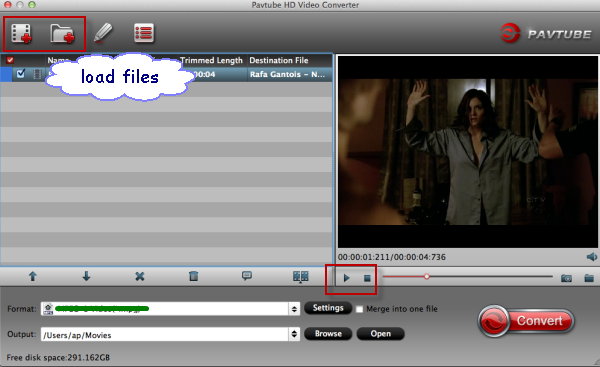
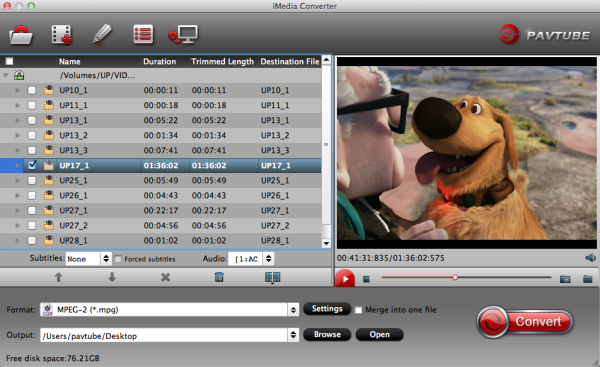
Step 1: Download Pavtube Mac MOV to Aperture Converter and import your Nikon D610 MOV file.


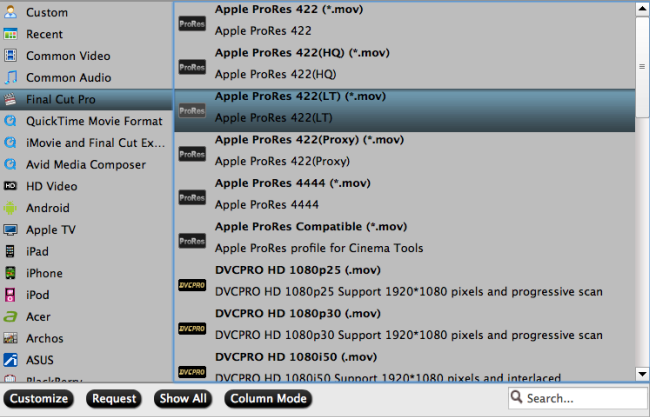
Step 2: Click format column and choose the output format. You are recommended to choose Final Cut Pro -> Apple ProRes 422 (*.mov), it's great for editing in Apple Aperture 3.


Step 3: Click settings button to adjust the output video's parameters, such as bitrate, resolution, etc. (Optional)

Step 4: Start converting Nikon D610 1080p MOV videos to ProRes codec for Apple Aperture 3.

After converting, you can load Nikon D610 video to Apple Aperture 3 for editing as you want, now you can have a try.


More tips for you:


Transfer Panasonic HDC-MDH1 AVCHD 2.7" videos to FCP 6/7

Summary: Read on this article, you can get the hints how to import and edit Panasonic HDC-MDH1 2.7" AVCHD MTS footage with Final Cut Pro 6/7 flawlessly without any issue.  

I purchased Panasonic HDC-MDH1 on 26.3.2012 in Bangalore. This is an exellent professional shoulder mount camera in lowest price, also best for Wedding, Birthday parties, Functions, outdoor shoots etc. Shoots in very lowest light clear picture. No vibration in long zoom shooting. 


I have just shot my first HD wedding video with the MDH1. I am very happy with the video quality with the 2.7" Touchscreen LCD, the camera which records in AVCHD format, I need to edit the   2.7" mts files on Mac with FCP before sharing with my friends and family.

But I find that Panasonic HDC-MDH1's recording AVCHD MTS files are not the preferred format for Final Cut Pro 6/7. Then I think the first step to do is to convert Panasonic mts video to FCP compatible Prores codec for editing with high quality on iMac/MacBook Pro with Mac OS X like Leopard, Snow Leopard, Lion, Mountain Lion and Mavericks 10.9.  Now I will share the easy steps here.

Step 1: Free Download and install Panasonic MTS to FCP Converter to your Mac. It's excellent Panasonic AVCHD Converter which can convert nearly all Panasonic camcorder videos to any formats you need, such as Apple Prores 422 MOV, Apple InterMediate Codec MOV, QuickTime MOV, etc. Then import your 2.7" AVCHD files from HDC-MDH1.

import-files-to-mts-converter

Step 2: Click the format bar, and move mouse cursor to "Final Cut Pro > Apple ProRes 422 (*.mov)" as output format .


Tips:

a.  There are other four presets for ProRes: Apple ProRes 422 HQ, Apple ProRes 422 LT, Apple ProRes 422 Proxy and Apple ProRes 4444. Usually the ProRes 422 HQ has better video quality than ProRes 422 and could meet your needs. If you need smaller size, turn to ProRes 422 LT.

Learn more Apple ProRes, please refer to Types of Apple ProRes Codecs

b. Click Settings to customize video size, bitrate, frame rate and other specs.

settings-for-output-format

Step 3. Click "Convert" button to start transcoding Panasonic HDC-MDH1 2.7" AVCHD videos to FCP 6/7 on Mac OS (Mavericks 10.9 included).

After a shot conversion, you will be able to import/load Panasonic HDC-MDH1 2.7" videos into Final Cut Pro 6/7 for editing without rendering.

Read More:

Wednesday, January 8, 2014

Pavtube Released 2014 World's Best iOS Data Recovery Software

Summary: Pavtube iOS Data Recovery is newly released for iOS Device users to recover lost data from iPhone, iPad, iPod Touch and iTunes Backup files.

Pavtube iOS Data Recovery 1.0.0 (Windows Version) is newly released for the new coming year. iOS Device users with any generations of iPhone, iPad, and iPod Touch can now recover lost data either directly from iOS device or from iTunes Backup file on Windows or Mac.

 Price: $59.95

iOS remains more popular than Android for holiday shopping in the US according to MacRumors. And iOS attracts Apple lovers of all over the world with its stability, no crapware, well-designed & intuitive user-interface, etc. But one still may encounter data loss by false configuration, device stolen, water damage, factory settings restoration, failure to update or jailbreak, etc. which are all frustrating. Pavtube developers found solution to help people who want to recover lost contacts, photos, videos, call history, SMS, iMessage, notes, reminders, and more.

"I have many friends using iPhone and other iOS devices. Some of them asked me for help when they deleted data unexpectedly," said Anda Wu, the software developer, "After some research, I finally found that the deleted data are actually stored in other ways on the device and in iTunes Backup files and can be recovered. And then it comes to my mind that we can develop an easy tool to recover lost data and help those who felt depressed on this."

Pavtube iOS Data Recovery is thus developed and released at a special point of time to help users in the fresh new year of 2014.

"It not only recovers 7 types of data, like lost contacts, notes, call history, and Safari bookmark directly from the device, but also recovers 11 types of data including images and videos from iTunes Backup files," continued by Anda. "And we minimized the process into only three steps: connect (or choose iTunes Backup file), scan, and recover."

"Pavtube iOS Data Recovery will be a wonderful saving for iOS device users to recover or backup data. And we are preparing for future updates to make it be able to recover more data." concluded Anda.

To learn more about Pavtube iOS Data Recovery, please visit

http://www.pavtube.com/ios-data-recovery/

http://www.pavtube.com/ios-data-recovery/quick-start-guide.html


Safe Free Download Pavtube iOS Data Recovery for Windows or Mac 1.0.0:


Some Related Tutorials:


Source: http://bestvideosolution.blogspot.com/2014/01/solution-to-recover-data-from-ios-device.html

Two ways to ingest Nikon D5300 H.264 MOV to Adobe Premiere Pro on Mac

How to import .mov footage taken by Nikon D5300 to Adobe Premiere Pro without rendering? By converting Nikon mov to Premiere friendly format, you can easily get the smooth workflow with D5300 and Premiere Pro on Mac (Mavericks included).

Nikon D5300 makes fantastic quality images and weighs almost nothing, so it's a pleasure to carry it everywhere. Compared to the pro cameras I often haul, the D5300 feels as if it's hollow, which is a very good thing. It can record H.264/MPEG-4 stored as .MOV video files which ensures high quality.

As the H.264 codec 
is highly compressed, so can not easily and directly import and edit Nikon D5300 mov files on Mac with Adobe Premiere Pro. If you want to import  Nikon D5300 MOV video to Premiere Pro on Mac for editing, you are likely to meet all kinds of problems due to the compatibility issue. So how can we import Nikon D5300 MOV footage to Premiere Pro? Here are two solutions:

Method 1.

Right click your MOV footage; rename the .mov files with .mpg extension. This "fools" Adobe Premiere Pro into thinking it's a different codec.

It works in this way; however, your footages didn't turn into another codec so that Premiere Pro may still does something wrong during editing. And if you didn't do a backup before changing the extension, it really ruins your valuable footage.

Besides, here's another problem: what if you have hundreds of clips to be edited? Rename all of them could be such a pain!

So here comes the second way to let Nikon D5300 import to Adobe Premiere Pro smoothly.

Method 2.

To crack the obstacle, the best way is to convert the H.264 MOV from Nikon D5300 to MPEG-2 or MOV which have been designed to work especially well as high-quality, high-performance editing codecs for Premiere Pro. Come and meet this Canon MOV to Premiere Pro Converter which would be a vital part of your workflow. You can order a license directly, or free download a trial version here.

Transcode Nikon D5300 H.264 mov files on Mac to Premiere Pro for editing

Step 1. Connect your Nikon D5300 to Mac with USB cable or use card reader to transfer the MOV files to hard drive disk; do not forget to keep your camcorder on.

Step 2. Run this Nikon D5300 MOV Converter, click the "Add video" button to load individuals mov videos; or click "Add from folder" to load the entire folder.


Step 3. Choose editing program compatible format.

Click the "Profile" option, you will find various video formats sorted by various programs/devices. For Adobe Premiere Pro, it should be "Adobe Premiere > MPEG-2(*.mpg)" or "MOV (AVC)(*.mov)".


Step 3. Click "convert" button to convert Nikon D5300 H.264 MOV for Premiere Pro with this best Canon EOS Video Converter.

After conversion completes, you can easily import Nikon D5300 footage to Premiere Pro for smoothly editing as you want.

Tips:

1. Click here to learn: Basic Steps to import Media Files to Premiere Pro on Mac.

2. If you are a Windows user, follow the windows workflow with Canon MOV files in Adobe Premiere.

Sunday, January 5, 2014

MXF MultiMixer: Top Choice to Encode MXF preserving Multiple audio channels

Summary: Want to deal with MXF files in multi-track? Here MXF MultiMixer from Pavtube will be your top Choice to Encode MXF preserving Multiple audio channels. This article will tells you how.

MXF files are more and more popular because Panasonic P2 camcorders, Canon XF camcorders and Sony XDCAM camcorders etc. are favored by a large proportion of users including both professional and amateurish photographers, such as: 

Panasonic: AG-HVX200, HVX-203, HPX170/171, HPX2000, HPX-2100, HPX2700, HPX3100, HPX3700, HPX500, HPX-300, etc. 

Canon: XF100, XF105, XF300, XF305, C300, C500 

Sony: PMW-350, PMW-320, PMW-100, PDW510, PDW-700, PDW-F800, PMW-500, PMW-200, PMW-160, etc. 

Most camcorders enable users to record Multi-audio channels, presenting stereoscopic in video shooting with great user experience, but neither MXF files nor multi-track MXF video are not friendly for playback or editing. Want to keep all audio tracks when converting MXF for playing on popular portable devices without quality loss? Want to convert more that 2 audio tracks intact to MOV for editing? Want to remove the unwanted audio tracks from original MXF Multi-audio tracks? Or need to mixing all audio tracks into one track after convertion? And here is exactly what Pavtube MXF MultiMixer can do for you. 

MXF MultiMixer, (For Mac:iMixMXF) works as a professional your best choice to covnert MXF for windows users which can convert transcode MXF files to AVI/WMV/MPEG-2/MOV for play MXF files on Quicktime with ease or import MXF files to After Effects/Premiere Pro/ Sony Vegas/Pinnacle Stdio/Windows Movie Maker for editing smoothly. 

What's more, it is the best Mixer tool which supports saving output video with the preservation of multiple audio tracks of original MXF videos. Other than multi-track preserving features, it is also capable of mixing several audio tracks into one track. Go to try those wonderful functions now and here offers you the Windows solution. 

 Encode MXF preserving Multiple audio channels with MXF MultiMixer

Download and install the best MXF Converter and Mixer, and then follow the instruction. 

Step 1. Load MXF footages. 

Run Pavtube  MXF MultiMixer on your PC, click "+" button to load the MXF video files or load the MXF folder. 


Tips: "Merge into one file" can help you to convert several MXF videos into one video. Just select the tasks you need and then check "Merge into one file", you will get one combination of those videos. 

Step 2. Select multi-track MP4/MKV/Proes format. 

Click "Format" menu to find "Multi-track Video", choose "Multi-track MKV (*.mkv)" or "Multi-track MP4 (*.mp4)" or "Multi-track MOV (*.mov)" for output.

Step 3. Set multiple audio tracks for MKV/MP4/MOV video. 

If you do not need all audio tracks for output, click "Settings" button you are allowed to uncheck the audio tracks you do not want for output. And you can choose to keep default settings or adjust parameters, like codec, bitrate, channels, etc, according to your different requirements. 

To mix multiple audio tracks into one track, go to check "Mix into one track" on the lower left. Conversely uncheck it you will get multiple audio tracks separately. 


Step 4. Start conversion. 

Click "Convert" button to start converting MXF to multiple audio tracks MKV/MP4/MOV videos, after a while go to "Open" button to locate the generated with on track. 

Now you can successly transcode MXF preserving Multiple audio channels with Pavtube MXF MultiMixer. Just have a try! 

Tuesday, December 31, 2013

Transcode JVC GY-HM650U ProHD MXF to ProRes 422 LT for FCP 6/7

To smoothly import JVC GY-HM650U MXF to Final Cut Pro 6/7, you can follow it to solving the problem by transcoding ProHD MXF to Prores 422 LT for FCP editing.

ProHD is a JVC's term describing a suite of professional high definition camcorders. JVC's GY-HM650 is the perfect camcorder for next generation newsgathering. With dual codec recording, clips can be transferred to the station immediately with built in FTP. Light, versatile and extremely easy to use, this camera offers superb low light performance, a long (23x) wide angle zoom lens, and MXF file interoperability from acquisition to air.


The MXF video is excellent, however, it cannot be directly edit on Apple software such as FCP 6 or FCP 7, for example:

“I record some video clips with the JVC GY-HM650U Camcorder and want to edit the MXF files in FCP X, however, the FCP just could not accept the HM650U MXF video clips, so how can I solve this problem? Thanks.”

First, you should know FCP native format is the Apple ProRes 422 codec. This is a common format developed by Apple. ProRes 422 is intended for non-linear editing with Apple Final Cut Pro. It retains higher quality when you convert MXF to ProRes for FCP. Below are some useful tips for you and you will know how to import and edit JVC GY-HM650U MXF to Final Cut Pro 6/7 on Mac. 


1. Download Pavtube iMedia Converter for Mac here. This is excellent software which can help you convert MXF video to ProRes 422, ProRes 4444, ProRes 422 LT for FCP 6/7 and FCP X. Besides, it supports many other formats for output. 

2. Install and launch the Professional MXF to FCP Converter for Mac, import the MXF video from JVC GY-HM650U. 


3. Choose the best output format for Final Cut Pro. Click on "Format" and choose "Final Cut Pro >>Apple ProRes 422(LT) (*.mov)" format. 


The Apple ProRes 422 (LT) codec provides the following: 
  • Roughly 70 percent of the data rate of Apple ProRes 422 (thus, smaller file sizes than Apple ProRes 422)
  • Higher quality than Apple ProRes 422 (Proxy)  
Learn more Apple ProRes, please refer to Types of Apple ProRes Codecs 

Tips:

a. You can click settings to adjust the output parameters, such as resolution, bitrate and frame rate. 


b. You can click edit button to edit MXF video, such as deinterlace, denoise, mute, volume up and crop. 


4. Click convert button to start JVC GY-HM650U ProHD MXF to ProRes 422 LT conversion.

After converting, you can import converted MXF footage to FCP 6/7 instantly without rendering. 


What's more: 

1. This MXF Converter for Mac from Pavtube will retain the timecode for Final Cut Pro after converting. And refer to the picture below to see how this cool mac mxf converting tool keep the timecode for FCP. 


2.Futhermore, if your MXF files have 2 audio tracks or more, here is a new program named iMixMXF with multi-track preserving and mixing features. You can download the trial version for evaluation!

In a word, hope you to enjoy your JVC GY-HM650U MXF footage workflow in Final Cut Pro 6/7 with ease.

Read More:

Friday, December 27, 2013

Import Sony F65 MXF to Premiere Pro CS6/CS5/CS4/CS3 on Mac/Windows

Can't import Sony F65 MXF video to Adobe Premiere Pro smoothly? In this article will give you the answer how to load and ingest Sony MXF footage to Adobe Premiere Pro CS6/CS5/CS4/CS3 for smooth editing. 

Sony F65 users include some of the most world's most demanding cinematographers. It's an advantage you can exploit no matter what your delivery format: true 4K, supersampled 2K or supersampled HD.


I have 4K footage shot on the Sony´s F65 I'd like to composite with in Premiere Pro. The files are saved in an MXF container.It seems that cs6 natively desn´t support this file, is there a plug-in available for Sony's SR RAW codec? Thanks in advance!
Many nonlinear editing programs including Adobe Premiere Pro (CS6/CS5/CS4/CS3) don't support importing MXF encoded files directly. So here comes up the question: how can we import Sony F65 MXF recordings to Premiere Pro without any problems?

Method 1. Sony MXF plug-in. Use the plugin to create a single MXF file of your spanned clips on the memory card and import the new file into the project.
Method 2. To solve the incompatible trouble you’d better change Sony F65 MXF a native format for importing to Premiere Pro (CS6/CS5/CS4/CS3). To get the best quality with 5.1 sound, you can MXF to MPG. If you also want to play it with QuickTime, you can reformat MXF to MOV videos. If you want to get a smaller file for quickly editing, you can encode Sony F65 MXF to WMV.

As you seen above, Pavtube MXF to Premiere Pro Converter for Mac is the best choice for you, and it is capable to convert Sony F65 P2 MXF to Premiere Pro efficiently and stably. 

With the Mac app, you not only can convert Canon XF/Panasonic P2/Sony XDCAM MXF video to MOV, MPG, WMV, you also can batch convert MXF clips to ProRes 422 for FCP (X), AIC for iMovie/FCE, etc. with included Profiles. I believe it is helpful for you. Below is a very easy guide on Sony F65 MXF to Adobe Premiere Pro’s native formats conversion.

Good News! Pavtube Release a New Site - multipelife.com with Product Migration and Name Change.

To thanks for your continued support, we are holding a 'New Site Special' in which you can get 20% off Video Converter Ultimate on Windows/Mac platform now:

Read more: http://1080p-video-tool.blogspot.com/2014/05/pavtube-new-site-release.html

PS: If you are a Windows user, please choose the Video Converter Ultimate, the workflow is the same.

Click here to download the free trial version, get it installed and let's start!
How to convert Sony F65 MXF footage for Premiere Pro CS 6/5/4/3

Step 1. Add MXF files to Pavtube iMedia Converter for Mac.

Connect you camcorder to Mac and keep it on until it show as a hard drive on desktop.

Install and run Pavtube iMedia Converter for Mac.

Click top left icon to load you footages. You can choose "Add videos" or "Add from folder" directly.


Step 2. Choose compatible format for Adobe Premiere Pro CS 6/5/4/3

Click "Format", you can choose "Final Cut Pro > Apple ProRes 422 (*.mov)". Or find Adobe Premiere Pro at left, choose "MPEG-2 (*.mov)" or "MOV(AVC)(*mov)" etc. All of them are the preferred codec for Premiere Pro (CS6/CS5/CS4/CS3)

Apple ProRes 422:


MOV, MPEG, WMV:


Step 3. Set up output videos settings for Premiere (Optional)

Click "Settings" which is marked as 3, you can fix the bitrate, frame rate, sample rate and video size, it's all up to you. Usually the higher bitrate you choose, higher video quality will be, and larger video size correspondingly.

Step 4. Start converting Sony F65 MXF for Premiere Pro (CS6/CS5/CS4/CS3)

Now click the big red circle at right bottom, wait for moments till the conversion complete. You can click "Open" to locate the converted video directly.

For beginners, here is a guide on how to import video files to Premiere Pro.

Here, Pavtube iMixMXF can exactly do this for you. It is a great MXF Mixer and Converter that enables you to convert multi-track MXF from Sony F65 to Prores for Premiere Pro preserving all the audio channels without quality loss, but also can make it easy for merging multiple video clips. The Windows users can Pavtube MXF MultiMixer.

Read More: