Showing posts with label Final Cut Pro. Show all posts

Monday, August 12, 2013

Importing/editing Canon 5D Mark III H.264 mov files in FCP X on Mac

Summary: From this article, you can know the best codec for importing Canon 5D Mark III mov clips to Final Cut Pro X editing on Mac, and only transcode Canon MOV to ProRes 422 or ProRes 422 HQ with Canon H.264 MOV Converter.

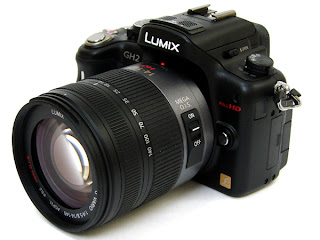
The Canon 5d Mark III that everyone has been waiting for has been announced. The camera brings a handful of improvements including speed, greater resolution, more processing power, and more options for shooting HD video. The full-frame sensor has been upped to 22.3 Megapixels and shoots up to 6 frames per second with a 61-point AF system. What’s great about the new sensor in this camera is that the pixel pitch is smaller, which allows for better low light performance.


I have really gotten everything I wanted out of my 5D Mk III. Best camera I ever had, it shoots mov files – which pains me is that FCP X could not recognize my mov footage. Did I miss something?

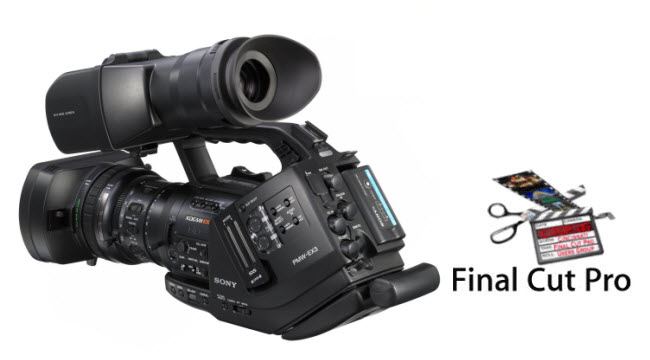
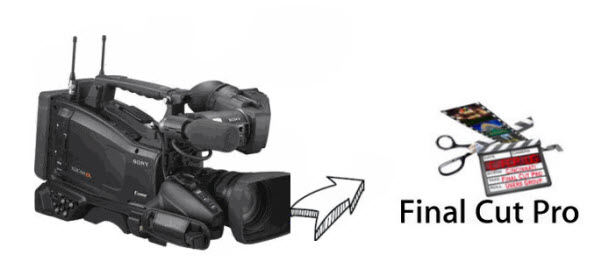
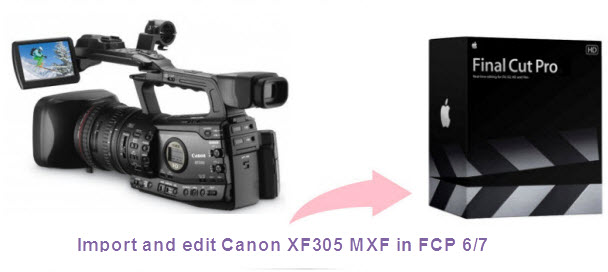
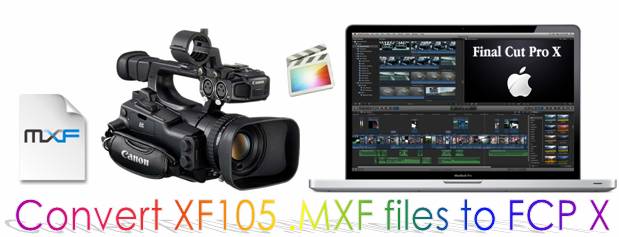
After searching, I find that the reason, that is, Canon 5d Mark III records video in H.264 MOV, it is not supported by FCP X perfectly. To edit Canon 5d Mark III mov video with Final Cut Pro X smoothly, I need to encode Canon mov recordings to FCP X compatible codec - Apple ProRes 422 MOV format on Mac.

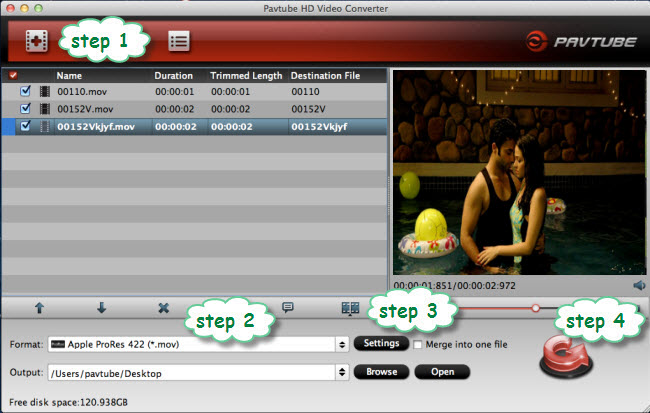
Now on the web, I came accross this Pavtube H.264 MOV to ProRes Converter for FCP X. I am impressed by how quickly the converter runs to give me the files from my 5D MK-III that I need for Final Cut Pro X, becides it make it possible to do some little editing some simple editing features. You can follow the steps below to convert 5D Mark III mov footages for editing in FCP X.

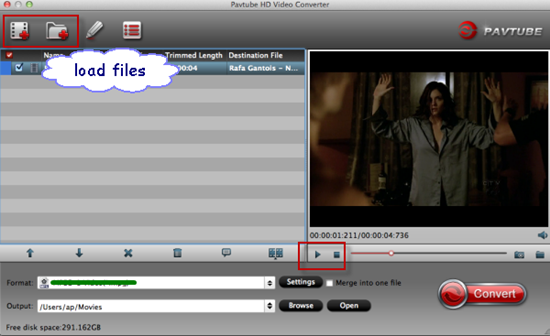
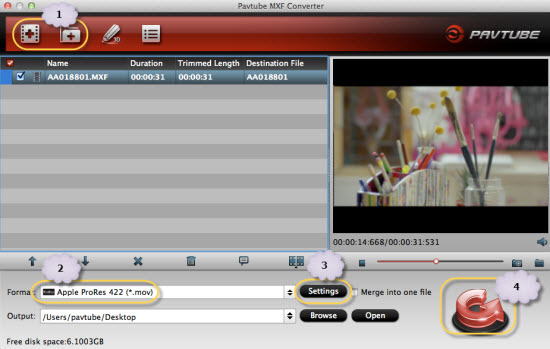
Step 1: Free Download the best Canon MOV to FCP Converter. Install and run it on you Mac. It’s excellent Canon MOV video converter which can convert nearly all canon cameras’ videos to any formats you need, such as Apple Prores 422 MOV, Apple InterMediate Codec MOV, QuickTime MOV, etc.

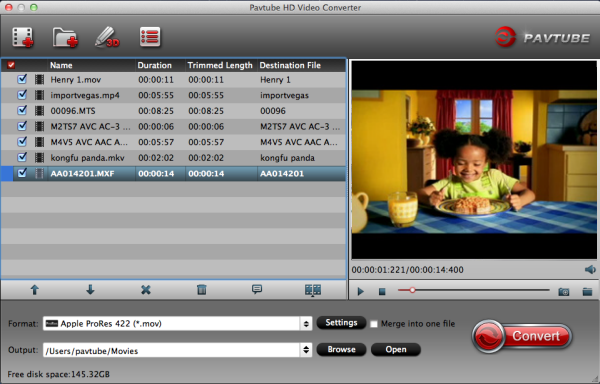
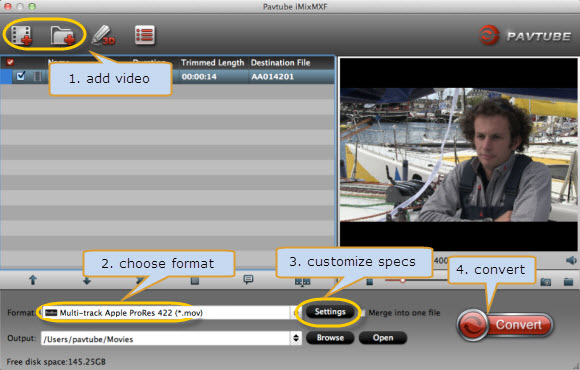
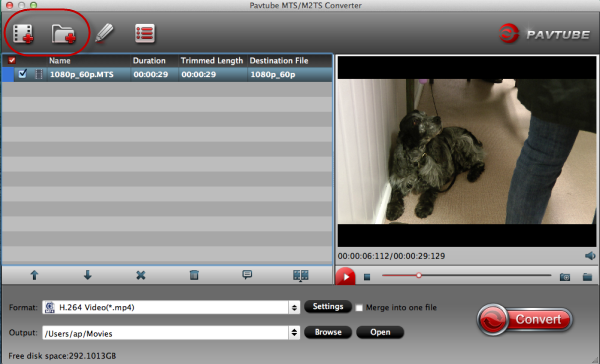
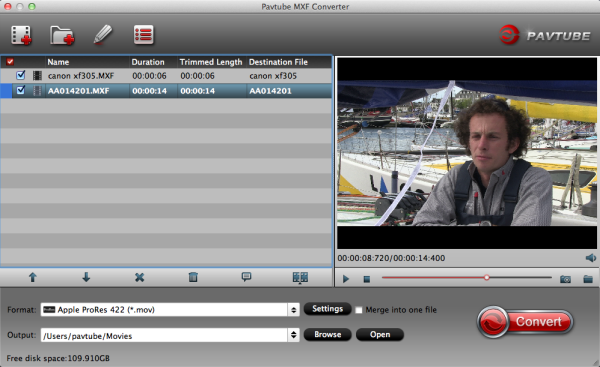
Step 2: Click “Add videos” to load individual videos, or click “Add from folder” to load the whole folder from Canon 5D Mark 3.


Tips:

If you have multiple MOV files, you can select the “Merge into one file” box to merge the MOV files into one single file so that you can play these files without interruption.

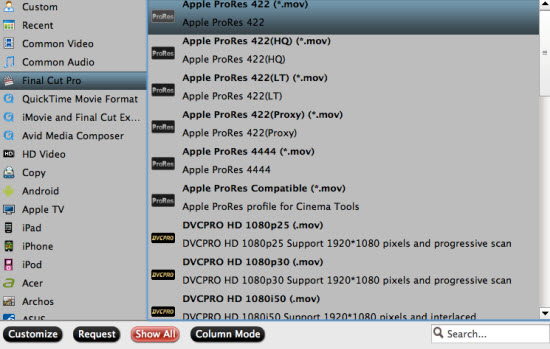
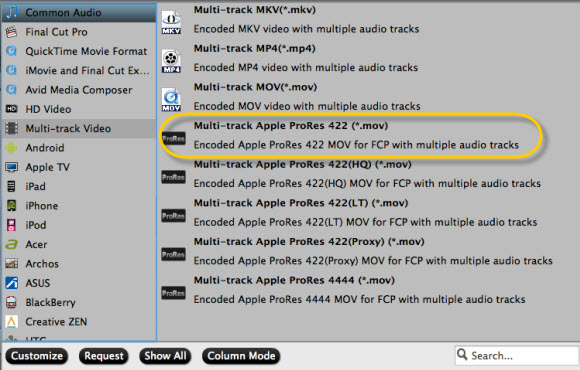
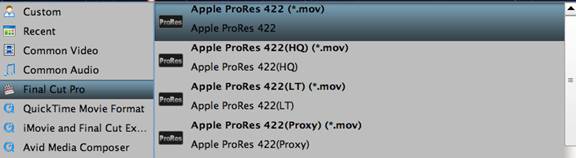
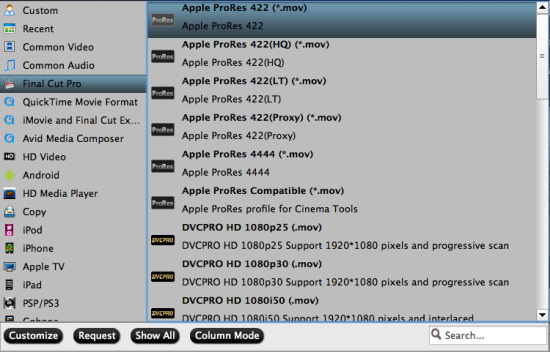
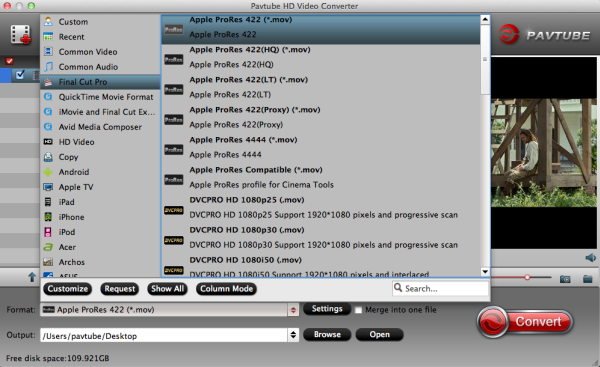
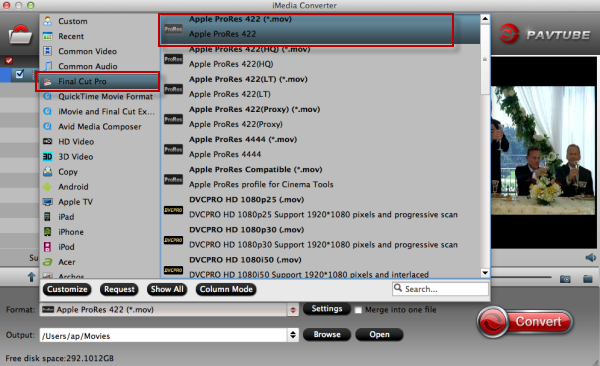
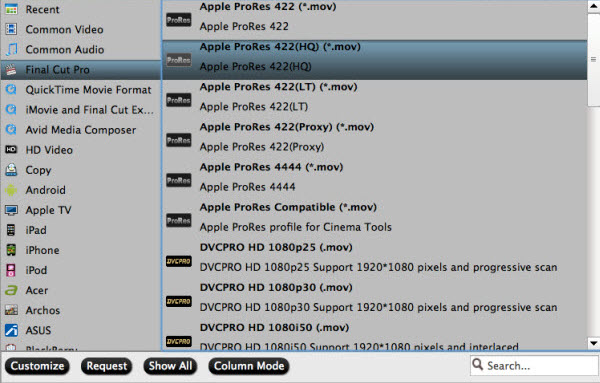
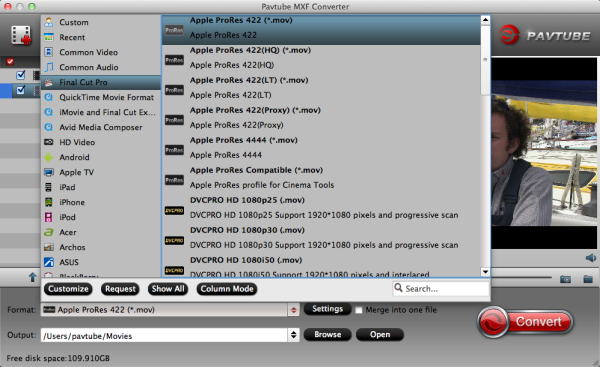
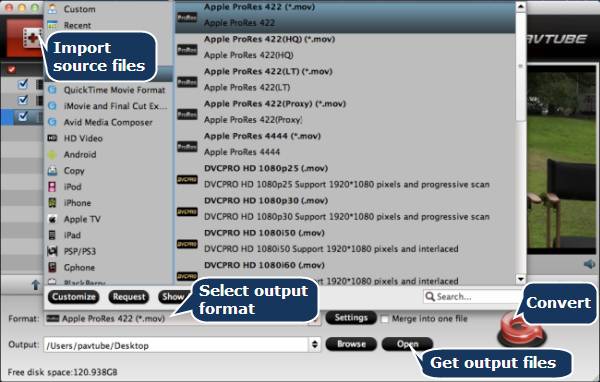
Step 3. Click on the “Format” and get the dropdown menu, then move you pointer to “Final Cut Pro”.

Here we recommend the Apple ProRes 422 (*.mov) or Apple PreRes 422(HQ) (*.mov) for as best video format for editing in FCP X as well as good video quality. Then you can set the output folder by clicking “Browse” icon.


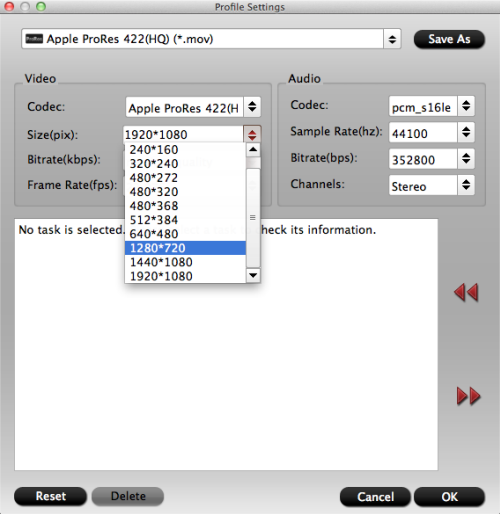
Step 4. Click the “Settings” icon and you will go into a new interface named “Profile Settings”.

You’d better set the video frame rate as 30fps, video size as 1920*1080 to keep the best quality for editing in Final Cut Pro X. If you want to have a smaller file size but keep the good quality, you can change the video size to 1440*1080.


Step 5: Click the “Convert” button; it will convert Canon 5D Mark III H.264 MOV to ProRes 422 for FCP X on Mac immediately.

Tips: Before you try to do the conversion, if you are also a FCP X user, please make sure that you have installed the Apple ProRes Codec manually since the FCP X asks users to install it by themselves.

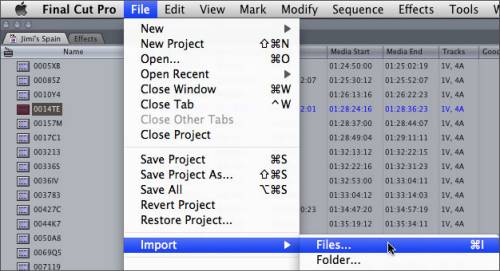
After the workflow, you can go to the output folder to find the converted video files. Now you are free to import the ProRes 422 MOV to FCP X under Mac without rendering.

This Canon MOV Converter for FCP can help you convert the video format/codec you need quickly, video and audio quality are best guaranteed. You can also follow this article: How to Import Media contents to Final Cut Pro X for editing. 

Read Related Articles:

Monday, July 29, 2013

Down-convert Panasonic GH2 MTS footage from 1080p to 720p for editing in FCP/Premiere

Summary: In this article, you can learn the best way to convert Panasoni GH2 AVCHD MTS to a file that FCP/Premiere can recognize on Mac(Mavericks 10.8 included) with downsizing 1080p HD video to 720p.


Panasonic Lumix DMC-GH2 

Panasonic Lumix DMC-GH2 updates the highly acclaimed if rather pricey GH1 Micro Four Thirds system camera. As such the GH2's styling is closer to that of a baby DSLR than its sibling's, the GF2 compact camera form. While stylistically similar, its size is roughly a third of the size of Olympus' Four Thirds E-5 DSLR, and closer in fact to that of a bridge camera. Except unlike a bridge camera, the Panasonic's added appeal is the ability to swap the lens in use. Therefore it's fair to say that for those who like the feel of a DSLR but not the attendant bulk, the GH2 is potentially a very attractive proposition. It's in effect a DSLR 'lite'. 

Easiest way to convert GH2 1080p .mts to 720p?

I'm a Director, DP-Editor/Gaffer. I do commercials and corporate work. I got my Panasonic GH2 and I shot all the .mts footage myself about Teaching Practices in Public Schools in Maryland. I like One-touch HD video recording and manual controls. And now I need to down-convert GH2 MTS footage from 1080p to 720p for storage and editing in FCP&Premiere. Is there any easy way (free or nominal fee)? 

Why we need to downsize the HD video?

By google search, you can see many folks are asking about how to downsize 1080p to 720p. It is my impression that if I edit with actual 720p files, it will be less strain on the system both in editing and rendering as well has hard drive space. In fact, it really does. After reducing the big video size, we will edit more smoothly, save space and make 1080p video playable on protable device like iPad.

An easy to use 1080p to 720p Converter

As in the above case, you have the need to find a professional MTS Converter for FCP/Premiere to downsize 1080p HD video to 720p. Pavtube MTS Converter for Mac is exactly the one ease of use. I have used it on my project, it is helpful in down-converting Panasonic GH2 1080p full HD video to 720p video quickly and transoding GH2 MTS file to FCP/Premiere editable Prores codec, then I can wok well with GH2 mts file in FCP and Premiere. Overall first impression is excellent. Below I will share the step-to-step guide to you.

Simple way to downconvert GH2 1080p to 720p for editing in FCP/Premiere

Step 1. Download Pavtube MTS Converter for Mac. This professional Panasonic MTS Converter can help you convert 1080p AVCHD MTS files to rich formats for use on Mac(Mavericks 10.9 included). 

Step 2. Install and launch this 1080p to 720p MTS Converter. Import 1080p MTS footage from GH2 to it. 

Step 3. Click "Format" bar to choose format for output, you can choose Final Cut Pro > Apple ProRes 422 HQ (*.mov) for editing in FCP and Premiere Pro.


Step 4. You can click “settings” to customize the output parameters, adjust the resolution, bitrate as you want. To down-convert 1080p to 720p, you just need set Size(pix) to 1280*720. That is the exact 720P.


Step 5. Click convert button to start converting Panasonic GH2 1080p AVCHD MTS to Prores for FCP and Premiere editing with 1280*720 definition.

As long as the conversion is done, you will get the 720p mov video files in full screen from its destination folder, and then you can import the files with 720p resolution to FCP/Premiere editing
 smoothly on Mac (including Mavericks 10.9).

Read More:

Mix Canon XF300 MXF to ProRes with multiple audio tracks for FCP X

Summary: In this tutorial, you will learn the way importing/editing Canon XF300 MXF files in FCP X smoothly by transcoding MXF to Prores on Mac(including Mavericks 10.9).


Q1: Just got a Canon XF300, it provide extraordinary image quality. I am wondering how to load my videos from XF300 to FCP X directly? Is MXF a supported format for FCP? Is it possible to keep multiple audio tracks?

Q2: Which software do I need to convert XF300 mxf files to be readable in FCP X ? I have more than 200 MXF files, I need to batch process them. Can anyone help regarding this conversion? Can I preserve the multi-track adudio?

As you can see, you will meet some stuttering problem when editing Canon XF300 MXF footage in FCP X on Mac (including Mac Mavericks). In fact, FCP does not support direct editing of Canon XF300 MXF in the timeline. If you want to edit Canon XF300 MXF in Final Cut Pro X, you first need to convert Canon MXF video to FCP compatible ProRes codec.

Required Tool: Pavtube iMix MXF

It can help us to convert Canon XF300 MXF to ProRes for FCP X editing with retaining higher quality and keeping multiple audio tracks. Below are some useful tips for you and you will know how to import Canon XF300 MXF to Final Cut Pro X on Mac (including Mac Mavericks).

Step 1. Add Canon MXF footage to the Canon MXF Converter.

Run Pavtube MXF audio Mixer. Click "Add" to load the source Canon MXF files. When the Canon MXF files are loaded to the MXF Converter, you can view the videos from the Preview window.


Step 2. Set Prores MOV as output format for Canon MXF to FCP X conversion.

Click on "Format", and select output format from the drop-down list. Follow "Multi-track Video>Multi-track Apple ProRes 422(*.mov) for editng XF300 multi-track MXF files in Final Cut Pro 6/7.


When set output folder, or click the icon folder in Output box and browse to the destination folder.

Step 3. You can click settings button to adjust the output video's parameters, such as resolution, bitrate, codec and frame rate, etc.

Step 4. Convert Canon XF300 MXF to Prores 422 for importing to Final Cut Pro X.

Click "Convert" button and the selected Canon XF305 MXF files will be converted to Prores 422 .MOV. You may check the converting progress and set auto shutdown in the convert window.

Additional Editing Features of the MXF Converter for Mac

- Trim, combine, de-interlace Canon MXF footage, capture Canon XF300 frame.

Trim Canon MXF clips: Click "Edit" to enter video editor, by default the "Trim" tab is activated, so just set start time and end time to include the duration you want to remain, cutting others out.

Combine/Join Canon MXF files: If you would like to join several files together, just select these files and check the Merge into one box.

De-interlace Canon MXF: Some footage may be saved as interlaced video with Juggled edges and ghosting. In that case you can set deinterlace effect to eliminate the combing. Follow "Edit"-> "Effect"-> "Deinterlacing".

Capture frame from Canon MXF: To thumbnail video frame, you may click the "Snapshoot" button when it plays to your favorable frame.


Tips:


If you don't want to get multi-track videos or your videos has less that two audio track to be converted, the latest version of Pavtube MXF Converter for Mac is designed to output each audio/video track separately.


Learn more:


Thursday, July 11, 2013

Tricks for importing Canon Legria HF M306 AVCHD MTS files to FCP X


Summary: If you are facing the issue when importing and editing Canon Legria HF M306 AVCHD footage in Final Cut Pro X, here recommend you the best Mac Canon MTS to ProRes Converter to achieve your goal smoothly.

Canon Legria HF R306 camera, as an update of entry-level Legria camcorder range at CES 2012, is a Full HD compact camcorder, featured with a 1/4.85in CMOS sensor, 32x optical zoom, 51x intelligent zoom, a 3in colour touchscreen monitor and a whopping 8GB of internal storage space. That specification is already pretty good for a camcorder of this price, but Canon has gone even further by adding Wi-Fi connectivity, which means you can transfer recorded videos to your PC without a USB cable and stream videos to DLNA-enabled TVs and games consoles. All of this is recorded straight to memory card so you can quickly and easily share your movies with friends and family.

I have just got a Canon Legria HF M306 camera and I have taken it on my trip. After recording some footage HF M306, I wanna share this with others. To get better effect, just now I'm trying to get the AVCHD recording from it into Final Cut Pro X, but without much success, that is, I can get the Canon to show up on my desktop, but can't seem to get FCP X on my Mountain Lion to capture the video from the M306 camera using the USB Cable. 

AVCHD is highly compressed and not ideal for editing with Final Cut Pro X you can't natively import Canon HF R306 mts in FCP X. In order to smoothly edit Canon HF R306 AVCHD files in Final Cut Pro X without crashing problem and avoid rendering, you'd better transcode the Canon AVCHD to FCP native format, say, Apple ProRes Codec with some help from a third-party software. 

Required Software:

Pavtube's AVCHD MTS/M2TS Mac - a top Canon AVCHD Converter for Mac users.

The Mac Canon MTS to FCP Converter is an easy to use yet professional AVCHD Converter on Mac OS X which can not only transcode Canon Legria HF R306 AVCHD files to Apple ProRes codec videos for Mac editing, but also provide simple video editing functions for you. Besides, the program can also convert HD videos from HD camcorders or DVs (like JVC, Panasonic, Sony and Cannon) for editing in Final Cut Pro, Final Cut Pro X, Final Cut Express, iMovie, Avid, Adobe Premiere etc.

The following passage guides you how to convert Canon Legria HF R306 AVCHD footages to Apple ProRes 422 encoded MOV file for FCP X. If you have the same problem about editing Canon HF R306 MTS videos in Final Cut Pro X, check out the brief guide below.

Step 1. Import Canon HF R306 AVCHD videos to the top MTS to FCP Converter for Mac.


Step 2. Click the format bar, and move mouse cursor to "Final Cut Pro > Apple ProRes 422 (*.mov)" as output format.


Step 3. Click "Convert" button to start transcoding Canon Legria HF R306 AVCHD files to Apple ProRes Codec for Final Cut Pro X under Mac OS.

Some more helpful features of the app:

1. Settings- click to set video resolution(1920×1080/1440×1080/1280×720/720×480), bitrate(from 1Mbps to 20Mbps), frame rate (24p/30p)

2. Editor (next to "Add" icon)- click to set deinterlace, denoise, mute, volume up, trim, crop, etc.

After a shot conversion, you will be able to load/transfer Canon Legria HF R306 AVCHD videos into Final Cut Pro X editing without rendering.

Tips: Before you try to do the conversion, if you are also a FCP X user, please make sure that you have installed the Apple ProRes Codec manually since the FCP X asks users to install it by themselves.


Editor's Recommendations

Tuesday, July 9, 2013

How to Import MP4 footage from Sony XDCAM EX into Final Cut Pro

If you are puzzeled with the problem that you can't edit your MP4 footage from Sony XCAM EX in Final Cut Pro, here recommend you the best Sony XDCAM EX Video Converter for Mac to solve this incompatible problem. So would you like to join us and add the MP4 movies to Sony XDCAM files to FCP for editing?

Sony XDCAM has four different product lines: XDCAM SD, XDCAM HD, XDCAM EX and XDCAM HD422 differ in kinds of encoder, contain type and in recording media.


Sony XDCAM EX series (like PMW-EX3, PMW-200, PMW-EX1, PMW 150) are one of the high-end professional Sony camcorders with outstanding video quality. The footages are wrapped in XDCAM codec MP4 format at data rate of up to 50 Mbps. However, due to the codec incompatibility issue, Sony XDCAM EX MP4 footages cannot work smoothly in Final Cut Pro, which makes the editing become harsh to some extend.

Hot Search: MXF to FCP X | P2 Files to FCP | XAVC to FCP

Don't worry, Pavtube HD Video Converter for Mac can give you easy but effective solution for importing XDCAM EX MP4 footages into FCP for editing. With the assistance of the Mac MXF Converter, you can effortlessly transcode MXF file to FCP acceptable formats like ProRes .mov. Then, what you need is just to import the converted file into FCP for editing. Just follow the steps below to transcode Sony XDCAM EX MP4 to ProRes for importing to Final Cut Pro editing.

[How-to]: Transocde Sony XDCAM EX MP4 recordings to FCP with highest quality

Preparation:
Connect your Sony XDCAM EX camcorder to Mac and backup the recorded .mp4 file on Mac.

1. Install and launch the Mac XDCAM EX Video Converter. This professional HD Video Converter can help you convert Sony XDCAM EX to ProRes 422 MOV format for Final Cut Pro, more output formats are also supported.


2. Click Format bar to choose the output format. Click and choose Final Cut Pro -> Apple ProRes 422 (*.mov).


4.You can click "Settings" to customize the output parameters, adjust the resolution, bitrate as you want.


5.Start convert Sony XDCAM EX to ProRes for FCP editing on Mac.

Click the "Convert" button to start transcoding Sony XDCAN EX MP4 to Prores for Final Cut Pro immediately. 

When you get ready to convert the added MP4 videos on Mac, Click the "Convert" button to start conversion. The conversion processes will transcode MP4 to ProRes MOV videos to be compatible with FCP editing.

After the MP4 to Prores conversion finished, you can easily import video files and projects into Final Cut Pro for further editing without any trouble. Congratulations! You have successfully taken the first step to make your own masterpiece.

With this Sony XDCAM EX to ProRes Converter, you can easily change XDCAM EX files to FCP for editing, this software runs fast, so you can convert your XDCAM EX MP4 footages to FCP in less time, video and audio synchronization are perfectly guaranteed.

Read Related Articles:

Tuesday, July 2, 2013

Sony XDCAM workflow- Getting XDCAM HD 422 MXF files into Final Cut Pro

Follow the article below you will know before Import Sony XDCAM HD 422 MXF to Final Cut Pro 6/7 and FCP X for editing on Mac, you need to convert Sony XDCAM MXF footage to FCP native ProRes MOV format with the best Sony XDCAM MXF Converter.

Q1: "I have recorded many 1080p footages from Sony XDCAM camcorder, which I borrowed from my friends. I haven't shot or edited HD before now, so need some help setting up the project. when I import Sony XDCAM MXF files to final cut pro 7, it says that the files are not supported, I searched the forum and many people say the MXF footage need to be converted to prores codec, can you give me some suggestions and what software I need to use?".
 
Q2: " MXF 1080i50 XDCAM HD 422 Long GOP 50 in Operational Patern 1a.The footage was recorded from a Canon C100 into a Ninja Atomos 2 (ProRes 422). I was not yet able to find the required export setting in FCP X. And my question is the required export possible from FCPX ?" 

Sony XDCAM camcorder is professional camcorder which is great for us to take high quality full HD videos, now popular models include PMWEX3, PMWEX1R, PMW200, PMW100, PDWF800, etc.


However, you may also face the problem as above that FCP 6/7 or FCP X does not recognize the .mxf videos. To make it easier for editing Sony XDCAM HD 422  MXF videos on FCP 6/7/X, you can use Sony XDCAM MXF Converter for Mac. It can not only convert Sony  XDCAM HD 422 .mxf videos to FCP 6/7/X, but also make iteasy for merge videos.

Here is the step-by-step guide for you to convert and transcode Sony XDCAM HD 422  MXF  MXF files to Apple ProRes 422 MOV for editing in Final Cut Pro 6 /Final Cut Pro 7/Final Cut Pro X on Mac with no rendering.

1.Download Pavtube iMedia Converter for Mac. This professional MXF Converter can help you convert Sony XDCAM HD 422 MXF files to ProRes 422 MOV format for Final Cut Pro, more output formats are also supported.

2.Install and launch this Sony XDCAM MXF to FCP Converter. Import Sony XDCAM HD 422 MXF footages to the converter.


3.Click "Format" bar to choose the output format. Click and choose Final Cut Pro -> Apple ProRes 422 (*.mov).

convert-format-to-prores-422


4.You can click "Settings" to customize the output parameters, adjust the resolution, bitrate as you want.

5.Start convert Sony XDCAM HD 422 MXF footages to FCP (X) editing.

When you get ready to convert the added mxf videos on Mac, Click the "Convert" button to start conversion. The conversion processes will transcode Sony XDCAM HD 422 MXF to ProRes MOV videos to be compatible with FCP editing.

After conversion, you can import video files and projects into Final Cut Pro X without any trouble. Congratulations! You have successfully taken the first step to make your own masterpiece.

With this Sony XDCAM MXF to ProRes Converter, you can easily change XDCAM HD 422 MXF files to FCP X for editing, this software runs fast, so you can convert your XDCAM footages to FCP in less time, video and audio synchronization are perfectly guaranteed. You can also find more tips and tricks on FCP in Pavtube FCP column and MXF column.

Read Related Articles:

Sunday, June 30, 2013

The Way for Editing Canon PowerShot S110 MOV footage in FCP 6/7/X on Mac

Summary: Follow the guide below you will get the easy way to transcode Canon PowerShot S110 MOV to FCP 6/7/X for editing with ProRes codec. 

Canon PowerShot S110:Top-quality stills and video, plus a hatful of features – our new favourite compact camera.

S110 offers a maximum ISO of 12800 at full resolution, built-in wi-fi connectivity, GPS functionality via pairing with a smartphone, 1080p movie recording at 24fps, full range of manual shooting modes, RAW format support and 10fps burst shooting.

If you have got the  S110 and often use it to record 1080P video, you may have the need to edit Canon PowerShot S100 MOV in Final Cut Pro 6/7/X on Mac. The FCP 6/7/X best supported video format is Apple ProRes 422 codec MOV format, so FCP doesn't support Canon PowerShot S110 mov footages well, you may encountered many problems, like import it slowly, and couldn't edit videos smoothly.

The best method to solve these problems is to convert S110 MOV footage to ProRes for editing in Final Cut Pro 6/7/X, you can follow the steps below to transcode Canon PowerShot S110 MOV to FCP 6/7/X for editing.

1. Download Pavtube HD Video Converter for Mac. This professional Mac HD Video Converter can help you convert Canon PowerShot S110 H.264 mov files to ProRes 422 MOV format for Final Cut Pro 6/7/X, more output formats are also supported.


2. Install and launch this Canon MOV Converter for FCP. Import Canon PowerShot S110 .mov footage to the converter.
canon mov converter for mac Frustration with FCP X and Canon PowerShot N MOV transcoding

3. Click format bar to choose the output format. Click and choose Final Cut Pro -> Apple ProRes 422 (*.mov).


4. You can click "settings" to customize the output parameters, adjust the resolution, bitrate as you want.


5. Click "Convert" button to start.

Once you have finished the conversion, you can import Canon PowerShot S110 1080p mov video files to Final Cut Pro 6/7/X for editing easily.

P.S. 

This Canon MOV to Prores Converter also highlight with 
importing Canon S110 1080p mov to iMoviejust enjoy yourself. 

Editor's Recommendations

Monday, June 24, 2013

XAVC to FCP-Import Sony PMW-400 XAVC footage to FCP 7/X for editing

Following Guide on Sony PMW-400 Workflow for Getting 4K XAVC Files Into Final Cut Pro.

XAVC is the newest HD recording format announced by Sony, it uses level 5.2 of H.264/MPEG-4 AVC which is the highest level supported by that video standard. XAVC can support 4K resolution (4096 × 2160 and 3840 × 2160) at up to 60 frames per second (fps). 

Final Cut Pro is a good tool to edit videos on Mac, however, for the new XAVC users, it is a big problem to loading XAVC files in FCP (including FCP 7 and FCP X), they will get some trouble for the video clips, or rather the XAVC clips, are not supported by FCP, such files will not be shown when importing.


Now comes along with the new PMW-400, which is the latest addition to Sony's XDCAM HD422 line-up. Sony PMW-400 is capable of MPEG HD422 50Mbps recording for higher picture quality, providing diverse format selection including XAVC support for HD production. So people now are all concerning about how to import Sony PMW-400 XAVC to FCP 7/X for editing?

As FCP are not workable with XAVC files natively, if you want to load Sony PMW-400 XAVC to FCP (including FCP 7 and FCP X), first you need to convert XAVC to FCP friendly codec like Apple Prores. of course, losslessly. To do so, you need a professional XAVC Video Converter to help.

Here I'd like to recommend an excellent XAVC to FCP Converter from Pavtube, which is a great Sony XAVC Converter for Mac. It can not only convert Sony PMW-400 XAVC videos to Apple ProRes codec, but also guarantee smooth editing.

Compatible OS: Mac OS X like Tiger, Leopard, Snow Leopard, Lion, Mountain Lion.

Now get it installed and let's work it out.

How to load Sony PMW-400 XAVC videos to FCP 7/X?

Step 1: click top left icons to load your footage from PMW-400 into XAVC to Prores Converter for Mac. You can load individual videos by clicking ‘add videos', or load the entire folder by clicking ‘add from folder'.


Step 2: Choose Apple ProRes 422 codec for Final Cut Pro 7/X.

Click the "Format" option, and move mouse cursor to Final Cut Pro > Apple Prores 422 (*.mov) or Apple ProRes 422 HQ (*.mov) as output format.


To get 1080 videos, we need to click the "Settings" button and choose 1920*1080 as output video resolution.

Step 3: Convert Sony PMW-400 XAVC files for FCP.

Click the read button Convert to start transcoding Sony PMW-400 XAVC files to MOV for FCP 7/X. When the conversion is completed, click "Open" button to locate the converted Apple ProRes 422 MOV files for editing with Final Cut Pro.

See more:
Convert Sony PMW-400 XAVC to iMovie/FCE

Monday, June 17, 2013

Best method to import Sony HDR-SR12 MTS to Final Cut Pro on Mac

To get Final Cut Pro working perfectly with SR12 AVCHD .mts files, a best way is to convert Sony SR12 MTS to ProRes MOV, something ensuring best results when using .mts files in FCP. Read on to learn details.
 

Sony HDR-SR12

As the leader in the high-definition camcorder category, Sony is further expanding the industry with the introduction of a new HD camcorder model. Sony HDR-SR12 hard drive camcorder is based on AVCHD technology and feature full 1920 x 1080 high-definition recording for outstanding clarity and detail. It delivers the highest HD resolution available without sacrificing recording times. And features a new high-profile encoding system to optimize encoding efficiency. And, because HDR SR12 is based on the industry-standard MPEG-4 AVC/H.264 video codec, it enters the market compatible with many third-party editing suites, however not including Final Cut Pro. 
 

I became a Mac user just a few days ago, when I bought a MacBook Pro. Now I'm trying out the trial of Final Cut Pro X 10.0.0.1 with my Sony HDR-SR12. I have problems getting my MTS-files to/imported to Final Cut Pro X. I've read the help over and over again, searched on Google and youtube, and in this forum. Nothing seems to help me. This is what I tried (and of course all sorts of it):  

- Start FCPX
- Connect my Sony HDR-SR12 with USB
- Turn the camcorder on and choose USB CONNECT
- Press the "Import media from a connected device" icon in FCPX
- "NO NAME" is showing up, with a circle... waiting...
- After a minute, "NO NAME" disappears

Any ideas? Thanks, 


Like almost all Sony HDR camcorder users, you may be confused on how to edit Sony HDR-SR12 video with Final Cut Pro on Mac OS X as above. Final Cut Pro isn't compatible with Sony HDR-SR12 AVCHD video, so before solving this problem, you have to convert Sony HDR-SR12 AVCHD to FCP acceptable file format like MOV video format encoded with ProRes or H.264 codec on Mac OS X for natively importing SR12 mts files to FCP.

Sony MTS to FCP Converter is a top assisting app for AVCHD to Mac processing. It re-wraps the Sony AVCHD .mts/.m2ts media into a .mov format so that FCP can read the mts files. Because no actual encoding takes place, the conversion takes in a few seconds. For users that wanna skip rendering process in FCP, it is also possible to export Apple ProRes encoded .mov.

The easy way to import and edit Sony SR12 AVCHD in Final Cut Pro 

Step 1: Download Pavtube AVCHD to Final Cut Pro Converter and import your Sony SR12 AVCHD file. This software will solve your AVCHD to Final Cut Pro importing problems.


Step 2: You will need to choose the output format for FCP. You are recommended to choose Final Cut Pro -> Apple ProRes 422 (*.mov), it’s great for editing in FCP. There are more formats for output, you can pick as you need.


Step 3: Click “Settings” button to adjust the output video’s parameters, such as bitrate, resolution, etc. for example, you can choose the resolution as 1920*1080 or 1280*720, that’s 1080p or 720p resolution, great for editing.


Step 4: Start converting Sony SR12 AVCHD to Final Cut Pro with Prores Codec.

After converting, you can load Sony SR12 AVCHD video to Final Cut Pro for editing as you want, now you can have a try.

Read Related Articles:

Wednesday, June 5, 2013

Losslessly transcode Panasonic AJ-HPX3100 P2 MXF to Final Cut Pro for editing

Summary: To make it easier for editing Panasonic AJ-HPX3100 P2 AVC-Intra MXF videos on FCP 6/7/X, you need to convert P2 MXF to ProRes codec for FCP with a professional P2 MXF converter Mac.

Panasonic AJ-HPX3100 is a high-end professional camera which offers high image quality and performance for high-end video production. This camera's native effective resolution is 1920 x 1080 and features 3x 2/3" 2.2MP CCD sensors for high quality imagery. Recording is possible in AVC-Intra 100, AVC-Intra 50, and DVCPRO HD; 4:2:2 full raster sampling is supported in the AC-Intra 100 format.

After make some footage on the Panasonic AJ-HPX3700, you may want to edit the P2 MXF files in Final Cut Pro. However, you may face the problem that FCP 6/7/X does not recognize the P2 AVC-Intra MXF .mxf videos. This is due to the unfriendly codec.

To smoothly import AJ-HPX3700 P2 footage into Final Cut Pro, you can need a professional P2 MXF Converter for Mac, which is a great Mac Panasonic MXF Converter to help me make the P2 MXF to FCP compatible ProRes transcoding. It offers the optimal preset profiles for Apple ProRes including ProRes 422, ProRes 422 (HQ), ProRes 422 (LT), ProRes 422 (Proxy) and ProRes 4444 for you to choose. And there is no need to worry about the quality loss. Now please follow the steps to transcoding AJ-HPX3700 P2 MXF to Final Cut Pro (FCP 6/7 and FCP X) with Apple Prores codec.

How to convert P2 Card MXF footage from Panasonic AJ-HPX3100 to ProRes 422 HQ

Step 1. Connect your AVC-Intra MXF Camcorder to iMac with USB 2.0 cable or use card reader to transfer the P2 AVC-Intra .mxf files to Apple hard drive disk.


Step 2. Add Panasonic AJ-HPX3100 P2 AVC-Intra MXF videos to this top Mac Panasonic MXF Converter.

Run Pavtube MXF Converter for Mac, and click the "Add Files" button to load the P2.mxf videos.
 

Step 3. Choose MOV with Apple ProRes 422 codec for Final Cut Pro 6/7/X.

Click the "Profile" option, and move mouse cursor to Final Cut Pro > Apple ProRes 422 HQ (*.mov) as output format. To get 1080 videos, we need to click the "Settings" button and choose 1920*1080 as output video resolution.
best format for editing xavc in fcp x 4K XAVC workflow with FCP 7  Convert F55 4K XAVC to ProRes 422 HQ

Step 4. Specify output file path. Click on "Browse" and browse to where you'd like to save target Apple ProRes 422 HQ video.

Step 5. Convert Panasonic AJ-HPX3100 P2 MXF to ProRes 422 HQ MOV for Final Cut Pro 6/7/X.

Click the "Convert" button and the Mac MXF Video converter would start converting Panasonic AJ-HPX3100 AVC-Intra MXF videos to Apple ProRes 422 MOV immediately.

Step 6. Press "Open" to locate result video. Launch FCP 6/7/X, and go to "File > Import > Files…" to import converted P2 footage to FCP project.


The software also converts P2 MXF and Canon MXF video to compatible formats for FCE/iMovie, Avid, Adobe Premiere Pro, After Effects, etc. You can convert Panasonic P2 MXF to AIC .MOV for FCE and iMovie, or transcode Panasonic AVC-Intra MXF to H.264 MOV, DV, AVI, M4V, MPG for Avid, Adobe Premiere Pro, and After Effects.

MXF files bite up storage. If you have lots of MXF video stored on Mac HDD and are now ending up with plenty of long files with only a few short gems, it is recommended that you use Bytecopy for Mac to import MXF and trim long video clips in Apple ProRes as well as common video formats (MOV, AVI, MP4, M4V, etc).

Read More:

Monday, June 3, 2013

MXF workflow for Canon XF305 and Final Cut Pro 6/7

By transcoding Canon XF305 MXF to ProRes MOV format, you can easily import & edit XF105 recorded MXF footage in Final Cut Pro 6/7 without rendering.

Canon XF305 is a successful example in the XF series camcorders, it record vivid HD videos in MPEG-2 compression. MXF is excellent, however, it is not an ideal editing format for FCP 6/7, that is to say, you can't import and edit Canon XF305 in FCP 6/7,for example:

I got Canon XF305 recently and it output MPEG-2 MXF files. I tried to import the MXF videos to Final Cut Pro 6/7, but it did not recognized. Any suggestions? How can I solve this problem? Thanks.


To smoothly edit Canon XF305 MXF in FCP 6/7, the conversion between Canon MXF and Final Cut Pro is necessary. Here, Pavtube's MXF to Final Cut Pro Converter for Mac is highly recommended, which can convert Canon XF305 MXF to MOV,say, the Apple ProRes encoded MOV format on Mac.

It is good at batch converting MXF recordings shot by Panasonic P2 camcorders, Canon XF series cameras to ProRes/AIC MOV formats compatible with your Mac Video editing software like Final Cut Pro (x), iMovie, Final Cut Express. Now follow the guide below to convert Canon XF305 MXF to FCP ProRes MOV easily on Mac.

Guide- Convert/Transfer Canon XF305 MXF to ProRes for FCP 6/7 editing smoothly 

Step 1. Free download and run the best Canon MXF to FCP Converter for Final Cut Pro 6/7, add MXF captured videos to the program.

You can not only click "add video" button to import Canon mxf files, but also you can click "add from folder"button to add MXF folder.


Step 2. Select output profile. If you want to edit MXF file in Final Cut Pro 6/7, suggest you choose Final Cut Pro > Apple ProRes 422(*mov).


Step 3. Click Convert" button to start transcoding Canon XF305 MXF to ProRes MOV for Final Cut Pro 6/7.

Some more helpful features of the batch MXF to MOV Converter for Mac:

1. Settings- click to set video resolution(1920×1080/1440×1080/1280×720/720×480), bitrate (from 1Mbps to 20Mbps), frame rate (24p/30p)

2. Editor (next to "Add" icon)- click to set deinterlace, denoise, mute, volume up, trim, crop, etc.

Once the MXF to MOV Conversion is done, you can go to the output folder to find the converted video files. Now you are free to import Canon XF305 MXF files in Final Cut Pro for editing under Mac without problems.

Read More:

Thursday, May 30, 2013

How to get/load Panasonic Lumix GH3 MTS to Final Cut Pro X

Summary: Read on the article to find the easy solution how to import and edit Panasonic Lumix GH3 AVCHD MTS in FCP X with no issues. 

Panasonic is trying to promote its brand new Lumix GH3 as "the first DSLM". That's "digital single lens mirrorless" for the uninitiated, thought it sounds - obviously and intentionally, no doubt - a lot like "DSLR" to us. Hardly a surprise then that it looks, feels and functions a lot like one too. GH3 features a 17.02MP Micro 4/3 Digital Live MOS sensor and a 4-CPU Venus Engine, which enable the GH3 to capture high resolution JPEG and RAW stills as well as intricately detailed HD video.


GH3 can record AVCHD video format.We like shooting and playing HD MTS videos at 60p, but we can't get an enjoyment on editing these 60p MTS footgaes in FCP X. To smoothly import Panasonic GH3 MTS to FCP X for further editing, you'd better transcode unsupported MTS or all AVCHD files to videos with a compatible Prores .mov format for FCP X before ingesting, thus you can directly bring GH3 AVCHD files to FCP without any plugin.

1. Free Download Pavtube MTS Converter for Mac. This software can convert Panasonic GH3 AVCHD MTS video to FCP friendly formats or other common formats.


2. Install and run this MTS to FCP Converter.

3. click format bar to choose output format for use in FCP X. click and choose Final Cut Pro -> Apple ProRes 422 (*.mov). it's the best format for FCP - to import Panasonic GH3 MTS to FCP X.


4. You can click "settings" button to adjust output parameters, such as resolution and bitrate.
5. Click convert button to start.

The Panasonic GH3 Mac MTS Converter will convert Panasonic MTS for iMovie quickly. After conversion, you can edit Panasonic GH3 MTS video in iMovie as you want.

You can also follow GH3 MTS to ProRes for Final Cut Pro conversion guide and learn how to import video files to FCP (X).


Read More:

Thursday, May 23, 2013

Canon XF105 Compatible with FCP? -Edit Canon XF105 MXF in FCP

By transcoding Canon XF105 MXF to ProRes MOV format, you can easily import & edit XF105 recorded MXF footage in Final Cut Pro 6/7 and FCP X smoothly without rendering.

The XF105 utilizes Canon's XF Codec – a file-based MPEG-2 compression with an MXF File Wrapper that ensures the widest compatibility with existing industry infrastructure, metadata and non-linear editing (NLE) systems. The codec's 4:2:2 color sampling provides ultra-fine transitions in tone and color for maintaining the highest image quality needed for advanced post production processing. But you maybe you must be disappointed when the FCP failed to import recordings from Canon XF105..


I am a photography enthusiast. I have a Canon XF105 camcorder and shoot the videos recently, it supports Full HD 1920×1080 resolution with Canon XF codec, up to 50Mbps bit rate and 4:2:2 color sampling. After shooting some .mxf clips on the Canon XF105, I want to merge multiple mxf videos into one and edit .mxf clip in FCP . But I find the problem that FCP does not recognize the .mxf videos? It does not even support importing mxf videos ?

I just bought a converter last month so I could edit my XF105 MXF files on Final Cut. But it seems tracks is missing when converting. Have you had this problem arise before? Can you assist? How to convert Canon XF105 MXF files to FCP with all the original audio tracks in the MXF container preserved?    

So how to solve the the problem when you wanna edit XF105 MXF footages in Final Cut Pro? Here is the easy way to fix it, namely, converting Canon XF105 MXF to MOV, say, the Apple ProRes encoded MOV format on Mac.

If you are interested doing likewise, check out Pavtube's MXF to FCP MOV Converter for Mac. The program is an easy-to-use and intuitive Mac tool for camcorder users. It is good at batch converting MXF recordings shot by Panasonic P2 camcorders, Canon XF series cameras to ProRes/AIC MOV formats compatible with your Mac Video editing software like Final Cut Pro (x), iMovie, Final Cut Express. Now follow the guide below to convert Canon XF105 MXF to FCP ProRes MOV easily on Mac.

Good News! Pavtube Release a New Site - multipelife.com with Product Migration and Name Change.
Its bestselling software products DVD Ripper has now become DVDAid, and Blu-ray Ripper has been renamed as BDMagic. And to thanks for your continued support all along our previous site and the new www.multipelife.com, we are holding a 'New Site Special' with fantastic discounts up to 40% off. You can get 20% off BDMagic, 30% off ByteCopy, 40% off DVDAid and 20% off Video Converter Ultimate on Windows/Mac platform:
https://www.facebook.com/pavtubefans/app_209569249055691

Read more:

http://1080p-video-tool.blogspot.com/2014/05/pavtube-new-site-release.html


Guide- Convert Canon XF105 MXF to MOV ProRes for FCP editing smoothly on Mac

Step 1. Free download and run Pavtube iMedia Converter for Mac, add MXF captured videos to the program. You can not only click "add video" button to import Canon mxf files, but also you can click "add from folder" button to add MXF folder.


Step 2. Select output profile. If you want to edit MXF file in Final Cut Pro 6/7 or FCP X, suggest you choose Final Cut Pro > Apple ProRes 422(*mov).

convert-avchd-prores-422-hq-mov

Tips: For editing in iMovie/FCE, you can choose iMovie and Final Cut Express > Apple InterMediate Codec(AIC)(*mov).

Step 3. Click Convert" button to start transcoding Canon XF105 MXF to ProRes MOV for Final Cut Pro.

Tips: By default, Pavtube MXF Converter for Mac exports files with all the original audio tracks in the MXF container preserved, thus there are no additional steps required for keeping multiple audio tracks in the generated files.

Some more helpful features of the batch MXF to MOV Converter for Mac:

1. Settings- click to set video resolution(1920×1080/1440×1080/1280×720/720×480), bitrate (from 1Mbps to 20Mbps), frame rate (24p/30p)

2. Editor (next to "Add" icon)- click to set deinterlace, denoise, mute, volume up, trim, crop, etc.

Once the MXF to MOV Conversion is done, you can go to the output folder to find the converted video files. Now you are free to import Canon XF105 MXF files in Final Cut Pro for editing under Mac without problems.

Read More: